Zero-configuration test for servers before OS installation
A zero-configuration test for servers helps verify BMC, sensors, fans, drive caddies and power before installing the OS.
Why test before installing an OS
Most hardware problems don't always appear at power-on — they show up later when the server runs under load: disks spin, temperatures rise, power switches over, and events are logged. If you install the OS first, configure the network and deploy services before noticing errors, you'll have to search for causes inside a "layer cake" of drivers, settings and applications.
"Zero configuration" is a short test of bare hardware before installing the OS and before connecting to the production network. You verify that the basic components work and that the management controller (BMC) shows the full picture: sensors, fans, drive caddies, power supplies and event logs. Essentially, it's acceptance testing of the server in a minimal but honest mode.
Most startups are broken not by "complex" things but by basics: power (one PSU doesn't hold load or doesn't fail over), cooling (a fan runs with errors or doesn't respond correctly to temperature), drives and backplanes (a slot isn't seen, line errors occur, the connection "flaps"), sensors (false readings that cause protective actions).
Early checks save time during deployment and handover because you catch defects before they become downtime. For example, if a PSU module in a delivered rack (including GSE S200 class) is unstable, it's better to find that in a bench test window than at night after services are running, when any reboot requires approvals and leads to losses.
Another advantage is that results are easy to formalize into a clear protocol. This helps hand over the server to operations calmly, and settle disputed points (what was "from the factory" vs what appeared later) with facts rather than guesses. Such a test often pays off on the first batch of equipment.
Preparation: what you need and what you don't
A server is ready for the check when it can be safely powered on and you can access the BMC without touching the future disk and OS configuration. Start with unpacking and a visual inspection: no dents in the chassis, no impact marks, rails not skewed, modules secured, and ports/cables undamaged. Ensure memory and expansion cards are seated firmly and drive trays close smoothly.
Assemble the minimal kit for the "zero" test. The less extra stuff, the easier it is to locate a fault: two power cords (if there are two PSUs) and access to outlets or a PDU, a separate management network cable for the BMC and a clear way to get an IP (DHCP or a preassigned address), a local console (monitor and keyboard or KVM), a simple log for results and a camera for photos.
Do not configure RAID, install a hypervisor or OS, connect monitoring agents, or apply VLANs and policies at this stage. Any such setup adds noise and can mask hardware symptoms. The goal is to see the hardware's clean state: sensors, fans, backplanes, power and logs.
Record results so they can be handed to operations or support without questions. Note serial numbers (chassis, PSUs, drives), firmware versions, MAC addresses, BMC IP, date and place of the check, and initial statuses (OK, Warning, Critical). If something looks suspicious, take a photo of the error screen and the serial label. For servers like the GSE S200 this data speeds up troubleshooting and avoids disputes about the initial state.
Scenario: checking BMC and event logs
BMC (IPMI/Redfish) is convenient to check before installing an OS: it’s a quick way to confirm the server is "alive", sensors are readable, and remote management won't fail at the worst moment. This step usually takes 10–15 minutes.
Connect the BMC to a dedicated management port, give it an address (DHCP or static) and open the web interface. If login is unstable or pages fail to load, don't automatically blame the network. Often the issue is firmware, the cable, the switch, or an IP conflict.
Check these things:
- BMC and BIOS/UEFI firmware versions and build dates. If they lag behind recommendations for your batch, schedule updates before commissioning.
- Basic settings: timezone and time (for correct logs), network mode, and remote console access.
- Health/Monitoring: are all sensors visible and are there no "Unknown/Not Present" entries where a module is clearly installed?
- SEL/Event Log: look for recent errors about power, memory, overheating, fans, or drive backplanes.
- Remote console (KVM): does it open and remain stable, and does virtual media work (if you plan remote OS installation)?
Use common sense with logs. It's normal to see entries for power-on, reboots and configuration changes. It's worrying if errors repeat without your actions or appear immediately after a cold start.
Typical red flags: repeated PSU/AC Lost events with stable power, ECC/Memory Training errors, overheating or temperature spikes "out of nowhere", Fan Failed or frequent fan max-outs, and BMC connection drops (watchdog, reset, network link flaps).
If you integrate servers for critical sites (e.g., datacenters or government agencies), agree in advance who records test results and how quickly warranty replacements are processed. Screenshots of logs and exact event times usually speed up investigations.
Scenario: temperature, voltage and health sensors
In a "zero" test it's worth quickly reviewing sensors. Hardware can look intact, but a bad sensor becomes a constant alarm in monitoring or, worse, hides a real problem.
Open the Health summary and sensor list in the BMC. Look not only for red statuses but also for odd values that are technically "near normal" yet inconsistent.
What to check first:
- Temperatures: CPU, inlet air, VRM, chipset, memory zone, drive bays.
- Voltages and currents: 12V, 5V, 3.3V rails, PSU current (if available), and RTC battery status.
- States: chassis open, presence of memory modules, PCIe status, chassis and backplane sensors.
Use manufacturer thresholds but judge by context. After transport and unpacking there can be "false" warnings: the server is still cold, inlet shows low temperature, or the chassis lid isn't fully closed. Let the system run 5–10 minutes and see if the warning clears.
Compare readings with the surroundings. If the rack ambient is 22–24°C but Inlet shows 40°C with no load, check airflow, blanking panels, rack orientation and obstructions in front of the intake.
If a sensor is "stuck" or reports unrealistic values
Before proceeding, try simple steps: refresh readings, reboot the BMC and retest, power off the server for 1–2 minutes and power it back on. Then check the physical side: are modules, fan cables and the backplane seated correctly, and is the chassis closed properly?
If the sensor still consistently "lies", stop and resolve the issue before installing the OS. Otherwise you'll carry the risk into production. Always save a screenshot/log and note the node's serial number.
Scenario: fans and cooling
Cooling issues rarely appear as immediate failures. More often they start as a strange noise or one zone running hotter, later causing reboots and throttling in production.
Open the BMC and confirm all fans are detected, reporting RPMs, and behaving similarly in the same row. If one fan shows much lower RPM in the same mode, stop and investigate.
Quick fan test
Let the system idle for 5–10 minutes, then switch the cooling profile (if available) from "quiet" to "performance" and back. The important thing is reaction: RPMs should change quickly and predictably without "dropouts" or hangs.
To document results you typically compare fan RPMs within a mode, confirm no Fan/Temp warnings, check reaction to profile changes, and listen for any rattling, scraping or intermittent humming.
Noise doesn't always mean a defect. Sometimes the server runs in an aggressive profile due to high inlet temperature or settings. A real defect often sounds different: rubbing, metallic tones, vibration of the chassis, or a noise that doesn't scale with RPM. Another sign is a fan that "sings" at one speed and then abruptly quiets at another.
Airflow and small things that break cooling
Check that blanking panels are in place, drive cages and panels are closed, and the airflow path isn't compromised. An open filler panel or a misinstalled module can look fine at idle but cause local overheating under load (often in memory, RAID/HBA or rear slots).
Warning signs of future problems: slowly but steadily rising temperature; one sensor consistently 8–15°C higher than others; fans going to high speed without an obvious cause; temperatures that normalize briefly after a reboot. If noticed during acceptance, replace the suspect fan or fix airflow before commissioning.
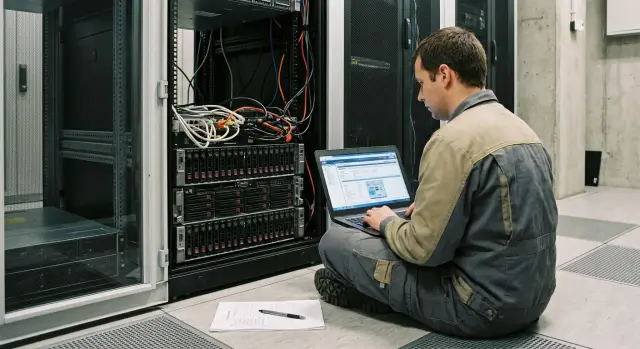
Scenario: drive caddies and drive connections
The goal is to ensure caddies, backplane and controller see every slot stably, without configuring RAID or installing an OS. If a single slot drops later, it becomes "random" errors under production load.
Start by checking visibility. Open the BMC or controller utility at boot and compare the number of physical slots in the chassis with detected drives and ports. Slot numbering should match the front panel.
Carefully test hot-swap on one or two slots (safer on an otherwise empty server). Remove a drive, wait 10–20 seconds and reinsert until it clicks into place.
During the test watch for simple signs: does the BMC log an insertion/removal event, do drive or bay Error LEDs light, does the drive return to the same slot, are there link down/reset/timeout/CRC messages, and does a neighboring slot start failing when you handle one tray?
If errors appear, separate drive problems from cage or controller faults. Move the same drive to another slot. If the error follows the drive, suspect the drive. If it stays with the slot, the backplane, cable or controller port is more likely.
A practical sign of slot power issues: a drive appears and disappears intermittently and the indicators behave unpredictably. In that case record which slot and which actions cause the instability so you don't just blame "bad drives" later.
Scenario: power, PSUs and redundancy
Power often looks "normal" until the first load spike. In the "zero" test include a short PSU and redundancy check so you don’t chase intermittent power errors after services are running.
First, in the BMC check that the system sees both PSUs, their statuses (OK/Warning/Failed), input voltage warnings and any switch-over events. Even if the server boots, logs may contain records of brownouts or brief input losses.
Then test N+1 by disconnecting each PSU in turn (unplug the power cord or switch off the specific PDU outlet), leaving the other connected. The server must not reboot, and the BMC should log the loss and restore of a PSU.
Quickly assess power routing: PSUs should be fed from different lines or PDUs (not the same power strip), cables should fit without play, the PDU group should not be overloaded, and input voltage reported by the BMC should be stable.
A class of problems is a PSU that is "alive" but unreliable under load. Clues are repeated input-power warnings at low load, brief PSU dropouts for seconds, sudden fan speed jumps without temperature rise, noticeable heating of the chassis or PSU connectors, or atypical whining from the second PSU when the first is removed.
If that appears, replace the cable, PDU outlet or PSU before installing the OS and deploying services.
Step-by-step 30–60 minute test plan
A "zero" test is easier to run by scenario with timing. This prevents missed steps and makes results comparable across deliveries and sites.
-
0–5 minutes: record baseline. Photograph the nameplate, note serial numbers, model and components (CPU, RAM, number of PSUs, drive bays). Record BIOS/BMC versions and key settings (date, power mode, fan profile).
-
5–15 minutes: BMC and events. Access the BMC, check availability, time, network settings and component states. Save current logs and then clear the event log so only new entries appear during the test.
-
15–30 minutes: sensors and cooling. Check temperature and voltage sensors and overall statuses. Ensure all fans are visible and their RPMs change with profile changes or short load (if onboard diagnostics exist). Note any sensor showing Warning or N/A and investigate.
-
30–45 minutes: drive cages and drives. Confirm all drive slots are detected, no backplane errors, latches and indicators work as expected. If a RAID controller exists, ensure it sees every drive and there are no line errors.
-
45–60 minutes: power and final logs. Disconnect one PSU at a time (if redundant) and verify the server stays up and the BMC logs the event. Restore power, re-export logs and produce a short report: what was checked, findings, parameters out of range and next steps.
Common mistakes and traps during the check
Many "zero" tests fail not because the server is bad, but because the check is rushed and undisciplined. Here are typical pitfalls.
Firmware and settings: they change but aren't recorded
A common mistake is skipping firmware updates for BMC/BIOS/controllers and then searching for sensor or fan anomalies for weeks. The other extreme is changing settings (fan profile, power mode, boot order) and not recording what was changed. Then it's unclear if an issue is hardware or a new setting.
Good habit: save firmware versions and key settings before the test and record any changes.
Trying to test "everything at once" and losing the cause
If you pull drives, run fan stress, and tweak BMC network settings simultaneously, errors become indistinguishable. Make incremental changes: change one thing, observe, record the result.
If you need a simple order, follow it: BMC and event logs, sensors (temperature/voltage), fans and reaction to load, drive cages and detection, then power and redundancy.
"It boots, so warnings can be ignored"
Warnings rarely go away by themselves. Even if the server boots now, entries like "temporary sensor loss", "unstable voltage" or "fan on threshold" often point to future failures. Aim for not only no critical errors but also clean telemetry.
Not checking redundancy: power and hot-swap
The most regrettable trap is checking only that the server powers on and stopping there. Later you may find the second PSU doesn't pick up the load or the drive cage fails to hot-swap properly (or you simply missed the BMC event).
Minimum: disconnect each PSU in turn and verify the server continues to run and that the event is recorded; simulate a drive replacement (with a test drive) and ensure the cage and logs react as expected.
Short checklist before installing the OS
Before installing the OS, run this final list. If everything is clean here, the chance of surprises in production is much lower.
- BMC is reachable, credentials and permissions are verified, remote console starts, and there are no new critical events in logs after your tests.
- Sensors for temperature, voltages and states show no persistent alarms; readings match reality (not 0°C or 120°C without load).
- Fans are visible to the system, show no errors, RPMs are steady; short load does not push temps into the red.
- Every drive bay recognizes a drive; if hot-swap is supported, you tested removing and reinserting one drive and the system responded correctly.
- Each PSU supports the server individually: you unplugged one PSU (the other stayed connected) and saw no power-related warnings or drops.
If any item raises doubt, document it immediately: screenshot, event time and the action you took. This speeds up discussion with the integrator or service team and saves hours of downtime.
Practical example: how the test prevents downtime
A new server is racked and services are scheduled in two days. Instead of installing the OS first, the team ran the "zero" test: power, management network and BMC access only.
In 10 minutes a drive slot intermittently appeared and disappeared. BMC periodically logged backplane errors. Externally everything looked normal and without the check this could have been blamed on RAID or "the OS" later.
They checked the BMC logs: errors matched times when the tray was touched. They repeated the hot-swap test and gently wiggled the tray — the error reproduced. Moving the drive to a neighboring slot showed stability, indicating the slot or backplane connection was at fault.
They stopped the OS installation and migration, saved BMC logs, noted the slot, replaced the cage or module (depending on model), and retested until logs were clean.
Production was unharmed because the issue was found before data and load were present. Fixing it took hours, not a night emergency call after a sudden RAID failure.
Next steps: embed the process and own the outcome
To make the zero-configuration test reliable, integrate it into acceptance and commissioning. Then every server will have a clear history: what was checked, when and with what result.
Store results so they can be retrieved months later when a disputed issue or a warranty claim arises. An acceptance act or internal ticket should include date, serial number and configuration (CPU, RAM, drive cages, PSUs), firmware versions (BIOS, BMC, RAID/HBA), screenshots of sensor and fan statuses, a power summary, BMC event log exports (before and after) and a final pass/fail with notes on what was fixed on-site and what needs replacement.
Repeat checks not only on first delivery. The risk of "silent" hardware issues rises after transport, PSU/fan/controller/cage/cable replacement, firmware updates, power incidents or overheating events.
Discipline is everything: add the scenario to the deployment standard, and enforce a rule "no server to production without a test act". Assign responsibility, create a ticket template and a simple artifact storage rule (logs, screenshots) in one place.
If you deploy servers and infrastructure in Kazakhstan, GSE.kz can handle supply and commissioning: from S200 Series servers to system integration and 24/7 technical support with a nationwide service network.
FAQ
Why do a "zero" test before installing an OS?
Yes — if the server will go to production or be part of a rack/cluster. A test on bare hardware quickly reveals power, cooling, drive backplane and sensor issues before OS, RAID or services complicate root-cause analysis.
How long does the check take and what can be done in an hour?
Typically 30–60 minutes per server: access BMC, check sensors and logs, observe fan response, verify drive slot visibility and power redundancy. If warnings or instability arise, time increases for localization and retests.
What should be prepared for the check to avoid unnecessary steps?
Minimum: two power cords (if the server has two PSUs), a separate network cable for the BMC management port, DHCP access or a reserved IP, and a way to open the console (KVM/monitor). Do not connect production network or install an OS — the aim is to see the hardware's "clean" telemetry.
BMC is unstable or KVM drops — what to do first?
Check the cable, switch port, possible IP conflict and BMC network settings, then reboot the BMC and try again. If the web UI keeps failing or KVM sessions drop, capture symptoms and logs — this is often firmware or management hardware, not the OS.
Which events in SEL/BMC logs are red flags?
Look for errors that repeat right after cold boot and without your actions. Red flags include PSU/AC Lost events when power is stable, memory errors (ECC/Training), Fan Failed, sudden temperature spikes, and BMC resets or link drops. These should be resolved before installing the OS.
What to do if a sensor shows strange values or is "stuck"?
Let the system run 5–10 minutes, refresh readings, reboot the BMC and, if needed, fully power-cycle for 1–2 minutes. If a sensor still shows unrealistic values or remains Warning/Critical, stop and fix it before production to avoid persistent false alarms or protective shutdowns.
How to quickly tell if fans or cooling are problematic?
Confirm all fans are detected and behave similarly in the same row, and check whether RPMs change when changing the cooling profile. Be suspicious if one fan deviates significantly in RPM, makes metallic noise, vibrates, or the system spins fans to max without temperature rise — these should be repaired or replaced immediately.
How to check the drive bay and slots without configuring RAID or installing an OS?
Verify the controller and BMC see all drive slots and that slot numbers match the front panel. Perform a careful hot-swap on 1–2 slots and watch the logs: if a disk "flaps", generates CRC/timeout/link down errors, or the issue stays with a specific slot when you move the disk, the backplane/cage/cable is likely at fault rather than the drive.
How to test power redundancy (N+1) correctly and what counts as a problem?
Temporarily disconnect each PSU in turn (leave the alternate connected). The server must not reboot, and the BMC should record the loss and restoration. Repeated input-power warnings, short PSU dropouts, unusual heating/noise, or odd fan behavior indicate to replace the cable/PDU/PSU before deploying services.
How to document the check so operations and support accept it?
Record serial numbers (chassis, PSUs, drives), BIOS/BMC/controller versions, BMC MAC and IP, date and place of the check, and statuses OK/Warning/Critical before and after the test. Save log exports and take photos of screens and labels — this speeds up warranty analysis and separates "factory" issues from later ones.