Workstation Stress Testing: Quick Checks Before Deployment
Stress-testing workstations before mass deployment: quick CPU, memory, and disk checks, pass/fail criteria, and common mistakes.
Why run stress tests before mass deployment
Mass deployment of workstations often fails because of small issues: everything boots fine at the test bench, but a week later users get freezes, blue screens or sudden reboots. Stress tests help catch those problems early, while the equipment is still in one place rather than spread across offices and branches.
Hidden defects rarely look like obvious faults. More often they are edge cases: memory shows an error once every few hours, an SSD starts returning write failures only under load, or the CPU goes into throttling because the cooler isn't mounted tightly. Another frequent scenario is unstable power: the PSU handles light tasks but the system reboots under peak load.
Checking stickers, serial numbers and even a successful Windows boot does not replace a post-unboxing test. Damage can occur in transit, and small assembly mistakes remain on the bench: an incompletely seated RAM stick, a forgotten protective film on a heatsink, or a weak drive power connection.
Early detection yields a simple but important effect: fewer returns and field visits, less downtime for departments because of a single problematic machine, and a clearer picture when troubleshooting "it worked yesterday, it doesn’t today." You also keep clean acceptance statistics and clear reasons for rejecting units.
Priority should be given to components that most often cause instability: CPU (temperature and stability), RAM (rare errors), disk (SMART, write/read), and overall power and cooling. If out of 50 stations two or three reboot only when CPU and disk are stressed together, it's far better to catch that during acceptance than to collect the machines from every floor a week later.
Even with high-quality batches, a quick run after unboxing is the best insurance before putting machines into service. This applies to locally assembled and supported deliveries as well—for example, from GSE.kz.
Preparing the workspace and testing conditions
Stress testing gives honest results only under the same conditions. If one machine sits by a cold window and another in a stuffy corner, comparing temperatures and stability is pointless.
Start with the basics: power and airflow. Ideally use a UPS or at least a good surge protector so short mains dips don’t look like "hardware failures." The outlet should be secure and not warm, and the workspace should have proper ventilation. Don’t place cases flush against a wall or cover them with boxes.
Do a quick visual check before powering on. It takes a minute but often saves hours of investigation:
- verify fans spin freely and don’t catch cables;
- ensure power and SATA/PCIe cables are seated straight and snug;
- listen at startup: any crackle, grinding, or coil whine is worth noting immediately;
- inspect CPU cooler mounting and RAM module retention;
- make sure there are no stray screws or plastic inserts inside the case.
Next—unified BIOS/UEFI settings. For a batch it’s important that parameters match: memory profile (XMP/EXPO) should be either enabled across all units or disabled across all; CPU power limits and power-saving modes should be consistent; boot order should point to your test drive. Otherwise one station might pass a temperature test while another fails due to more aggressive settings.
To keep the process manageable, plan how you will record results. One spreadsheet (Excel/Google Sheets/local) is enough: list each machine’s serial number (and inventory tag if available), test dates and durations, peak CPU temperatures and the outcome (pass/fail), plus notes: noise, reboots, errors, unstable ports. This quickly reveals recurring issues in a batch and makes it easier to justify quarantining specific devices before deployment.
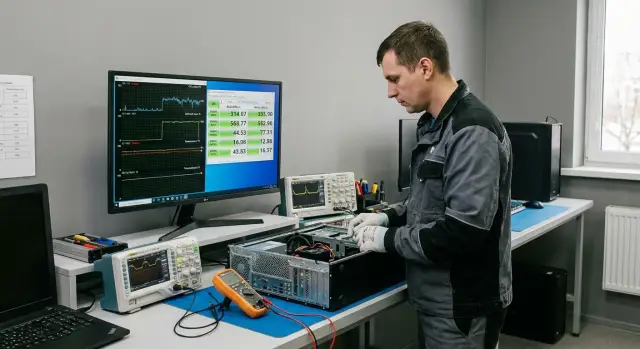
Quick CPU tests: load, temperature, stability
A short CPU run of 10–15 minutes is often enough to catch overheating, throttling and instability that later manifest as slowdowns or sudden reboots. Choose a test that stresses all cores and run sensor monitoring in parallel.
Start the load after 3–5 minutes idle to see the difference between idle and peak. If the system hits high temperatures and sharply drops frequency in the first minutes, that’s already a signal—even if the test doesn’t report an error.
During the run watch more than just temperature. Important observations include how the frequency behaves, whether calculation errors occur, and whether the interface becomes unresponsive. A useful minimum set of observations:
- peak temperature and how fast it rises;
- frequency under load: steady or oscillating;
- throttling and power limits (if shown by monitoring);
- test errors or failure messages;
- overall system responsiveness.
Cooling issues usually show as temperature spikes, fans ramping up suddenly then dropping, and frequency swinging like a pendulum. In batches this often means a mismounted cooler, forgotten protective layer on thermal pads, too thick a layer of thermal paste, or poor case airflow.
Stop the test immediately if there’s an obvious risk to hardware: burning smell, unusual crackling or whining; sudden shutdowns, reboots or blue screens; visual artifacts or loss of display; temperature rapidly entering a dangerous range and not stabilizing.
A typical acceptance example: two machines throttle and halve their frequency within 3–4 minutes. Outwardly they look identical, but the cause is often simple—the cooler isn’t pressed down evenly or a fan is connected to the wrong header. It’s better to catch that before installation than to disassemble the PC at a user’s desk.
Quick memory tests: catching rare errors
RAM errors often don’t appear immediately. A PC can boot fine and pass software installs, but a day later it may blue screen or corrupt files. So even for a batch, do a short memory check, and for "suspicious" machines run a longer test.
Express check for a batch and extended test for suspects
For mass deployment 1–2 quick memory passes per station are usually enough to weed out obvious DIMM failures and unstable settings. If a particular PC already failed, extend the test: several passes or a 1–2 hour run, since rare errors often appear only after warming up.
Before and after the test watch for indirect symptoms: blue screens, unexplained hangs, random reboots under load, corrupted archives, extraction errors and strange installer failures. Often this appears as "jumping" problems across different programs: one time the browser, another time Office or a driver.
Memory profiles, speeds and stability
If memory is running with an increased profile (e.g., XMP/DOCP), first test at stock mode, then repeat with the profile enabled. In practice many "rare" errors show up at higher frequencies or tighter timings.
If acceptance prioritizes reliability over peak speed, the rule is simple: when in doubt, revert to JEDEC standard parameters and retest. Stability beats a few percent of extra performance.
How to tell if it’s a module, slot or controller
When a test reports errors, don’t rush to condemn the whole PC. A simple ordered approach helps find the cause: disable the overclock profile and retest; test sticks one by one; move a suspicious stick to another slot; see if the error follows the stick or the slot. If errors occur only in a single slot, the motherboard or controller may be at fault.
Example from a batch: one machine showed a rare error only with the memory profile enabled—reverting the speed fixed it. In another case errors moved with a single DIMM across slots—indicating a faulty module that is easier to replace before deployment.
Disk checks: SMART, speed and write errors
A disk often looks "fine" until freezes during copying, update failures, or sudden reboots begin. Spend 10–15 minutes on a short but revealing run.
Start with SMART. This is not a percentage score but a set of counters where alarming events matter: reallocated sectors, read errors, and interface issues. If reallocation has already occurred or errors are rising, quarantine the drive rather than trying to test it to death.
Next run a short read/write test on a small portion (for example, 5–10% of the drive or a fixed test file). This often catches hidden controller defects, unstable SSD cache memory, or cable/port issues without spending hours on full-capacity tests.
When evaluating speed look beyond the average number. Sudden drops, "sawtooth" patterns on the graph and latency spikes are worrying—especially if they repeat on the same regions.
In each PC report it’s useful to record:
- key SMART counters (reallocations, read errors, CRC/interface errors);
- average read/write speed from the short test;
- presence of drops or instability (yes/no plus a short comment);
- test duration and drive temperature (if available).
It makes sense to check the system drive twice: before imaging and after. Pre-image testing weeds out bad drives without extra work. Post-image testing confirms the drive behaves under real write activity (updates, drivers, service partitions).
Combined load: power, cooling, overall stability
Separate CPU and disk tests can leave some problems hidden. Combined load is closer to real work: CPU computes while the disk writes, fans go to max and the PSU and board power rails experience peaks.
CPU plus disk: a quick way to find weak spots
Simple setup: run a CPU load while simultaneously performing active disk writes (for example, copying a large file in a loop or using a utility that creates and verifies a large test file). Run for 10–15 minutes. If a station has hidden cooling defects, poor power contact or bad fan profiles, it often shows up here: frequency drops, hangs, reboots, or write errors.
Record not only the fact of failure but the moment it happened. A failure at minute 2 usually indicates a gross issue (cooler, thermal contact, cable). A failure at minute 12 more likely indicates heat accumulation in the case or VRM overheating.
Idle check: overheating can occur without load
After the load leave the station idle for 5–7 minutes. Sometimes fans suddenly drop RPM and heat remains inside the case, so temperature rises even while idle.
Also listen and look: creaks, rattles, case vibrations, periodic HDD clicks (if present). In batches of dozens of machines these small annoyances quickly become many support calls.
Log the max CPU temperature and when it was reached; notable noise increases and fan behavior; time to first error/hang/reboot; and symptoms like throttling, dropped disk throughput and write errors.
Step-by-step acceptance process: 30–60 minutes per station
To avoid chaos, use one short repeatable script for each machine. It’s important not just to "run a load" but to know exactly what was checked and what the results were.
A sample process that usually fits 30–60 minutes and works for a batch (office PCs, all-in-ones, workstations):
- Verify identification and configuration: serial number, model, CPU, RAM size, disk type and capacity. Log any discrepancies with the order.
- Start monitoring (CPU temp, fan speeds, overall error baseline) and perform an initial disk check: SMART and a quick read test.
- Apply loads in sequence: CPU (check temps and frequencies), then memory (at least one pass, longer if suspicious), then a short combined CPU+disk test.
- After loads re-check the disk: SMART again and see if new warnings appeared.
- Assign a status: "pass" or "quarantine." For quarantine note one clear reason and symptom, e.g. "CPU overheat to X°C in 3 minutes" or "memory errors at minute 7."
If you accept, for example, a batch of GSE L200 machines or M200 all-in-ones for an office, keep one log with consistent fields: configuration, max temperature, memory test result, SMART before and after, final status.
Time guideline: about 5 minutes for identification and basic checks, 15–25 minutes for CPU and memory, 10–15 minutes for combined load and recording results.
Acceptance criteria and interpreting results
The goal of tests is a clear answer: this machine runs stably under load and shows no hidden defects. Define criteria in advance and apply them consistently across the batch.
Clear thresholds: what counts as “fit”
A station is fit if during tests there are no errors, hangs or reboots, and temperatures remain within reasonable limits without notable frequency drops.
Practical thresholds:
- CPU: no sustained throttling, frequency not oscillating unnecessarily, full-load temperature not entering prolonged overheating (guide—up to 85–90°C with normal ventilation and a clean heatsink).
- Memory: 0 errors. Even a single RAM error is a fail.
- Disk: SMART with no alarming values (reallocated and pending reallocation sectors = 0), write test without errors, and no staircase-like speed drops on flat areas.
- System: no blue screens, driver crashes, black screens, or spontaneous reboots.
Single errors and intermittent symptoms
A single memory error is rarely a fluke. It often becomes rare crashes for users later, and diagnosing it later is costly.
Intermittent symptoms (sometimes pass, sometimes fail) are more often due to contact or configuration: loose DIMM, aggressive memory profile, VRM overheating, weak PSU, or an unlucky BIOS revision.
Reruns make sense when the failure occurred once and you found a likely cause, or when the test environment changed (ambient temperature, power, fan profile). Change only one thing between attempts: reset BIOS to defaults, reseat RAM, replace a power cable, or disable the memory profile.
How to record results to avoid disputes later
Good records save hours and help compare stations. A useful template usually includes:
- identifier: serial number, desk/asset tag, date;
- configuration: CPU, RAM size and speed, drive model, BIOS version;
- conditions: approximate room temperature, test durations, which loads were run;
- result: "pass/fail" and short notes (max temperature, whether throttling occurred, SMART status, specific error and time of failure).
If two of 50 machines show a rare reboot under combined load, the log often reveals a common factor: same memory batch, BIOS version or identical assembly.
Common mistakes during stress testing and how to avoid them
Problems often arise not from the tests themselves but from conditions and discipline. The result is wasted time, inconsistent outcomes and no clarity on the real fault.
The first trap is confusing overheating with poor bench ventilation. If you run loads in a closed space, with the case against a wall, or in a room without fresh air, temperatures will rise even on otherwise good machines. Leave case clearance, verify fans and ensure no dust or packing inserts block airflow.
The second mistake is immediately deploying the corporate image and only then trying to diagnose. You lose the "clean baseline" and won’t know whether it’s a driver, security policy or hardware issue. It’s safer to do basic checks in the factory OS or a minimal diagnostic environment before imaging.
Third—don’t forget to log BIOS and driver versions. Today a test passes, tomorrow BIOS was updated and the problem disappears (or appears), and you have no proof. Recording versions in the acceptance sheet is enough.
Another mistake is a single universal test that tries to cover everything. CPU can be stable while memory shows rare errors, or a disk may have write issues. Test CPU, RAM and storage separately, then add a short combined load.
Finally, many ignore power at the bench. A cheap extension lead, overloaded circuit or fluctuating voltage produces false failures and strange reboots. If you see instability, repeat the test on another power source.
A practical rule that avoids most mistakes:
- test with repeatable cooling conditions;
- run diagnostics first, then image;
- record BIOS/drivers and test dates;
- separate CPU, memory and disk tests;
- check the bench power as strictly as the PC itself.
Short checklist for a batch before shipping to users
When testing a batch, consistency matters most. A single order of checks and a uniform result form quickly highlight outliers.
Before packing, walk through five items that cover the most common hidden defects: overheating and rare memory errors.
- Verify serial numbers and actual configuration against the order: CPU, RAM size, drive type and capacity, network adapters. Log any mismatch immediately.
- Check SMART on each drive and run a short read/write test. You need not peak speeds, but absence of errors, hangs and sharp drops.
- Run a CPU load and ensure frequencies remain stable and temperatures don’t enter a dangerous range.
- Run memory tests for at least 1–2 passes. Even a single error usually indicates a problem that’s hard to reproduce later.
- Run a combined load (CPU + memory + disk) and record the result: pass or fail with metrics.
After testing, attach a simple label with the date and status (OK/needs work) so any colleague can quickly understand the outcome.
Case study: mass deployment of 50 workstations
The team received 50 workstations with a tight deadline: deploy and hand them over in 2 days. Testing each machine "to the max" would miss the deadline; not testing at all would create a service backlog in the first week.
The workflow was: quick pass for all 50, and in-depth testing for 8–10 devices as a quality control sample. A quick pass took 30–40 minutes and caught most hidden problems: load overheating, power instability, rare memory errors and write failures on disks.
To avoid chaos the testing was organized:
- 3 test benches with identical settings and result logging;
- 2 technicians rotating machines on a timer and launching tests;
- a fixed script: CPU and temps, memory, disk, then a short combined load;
- in-depth checks at the end of the day once the batch picture was clear.
As a result, 3 of 50 devices were problematic. Two showed memory instability (errors only on a repeat run), and one disk started showing write errors when hot. These machines were quarantined, re-tested cold and hot (after 15–20 minutes of load) and then handled per policy: replace the module or the device rather than forcing deployment.
The report to IT and procurement was short and clear: serial number, status (OK/quarantine), reason, actions taken and recommendation (deploy/repair/replace).
Choosing a supplier and support with a clear service cycle makes mass deployment much smoother. For example, GSE.kz as a manufacturer and integrator provides production and service—handy when you need to agree on acceptance tests and the handling procedure for defective units.
FAQ
How much time is realistically needed to stress-test one workstation during batch acceptance?
For mass acceptance, **30–60 minutes per station** is usually enough: 10–15 minutes for the CPU, a quick disk check and 1–2 memory test passes, plus 10–15 minutes of combined load. If a machine has already failed or is part of a control sample, extend the run to 1–2 hours to catch rare heat-related errors.
What should I test first if time is limited?
Start with the most common instability sources: **CPU (heat and throttling), RAM (errors), disk (SMART and read/write)**, then run a short combined CPU+disk load. This order quickly reveals overheating, rare memory errors and power/contact issues that won’t show up when the machine simply boots into Windows.
What conditions are needed for stress tests to be fair and comparable?
Tests only make sense in repeatable conditions: normal ventilation, identical case placement, stable power and identical BIOS/UEFI settings across the batch. If you have a UPS or a quality surge protector, use it so short network dips don’t look like hardware failures.
How can I tell from the results that a station is truly “fit”, not just “seems okay”?
Consider the station **failed** on any hang, blue screen, spontaneous reboot or test error, and also on clear sustained throttling due to overheating. For memory the rule is simple: **0 errors**—even a single RAM error is a reason to stop and investigate, because it often becomes rare crashes for users later.
What should I do if the PC reboots or hits a blue screen under load?
Stop the test and record the failure moment and conditions, then check simple causes: RAM seating, disk power connection, CPU cooler mounting, BIOS settings (especially memory profiles). Repeat the run only after changing **one** factor at a time, otherwise you won’t know what fixed the issue.
Should XMP/EXPO be enabled during acceptance, or is it better to test at standard speeds?
If the acceptance goal is reliability, a safe approach is: test first at standard parameters (JEDEC), then—if needed—with XMP/EXPO enabled. If errors only appear with the profile enabled, it’s better to stick to stock frequencies than to push an overclock and risk instability in a week.
Which SMART indicators are considered alarming on a new machine?
In SMART, the alarming values are events, not an overall percentage: reallocated sectors, pending reallocation, and interface/read errors. If these counters are non-zero or growing, it’s more practical to quarantine the drive immediately rather than hope a long test will fix it.
Why run a combined load if CPU and disk were already tested separately?
Separate tests can miss power, VRM or internal-case overheating that show up only when components work together. A short CPU+active-disk write run often reveals hidden reboots, frequency drops and write errors—conditions that most closely resemble real user workloads.
Can I test only a sample of the batch instead of every machine?
Yes. A common approach: run a quick pass on all devices and perform in-depth checks on a sample as quality control. This saves time while still giving a chance to catch rare defects, especially if you select machines with borderline temperatures, noise or one-off oddities for deeper testing.
How should I record results so I don’t argue later with service or vendor?
The minimum that helps in disputes: serial number, configuration, BIOS version, test durations, peak temperatures and a clear reason for the “quarantine” status. If procurement and support are handled via the manufacturer or integrator like GSE.kz, such records speed up troubleshooting and replacement because you bring repeatable facts, not emotions.