Workstation maintenance in schools and universities: a calendar
Workstation maintenance in schools and universities: how to create a cleaning, fan and cable check calendar so lessons don’t stop.
What seems to fail “suddenly” and why it interrupts lessons
A failure during a lesson almost always looks sudden, but the causes usually build up over weeks. Dust clogs heatsinks, fans struggle to spin, temperature rises, noise appears. Add loose connectors, worn power strips and cables under desks, and at the worst moment a PC reboots or simply won’t turn on.
The problems that most often appear during class are:
- the computer won’t start due to poor power contact or a faulty power button
- loud noise and throttling from dust and a worn fan
- lost image because of a loose HDMI/DP or monitor power
- the network “drops” due to a cracked patch cable or a loosely inserted connector
- peripherals don’t work because of worn USB cables and ports
The main issue is not only the breakdown itself, but the loss of time. The teacher switches from the lesson to “repair mode”, the class waits, some students can’t finish assignments, and then you have to catch up on the program.
Good news: much of the maintenance for workstations in schools and universities can be done without stopping the classroom if you break tasks into short actions in advance. For example, 5–10 minutes before the first lesson or during a long break you can realistically:
- assess noise and heat by ear and simple indicators
- tighten and label cables, remove tension
- quickly inspect power strips and outlets for heat and looseness
- replace one suspicious patch cable on the spot
To avoid chaos, agree on short “maintenance windows” in advance with the deputy head, the person responsible for the classroom and the IT specialist. That way small jobs won’t interrupt lessons, and large tasks will go into a separate plan for the term break.
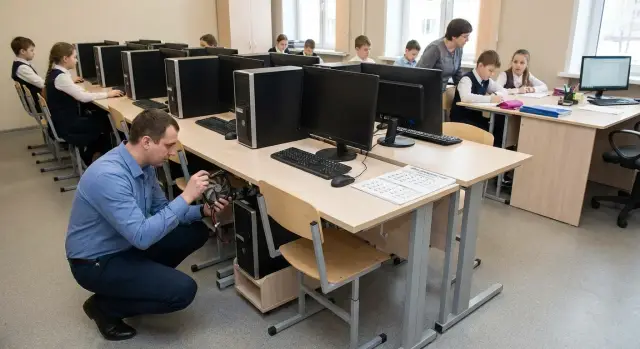
What workstation maintenance consists of
Workstation maintenance is a set of short, repeatable checks that reduce the risk of sudden failures during lessons. It’s important to define in advance what counts as “normal” and what already requires a service request.
The foundation is cleaning. It’s convenient to split this into external and internal. From the outside, remove dust from the case, keyboard, mouse and monitor, and clean grills and filters if present. Inside, pay attention to heatsinks, the power supply and areas where dust most quickly blocks airflow. In classrooms it’s useful to note where dust accumulates more (a row by the window, seats near a radiator) so you can adjust the cleaning frequency.
The second part is fan inspection. The signals are usually simple: new noise, rattling, vibration, smell of overheating, or the system “slowing down” after 20–30 minutes of work. It’s convenient to note temperature (if visible in a utility), any unusual noise and whether fans start normally.
The third part is cables and power. Check for loose power and network plugs, intact cable sheaths, bends under the desk, how securely HDMI/DP and USB are fastened, and the condition of power strips and surge protectors. A common classroom problem: a cable is brushed by a foot and contact only sometimes fails, so the issue looks intermittent.
A separate block is software. Schedule system and driver updates to avoid surprises on test days. Keep antivirus current and monitor free disk space.
Finally—paperwork. You need a simple work log (date, workstation, what was done, what was noticed) and a short report if something requires repair or replacement. This prevents disputes and helps plan purchases.
Roles and responsibilities: avoid “not my job”
Maintenance often fails not because of dust but because of unclear roles. If you don’t agree in advance who opens the classroom, who brings consumables and who accepts the work, small tasks get postponed and turn into breakdowns.
It’s useful to fix roles with a short order or a one-page regulation:
- IT specialist: plans the calendar, keeps the work log, fixes typical failures, checks error logs.
- Lab assistant or classroom administrator: provides access, manages inventory storage, notes unusual noises and overheating.
- Class teacher or homeroom teacher: reports problems right after the lesson and does not allow DIY “repairs”.
- Contractor (if any): performs complex tasks in an agreed window and provides a report listing the actions taken.
Agree on access and consumables in advance: where compressed air cans, cable ties, spare cables are stored, where keys are kept and who can open the cabinet. Operating rule: each classroom has one person responsible for keys and one backup, and consumables are replenished when they reach a minimum level.
What to do in-house and what to outsource depends on skills and safety requirements. Typically you can handle external cleaning, visual cable inspection, replacing a mouse or monitor power cable in-house. Internal work inside the system unit, PSU diagnostics and recurrent overheating are better assigned to those accountable for the result.
To prevent issues from “wandering” across chats, keep a single issue list: date, classroom, PC, symptom, what was done, whether it recurred. After a month you’ll see where a one-off repair isn’t enough and the root cause must be fixed: poor power, clogged fans or worn cables.
Inventory: the calendar won’t work without it
A maintenance calendar is based on a simple question: what exactly are you servicing? Without an inventory, work quickly becomes chaotic. The same PC may be cleaned twice, while a problematic unit in the corner is ignored because “it’s not ours.”
Start with a list of workstations by classroom. For each station record not only “PC #5” but what device is there and what is connected to it. Educational institutions often mix PCs, all-in-ones, thin clients, and sometimes a small server in the room. They require different care and have different risks.
Minimum data you can collect in 1–2 walkthroughs:
- classroom and workstation number (linked to the desk or rack)
- device model and serial number, plus peripherals (monitor, UPS, printer, projector)
- device type: PC, all-in-one, thin client, server
- condition: approximate age, failure frequency, notes about noise, overheating, “sometimes won’t turn on”
- criticality: exam rooms, regular classrooms, library, staff room
Simultaneously note “hidden” problems. Photograph problem areas: cable bundles under desks, power strips, power blocks, places where students often snag cables with their feet. These photos save planning time later.
Example: if a class has 15 identical PCs and 3 regularly make noise, the calendar for them should be different. Put them in an earlier slot and check them more often; the others follow the standard cycle.
How to build a maintenance calendar: step by step
A maintenance calendar for school and university workstations is useful only when it matches the real schedule and is clear to any performer. Start simple: decide what can realistically be done in 15–30 minutes and what needs a separate window.
Working scheme:
- determine frequency by task type: quick checks daily/weekly, deeper cleaning and inspection quarterly, major work annually
- tie tasks to the academic schedule: short operations during breaks and "windows", noisy and dusty tasks during holidays
- divide the classroom into zones (row 1, row 2, teacher’s station, rack/cabinet) and service in parts without turning off the whole room
- appoint a primary responsible person and a backup: who performs, who accepts the result, who is notified of problems
- use a single checklist and log template: “OK/replace/observe”, date and signature
Allow time for re-checks. After cleaning or cable rearrangement some issues appear only under load: fan noise, network drops, or an intermittently disconnecting monitor.
Keep the calendar as a simple monthly plan and a short weekly plan. If tasks are regularly postponed, it signals that the frequency is too high or the window is poorly chosen.
Cleaning without extra dust and noise: rules for classrooms
Dust collects quickly in classrooms: chalk, paper, fabric, constant movement. For maintenance it’s important to separate light cleaning (frequent and quiet) from deep cleaning (less frequent, involves disassembly).
Most work can be done without opening the case. This reduces the risk of damage and takes a few minutes per workstation:
- wipe the desk, keyboard and mouse with a slightly damp wipe (no dripping)
- use a soft brush on case grills and ventilation holes
- remove and clean external dust filters if present
- gently clear dust around outlets, network points and power strips
- ensure the case has an air gap and is not blocked by a stack of notebooks
For quiet cleaning between lessons, work one row at a time, 5–7 minutes per row. Use compressed air in short bursts and only where dust actually interferes. Aim the air toward a waste bag or wipe to avoid raising a cloud. Don’t open the case unless necessary—this is a separate operation.
Store consumables in one closed container (for example, in the lab office) so you don’t hunt for them across classrooms. A minimal kit: microfiber and lint-free wipes, a brush, cable ties, a marker for labels and some waste bags.
Record the result immediately: note in the log (date, classroom, how many stations) and one short “after” photo of a sample workstation. Schedule deep cleaning with disassembly and blower during holidays, weekends or evenings when the room is definitely free.
Fan checks: what to look for and what to record
Fans often give the first signs that a PC is about to misbehave. Noise gradually increases, then overheating, slowdowns or reboots occur in the middle of a lesson. Fan checks are one of the fastest and most useful items in workstation maintenance.
Quick check in 2–3 minutes
Start simple: look, listen, assess airflow. Usually that’s enough to decide whether a teardown is needed.
- Visual: does the fan spin smoothly, is there a dense layer of dust on the grill?
- By ear: steady noise or new clicks, whistles, rattling?
- Airflow: weak warm exhaust and a hot case often indicate a problem.
- Temperature by touch: the case and exhaust area should not be scalding hot.
- PC behavior: have there been recent freezes, sudden reboots or slowdowns?
Before opening the case turn off the PC and power (including the power strip) and wait for fans to stop. Do not touch the blades by hand, even to “spin them a little.”
What to record in the log
Records save time on the next visit and help plan replacements.
- location (classroom, seat, inventory number)
- which fan (CPU, chassis, power supply)
- symptom (noise, cracking, stops, weak flow, overheating)
- urgency: monitor, service in next window, replace
- recommendation: cleaning, check mounting, replacement
Plan replacements by priority: noisy and overheating units first, then suspicious ones, and only then preventive replacements by age. This avoids taking the whole classroom offline at once.
Cables and power: how to reduce the risk of breaks and outages
Most “sudden” problems in a computer lab start with wires and power. A cable gets bent by a chair leg, a power strip is overloaded, a tangle forms under desks, and at the wrong moment something simply disconnects. For workstation maintenance this is the fastest way to reduce lesson interruptions.
Quick check in 2–3 minutes per station
Make a short walk and note only what needs action:
- no tension: the cable should have a small slack
- plugs wobble (power, HDMI/DP, Ethernet), contact isn’t intermittent
- signs of heating: darkening of plugs, smell, warm power strip body
- intact insulation: cuts, kinks, nicks at the plug entry
- power strip overload: many power bricks in one outlet or chained adapters
Labeling saves time during replacement. Simple rule: sticker with the PC number on both ends of the cable and a label of purpose (for example, “PC-12 LAN”, “PC-12 MON”). Color tags under desks help: one color for power, another for network.
Tidying and a small spare stock
Route cables along the wall or in a cable channel, make a neat loop under the desk without tension. Use cable ties so a cable can be removed and replaced without extra effort.
Keep a minimal spare kit per classroom: 2–3 power cables, 2 patch cables, 1–2 video cables of the right type, 1 good power strip. Even if PCs and all-in-ones are generally reliable, the weak link is often the cable or power.
How to perform maintenance without stopping classes
To keep maintenance from disrupting lessons, plan it as a series of short micro-windows. Usually 10–15 minutes is enough to tidy 2–3 stations in one row. Agree the time with the teacher in advance and choose moments when students work independently.
Divide tasks into two groups: “no shutdown needed” and “only with power off.” Without shutdown you can do external inspections, check cable fastening at the desk, gentle external cleaning and note fan noises by ear. Any work inside the case, power reconnection, fan replacement and internal cleaning must be done with full power off in a separate window (before or after classes, or during long breaks).
A small reserve helps: 1–2 spare stations in the class or a laptop for the teacher. Then a student can move and you can complete the work calmly and log the result.
Keep everything in one “quiet logistics” kit: a trolley or case with consumables so you don’t run for spare parts. Before starting, briefly say what you will check and how long it will take.
Example of a micro-window:
- mark 2–3 PCs in the log and inform the teacher
- external inspection of cables, outlets, network ports
- light external cleaning and check for free air intake
- note suspicious noise/vibration with “only with power off” tag
- return the station to its original state and mark the work done
This rhythm makes maintenance nearly invisible to teaching and sets a steady pace for the semester.
Example: a calendar for two computer labs
Initial data: two classrooms with 12 PCs each (24 total), lessons run until 18:00, holidays are 2 weeks. Goal: maintain workstations without stopping classes: small tasks in short windows and noisy dusty work during holidays.
During term weeks a pace of 6 PCs per week works well. That way you cycle through the whole park in 4 weeks and then repeat. In one classroom that’s 3 PCs, in the other 3 PCs. Allocate 10–15 minutes per PC after 18:00 (or at the end of the day), without opening the case.
A weekly rhythm might look like:
- Mon: Room A, PCs 1–3 — external inspection, cables, peripherals
- Tue: Room B, PCs 1–3 — same
- Wed: Room A, PCs 4–6 — same
- Thu: Room B, PCs 4–6 — same
- Fri: quick sweep of both rooms — notes on fan noise and overheating
During the semester focus on “quiet” tasks: label cables, remove tension from system units and monitors, wipe cases and grills from the outside, check mouse and keyboard fastening, and keep a short problem log. Practically, three fields suffice: date, PC/station number, symptom (e.g., “noisy”, “heats up”, “network drops”).
On holidays plan work that interferes with lessons: deep internal cleaning, replacing the noisiest fans, careful cable routing, removing temporary extensions and splices. After work run each PC for 10–15 minutes and record temperature and noise levels “before/after.”
Measure the effect simply: compare the number of support requests per month, the number of overheating/reboot incidents and peripheral failures (when the mouse or keyboard “suddenly” stopped). If the numbers fall, the calendar works.
Common mistakes and traps in maintenance
The most common mistake is doing maintenance only “when it’s already bad.” Dust accumulates unnoticed, then a wave of overheating starts: computers get noisy, slow, and reboot, disrupting lessons. Regular short checks are usually more effective than an annual deep clean.
Second trap: no simple log. Without it every walkthrough starts from zero: what was cleaned last time, which PC already ran hot, where a fan was changed, which PSU is “suspect.” It’s enough to record date, classroom, station number, what was done and what remains to be done.
Another problem is shutting down the entire class at once. That may be convenient for servicing but inconvenient for learning. In many cases you can work in parts: 2–3 stations between lessons or one row during independent work if the teacher is informed.
A specific risk is improper cleaning. Aggressive cleaners, wet wipes where dry are needed, or attempts to pull a cable “by force” cause cracked plastic, loosened ports and broken clips. Rule: minimal moisture, gentle force, do not yank.
Finally, many look for a PC problem when the issue is power. Power strips, surge protectors and mains cables wear out faster: bends, tension, socket looseness, signs of heating. If you don’t check them regularly, outages will repeat even after a perfect internal cleaning.
Short checklist: what to check in one walkthrough
A single walkthrough should not turn into a half-day repair. Its goal is to quickly spot risks and record what needs doing later. This format works well for maintaining workstations in schools and universities when lessons follow a schedule.
Agree a short window (a break or time before the first lesson). Take minimal consumables: lint-free wipes, soft brush, compressed air, a couple of cable ties and a marker. Turn off power only where you really touch cables or open the case.
Check in the same order every time:
- external inspection: cracks, broken ports, loose connectors, foreign objects near vents
- grills and intakes: light external cleaning without raising dust in the classroom
- fans by ear: new hum, rattling, start-up jerks
- cables and power: tension, bends, compressions, readable labels, warm plugs and power bricks
- power on and quick test: boot, keyboard and mouse response, network, sound
After the walkthrough make an entry in the log: date, room, station number, what was noticed, what was done on site, what requires a service request. Mark problem points clearly (sticker on the case or a mark on the map) so you don’t hunt for them again.
Once a semester reconcile inventory and update the calendar based on actual failures. Increase check frequency where things fail more often (fans or cables) and stock up on consumables.
Next steps: how to embed the process for the whole academic year
To keep maintenance from relying on a single enthusiast, formalize it as a repeatable process. In the first semester it’s more important to achieve regularity than a perfect system.
Collect a basic inventory: how many workstations, device models, where they are, who is responsible for each room. Then choose a frequency you can realistically maintain: for example, a quick walkthrough monthly and a short check before exam weeks.
Start a maintenance log—paper or a shared table, the format isn’t crucial: date, classroom, what was checked, what was found, what was done, what needs to be purchased. Add labeling rules: identical stickers on power cables, network cords and power strips plus the workstation number. This speeds up troubleshooting and reduces the risk of "replugging the wrong thing."
To keep the process going all year it helps to:
- approve a semester calendar and assign responsible people for rooms and the consumable store
- define a minimum standard: what is checked in 10 minutes and what only during deep work
- schedule deep cleaning and consumable replacement for holidays, collecting a parts list in advance
- keep a small spare stock: fans, power cables, patch cables, filters, power strips
- if the fleet is renewed, include maintenance and support in procurement so upkeep isn’t an afterthought
When buying new workstations, clarify service and spare parts availability. In Kazakhstan it’s often convenient to handle this comprehensively through GSE.kz: domestic PCs, all-in-ones and servers for classrooms, plus deployment, system integration and nationwide service support. That way maintenance becomes part of the academic year, not a one-off campaign.
FAQ
How often should maintenance be done in a computer classroom?
Usually two levels are enough. Do quick checks weekly or monthly (noise, heat, cables, power, peripherals), and plan deep cleaning and work that requires opening the case for school holidays or weekends so you don’t raise dust or turn off the class for long.
How to perform maintenance without disrupting lessons?
Break the work into 10–15 minute "micro-windows" and service 2–3 stations at a time instead of the whole room. Pre-agree with the teacher on time—before the first lesson, a long break or the end of the day—and record which places you touch so students can move seats.
What can be cleaned without opening the case and risking damage?
You can work quickly and safely from the outside: wipe the case, keyboard and mouse with a slightly damp lint-free wipe (no dripping), clean dust from grills and filters, and ensure nothing blocks airflow. Inside the system unit should be opened only in a separate window and with power fully disconnected.
What signs indicate a fan is about to fail?
Watch for changes: new whistling, cracking, vibration, a noticeable rise in noise after 20–30 minutes of work, and slowdowns or reboots during normal tasks. If the noise repeats or the case becomes very hot, plan a teardown and cleaning or a fan replacement before it fails during a lesson.
What to do if the monitor image periodically disappears?
First check the basics: monitor power, tightness of the HDMI/DP connection, cable integrity and whether the cable is under tension under the desk. Intermittent image loss is often caused by a loose connector or a cracked cable; replacing the cable with a known-good one is usually the cheapest fix.
Why does the network "drop" and how to check it quickly?
Start with the patch cable and connector: in classrooms they are often bumped by feet, so the contact becomes intermittent. Quickly swap the patch cable for a spare, check whether the plug is loose in the outlet or network card, and then secure the cable to avoid tension and sharp bends.
How to tell if the problem is the power strip or power supply rather than the PC?
Inspect the power strip and plugs: are they warm, is there any smell, darkening of the plastic or looseness in the socket? If there are chained adapters or many power bricks on one outlet, redistribute the load and replace a worn power strip, because power issues often masquerade as a "computer fault."
How to organize updates and software so there are no surprises during a lesson?
Schedule updates at the end of the day or in an agreed window and avoid running them right before tests or exams. Keep antivirus and system files up to date, but check there is enough free disk space and that updates won't force an unexpected reboot during class.
Who should be responsible for maintenance so it doesn't become "not my job"?
Assign at least three roles: who plans and keeps the log, who gives access to the classroom and manages consumables, and who reports symptoms immediately after a lesson. When roles are fixed, small tasks don’t get stuck and complex work can be outsourced or scheduled for the holidays.
What must be recorded in the log and which consumables should be kept in stock?
Keep a simple log: date, classroom and seat, symptom, what was done, what needs to be done later, and whether the issue repeated. Maintain a small stock of common consumables—power cables, patch cables, video cables and a couple of reliable power strips—so a minor fault doesn't stop a lesson.