Wi‑Fi planning for office and campus: coverage and capacity
Office and campus Wi‑Fi planning: how to run a site survey, calculate capacity by client density and choose settings for stable connectivity.
Where to start: what exactly do you want from Wi‑Fi
“Wi‑Fi in a building” almost always means one of two goals.
In an office, the focus is usually on high user density in meeting rooms and open‑plan areas, video calls and stable use at mostly fixed workstations. On a campus, people move between buildings, corridors, lobbies, cafeterias and sometimes outdoor areas. Roaming becomes important: the connection should stay smooth as people move along a route.
Agree upfront which problem you’re solving: coverage or capacity. Coverage answers “is there a signal?”, but doesn’t guarantee quality. You can see full Wi‑Fi bars and still have poor connectivity: an AP can be overloaded, devices can “fight” on the air, or channels can suffer interference. Capacity answers “how many people and devices can work properly at the same time.”
Typical signs that Wi‑Fi is already a problem: drops and repeated reconnects (especially while moving), high latency and stuttering in calls, packet loss (causing freezes, VPN and video issues), sharp speed drops during peak times and repeated complaints about the same areas.
Next, state your goals in plain terms. Usually 2–4 priorities are chosen: stable calls, predictable peak performance, reliable roaming across a floor or between buildings, and guest access with clear limits. If you have security requirements (for example, isolating corporate and guest networks) note them early.
To avoid later arguments about whether the network “works well”, define success criteria in advance. For example: calls in meeting rooms don’t drop, the network supports the required number of users at peak, and there’s no noticeable pause when moving from an office to a corridor. For a campus, clarify whether you need reliable Wi‑Fi only inside buildings or also in routes between them.
It’s practical to describe 2–3 typical scenarios. For example: 20 people in a meeting room on video calls, 60 students in a lecture hall taking an online test, staff in a lobby during break. These scenarios will guide the site survey and capacity calculation.
Gather inputs: plans, users, devices, constraints
To avoid guesswork, start with facts about the site and how the network will be used. These inputs directly affect the number of APs, their placement and settings.
Get up‑to‑date floor plans. It’s important not only to know “where the rooms are” but what the walls and partitions are made of. Drywall and wood usually let signals through more easily than brick. Glass with coatings and metal often cause surprises: a neighboring office may look close but have weak signal. If materials are missing on the plan, check with facilities or the contractor.
Describe use zones. Not all spaces are equally important: a corridor can tolerate a medium signal, while a meeting room with video calls cannot. Mark critical places where outages are most noticeable.
Count active devices at peak, not just people. In an office, a person often has two devices (laptop and phone), plus printers, displays, scanners and terminals. On a campus, lecture halls add dozens of devices connecting at once. Note old devices separately: they can reduce speed and stability for an AP.
Briefly record what Wi‑Fi is needed for. Video and VoIP react badly to latency and loss, while downloading updates is much more tolerant.
Use a short checklist: where are peak gatherings and how long do they last; which applications are critical; is guest Wi‑Fi needed and how often; security requirements; mounting constraints (cabling, PoE, places where you can’t drill or mount equipment).
For large sites (office plus warehouses plus outdoor areas), align inputs in a single document with IT and facilities. That reduces surprises at installation like “you can’t run a cable here” or “this area needs a separate secured network.”
Site survey: how to see the real picture
Even perfect plans don’t show the most important things: where signals actually drop, where the air is congested and what causes interference. A survey turns guesses into verifiable data.
A simple walkthrough is often enough for a small office without high density or strict requirements. Walk through key areas, note wall materials, locations of workstations and meeting rooms, and mark shielding structures.
A detailed (instrumented) site survey is needed when there are many people, lecture halls or call centers, planned events, or existing complaints. It’s especially important in complex buildings: lots of metal, glass partitions, atriums, long corridors, level changes and staircases.
On site, measure more than just signal bars. At minimum measure signal level and link quality while moving, signal‑to‑noise ratio, channel utilization, visibility of neighboring networks and sources of interference.
Interference often comes from everyday devices: neighboring Wi‑Fi networks in an office building, Bluetooth headsets, wireless cameras, microwaves. Structural factors include elevator shafts, dense cable runs, metal partitions and racks. On a campus, temporary APs during events and schedule‑driven load spikes matter.
Mark problem areas immediately on the plan and with photos. Risks often appear in elevator lobbies, stairwells, atriums, long corridors and rooms with lots of metal or equipment.
The result of a survey shouldn’t be just a “pretty heatmap” but a list of risk zones and causes: where coverage is lacking, where capacity is insufficient and where the air is “noisy.” This makes calculation and tuning much easier.
Capacity calculation: client density and peak loads
Calculate capacity by zones where people gather simultaneously, not for the whole building. Otherwise you may get good coverage but complaints in meeting rooms, lecture halls and the cafeteria.
Differentiate between “how many devices in total” and “how many devices are active at the same time.” Many devices may be present but only a portion are active. In a meeting or lecture the share of active devices jumps: people join video calls, open documents or take tests.
A simple process:
- Break the site into zones and estimate peak people in each.
- For each zone, estimate the share of devices active at the same time.
- Define load scenarios (messaging and email, or half the room on video conferencing).
- Then decide how many APs are needed and where to place them.
Example: a 20‑person meeting room. Each person has a laptop and a phone (40 devices), 60% active (24 devices). If 10 people are on video, the load approaches that of a small auditorium peak rather than a simple office room. That directly affects the design.
Plan for growth: new staff or students, additional devices, IoT and increased guest use. Keep headroom for active clients and design separate scenarios for guests and service devices.
AP placement: where and how many
Start placement from where users are and how they move, not from a number. It’s better to think of “stable connectivity where people work” with clear zone boundaries than “strong signal everywhere.”
Choose AP types by zone. In a typical office, ceiling indoor APs are often sufficient. In auditoriums and meeting rooms capacity matters, so you may need multiple APs in a single room. Long corridors are better served by several lower‑power APs or narrower coverage cells rather than one high‑power AP covering an entire floor. Outdoor areas require weatherproof APs and focused coverage where people actually walk.
Basic placement rule: closer to clients, lower power, more APs. Trying to “blast” through walls with one powerful AP often backfires: the client can hear the AP but the AP can’t hear the client well, retransmissions increase and quality drops.
Before finalizing the layout check: APs are placed in peak areas (meeting rooms, classrooms, cafeteria, reception); they aren’t mounted next to metal, HVAC or coated glass; there are enough ports and PoE budget, and cabling doesn’t concentrate into a single overloaded closet; channel and overlap planning avoids turning neighboring APs into competitors.
Bands and channels: choices that affect stability
Wi‑Fi often fails not because of weak signal but due to band choice, channel width and channel plan. Decide where you’re willing to trade peak speed for reliability and where speed is essential.
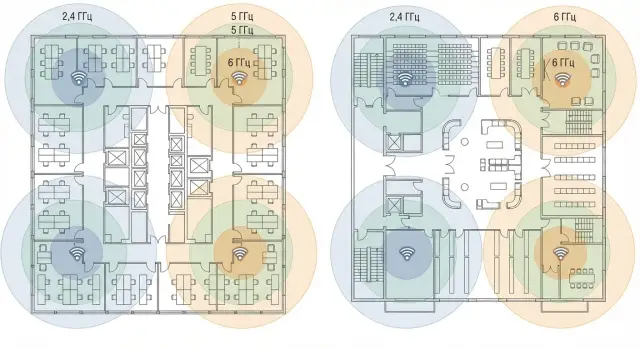
2.4 GHz, 5 GHz and 6 GHz: what to choose
Keep 2.4 GHz where range and compatibility matter: storage areas, backrooms, simple sensors and legacy devices. In offices and lecture halls it gets crowded quickly because there are few channels and much interference.
5 GHz is commonly the main band for workstations: more channels, fewer household interferers and easier to separate APs so they interfere less.
6 GHz (Wi‑Fi 6E/7) is useful in dense zones but only shows benefit when a significant number of clients support it. If many devices still use 2.4 or 5 GHz, offload will be limited.
Channel width, DFS and floor‑by‑floor planning
Channel width is a common source of instability. 80/160 MHz can give high speeds in ideal conditions but increase overlap and contention in real offices. In dense areas 20 or 40 MHz often deliver steadier performance.
DFS channels in 5 GHz expand options but carry risk: if radar is detected, an AP must change channel and some clients may see a pause. Use DFS consciously and be cautious in zones where calls are critical.
A simple rule for floor planning: APs that can hear each other well (including through floors) should not use the same channel.
AP settings: tweaks that most often improve quality
Once APs are placed, quality often depends not on hardware but on a few settings.
First, check transmit power. Setting everything to max doesn’t help: clients will hear too many neighboring APs, noise rises and interference grows. Lowering power on some APs often reduces overlap and improves roaming.
Second, legacy rates and basic speeds. Slow clients occupy the air longer and hurt everyone. If legacy devices aren’t needed, disable old basic rates.
Third, roaming. Devices tend to cling to a weak AP. Minimum signal thresholds and disconnect rules that nudge clients to a stronger AP help. Balance is key: thresholds that are too high cause unnecessary handoffs, too low keep “sticky” clients.
Band steering is useful but enable it gently based on your device mix. If you have many old terminals or IoT devices, aggressive rules may break connectivity.
How to validate the design in practice: step‑by‑step tests
After layout and settings, the most important test is real use — “walk the route” in realistic scenarios.
1) Prepare routes and test points
Choose a clear route: entrance, corridors, desks, meeting rooms, cafeteria, lecture halls, warehouse (if terminals are there). Mark test points on the plan. Before testing, record the test device (phone/laptop model), time and network profile (guest or corporate): the same spot can behave differently.
2) Test capacity and roaming at peak
Test capacity in the most loaded zone. A realistic scenario: some people in video conferences, others working with documents and messaging. Check not only throughput but stability: latency, video stutters, reconnects.
Roaming is easiest to test during a call: cross the border between two neighboring zones several times (for example corridor and open office). If you see freezes, adjust powers, channels or roaming thresholds.
3) Record results so they are actionable
You don’t need a huge report. Note the plan point and time, which AP the device associated with, whether there were delays or losses, whether drops or sticky associations occurred, and how many people/devices were nearby.
For universities, clinics or government sites, agree on a test protocol and acceptance criteria in advance — this avoids disputes at handover.
Common mistakes in office and campus Wi‑Fi
Complaints usually come not because of “bad APs” but because the network was built without clear rules.
A typical mistake is deploying too few APs and turning transmit power to max. Coverage may look wider, but clients cling to distant APs, roaming worsens and the air becomes noisy.
Another mistake is mixing different models and settings without a unified standard. The network behavior becomes unpredictable and maintenance turns into manual work.
A third error is wrong channel width. Too wide channels show great speeds in an empty room but cause mutual interference during work hours. In dense offices stability usually matters more than peak numbers.
Fourth, forget narrow bottlenecks outside the radio domain. Good radio won’t help if you’re limited by the internet pipe, firewall performance, DHCP/DNS under mass connects, PoE budget on switches or an overloaded uplink.
Fifth, postpone guest access and security “for later.” Guests appear suddenly; without preplanned isolation and limits you’ll either risk the internal network or end up with password chaos.
Short checklist and next steps
Before buying hardware, take half an hour to check the basics, especially where load varies by schedule.
Before work starts make sure you have: current plans and a list of zones, peak capacity estimates (active devices), understanding of cable routes and spare ports, PoE and power calculations, mounting constraints and security requirements.
At acceptance test the scenarios, not bars: walk the route “office — corridor — meeting room” during a call; test the heaviest load area; check handoffs between APs without drops; test network behavior during busy hours.
After launch have a simple support regimen: how firmware and management are updated, who watches monitoring, how changes are requested and how new zones are verified. Build scaling in from the start: spare ports and PoE, ability to add APs without major redesign, and a plan for new buildings and device growth.
If you need a turnkey project (survey, design, installation, configuration and support), it’s convenient to work with an integrator who handles infrastructure holistically. For example, GSE.kz as a system integrator with 24/7 support can cover these tasks within the overall IT contour when network availability is critical for teaching or operations.