Warranty for IT-department upgrades: a policy for RAM and SSD replacement
Warranty during IT-department upgrades: how to write a policy for replacing RAM and SSD, compatibility rules and records after work.
Why you need an upgrade policy
Upgrades inside a company usually start with a simple request: add RAM, replace an SSD, install a second drive, sometimes upgrade the power supply or GPU. These look like small tasks — until something fails and questions arise: what exactly was changed, who did it, which parts were used, and how it affects the warranty.
Without a policy the dispute often loops. A user says “it worked yesterday”, the IT team remembers “we replaced the SSD last week”, and the vendor or service asks the expected questions: was compatibility confirmed, were there signs of failure before the work, who is responsible for the installed components. Without records it’s hard to prove the correctness of the work or the device’s original state.
A policy isn’t bureaucracy for its own sake. It solves three practical problems: a unified procedure, clear responsibility, and proper records. Then any upgrade becomes a repeatable procedure rather than a “one-off memory job”.
Agree in advance on:
- which upgrades the IT department can perform (for example, RAM and SSD replacement) and which must be done through the vendor/service;
- who approves the work and when the workstation must be taken offline;
- what is recorded before and after (serial numbers, RAM capacity, SSD model, results of checks).
This applies not only to office PCs but also to all-in-ones, workstations and servers, where risks and the cost of mistakes are higher. In a fleet of computers and servers a clear policy helps quickly reconstruct changes and avoids wasting time выясняя “who touched what”.
How upgrades relate to warranty and responsibility
Replacing RAM or SSD usually does not automatically void warranty. Problems stem from how the work was done and what remains (or is missing) in the documentation. So rules on “IT-department upgrades and warranty” should be based on clear agreements: who installs what and how the result is confirmed.
It’s important to distinguish two situations:
- the component failed on its own (for example, the SSD stopped being detected);
- the failure resulted from the installation (for example, a bent contact in the M.2 slot, a stripped mounting screw, or a damaged power connector).
In the first case warranty replacement is usually discussed. In the second, the installer is responsible.
Warranty service is more often affected not by “foreign” memory sticks but by signs of tampering and damage. Typical causes of rejection or prolonged investigation:
- broken RAM slot latches, PCB cracks, stripped screws;
- signs of incorrect connection or misaligned modules;
- missing factory seals where they were present;
- components that don’t meet compatibility requirements (voltage, type, form-factor);
- no records: what was changed, when, by whom and to what.
Responsibility areas are best written directly into the policy. For example: the IT department is responsible for selecting compatible components and neat installation; the user is responsible for handing over the device and data safety (per your internal rules); the vendor/integrator is responsible for warranty repair of the base configuration if there are no signs of damage.
Agree in advance with the manufacturer or integrator which replacements are allowed without additional conditions: can SSD/RAM be changed without voiding warranty, what actions count as tampering, and what marks are required. If you service corporate PCs and servers, including locally produced equipment (for example, from GSE.kz), there are usually clear compatibility and documentation requirements. Get these in writing and include them in the policy.
Who can replace RAM and SSD and how to approve it
To avoid an upgrade turning into a warranty blame game, assign roles and a short approval workflow in advance. This is especially important when IT performs upgrades regularly rather than a one-off “installed a stick and forgot”.
Most often four roles are enough: who requests the upgrade, who does it, who approves and who accepts the result. When roles are not separated, details get lost: why the change was made, what exactly was installed, and why “something got slower” afterwards.
Roles and responsibilities
- Requester (employee or manager): describes the problem and desired outcome (for example, “not enough memory for 1C, the system lags”).
- Approver (budget owner or IT manager): confirms necessity, budget and operational risks.
- Executor (IT engineer): selects compatible components and performs the replacement.
- Acceptor (site manager or service desk): checks that everything works and closes the ticket.
A request should be based on facts, not “install an SSD”. Minimum: device model, serial number (if present), current configuration, what is wrong and the expected result. Example: “office PC, 8 GB RAM, HDD; reports freeze during generation; goal — Windows boot under 30 seconds and stable operation.”
When approval is mandatory
Make approval mandatory if the device is under warranty, if it’s a critical workplace (cash desk, reception, accounting) or if upgrades affect servers and workstations. For equipment with official support (including locally produced devices) it’s useful to document which actions are allowed without voiding warranty.
Fix time windows and priorities up front: work window (for example, during lunch), acceptable downtime (0–30 minutes) and a rollback plan. This prevents disrupting a unit’s work and leaving users waiting.
Preparation for work: safety and state documentation
Before replacing RAM or SSD the main risks are not the installation itself but small issues: static electricity, swapped configurations and lack of proof that the device was working before the job. A little preparation greatly reduces warranty disputes and speeds up support if something goes wrong.
Before opening the case do the bare minimum: shut down the OS properly, power off the device, unplug power and peripherals. On laptops and all-in-ones also disconnect docks and adapters. Use ESD protection: an anti-static wrist strap or, at least, discharge static by touching grounded metal and work on a clean surface.
Then verify the device model and current configuration against inventory records. The asset card should match serial number, inventory tag and actual parameters (RAM size, type and capacity of drives). If the device belongs to a specific manufacturer line, note the precise modification and revision to avoid installing a component that looks similar but is unsupported.
If there are seals, service marks or control stickers on the case or covers, take photos before starting. The photo should show the overall device and a close-up of seals/covers. This simple insurance makes it easier later to prove there was no prior damage or that seals were already missing.
Prepare a rollback plan in advance. Agree on what to do if the new module doesn’t boot: reinstall the old component, recheck the installation, change BIOS/UEFI settings only by approved procedure, or send the device for diagnostics. Label removed RAM/SSD immediately (which PC, replacement date) and keep screws and thermal pads if present.
Compatibility requirements: RAM and SSD in plain terms
Installing a “nearly compatible” memory or SSD can make a computer unstable: freezes, blue screens, or a drive disappearing after reboot. Then the blame game begins: what caused it and who is responsible, especially if the device is under warranty.
RAM: what must match
Memory compatibility isn’t general — it’s about specific parameters. Start with type and form-factor: DDR4 and DDR5 are not interchangeable; DIMM (desktop) and SODIMM (laptop/mini-PC) are physically different.
Before purchase and installation quickly check: type and voltage, frequency and timings (easier when identical), form-factor, motherboard limits (max capacity, slot count and supported module sizes), and memory modes. For dual-channel setups it’s convenient to use matched pairs.
Mixing modules is sometimes possible but is a frequent cause of “weird” issues. Even if the PC boots, it may drop to a lower frequency or run less stably. For office PCs and workstations it’s easier to keep identical modules from the same series.
SSD: ensure it fits and is detected
For SSDs do not confuse interface and form-factor. M.2 is just a connector. An M.2 drive can be SATA or NVMe, and the board may not support all types. M.2 also has a key (M or B) and a length (commonly 2280) that must match the slot and mounting.
Before installation check where the drive will go (SATA 2.5" or M.2), and for M.2 verify NVMe vs SATA, the key and length. Also confirm the drive is visible in BIOS/UEFI. Sometimes new drives require a BIOS/UEFI update, but perform that only according to your internal procedure and the manufacturer’s guidance.
If you manage a fleet of varied models (office desktops and all-in-ones), keep an allowed list of RAM/SSD by model. That reduces errors and speeds procurement.
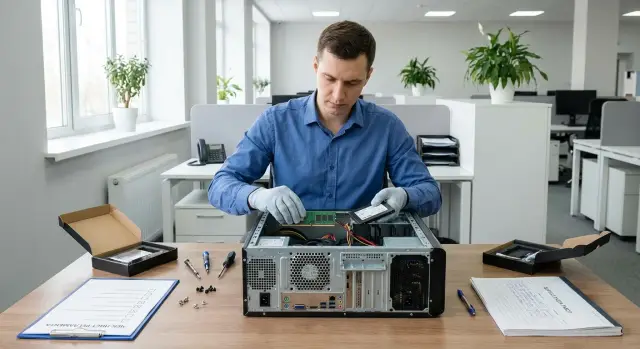
Step by step: replace RAM and SSD without surprises
To avoid the upgrade ending in a warranty dispute, follow the same procedure every time: document the initial state, replace hardware, then verify operation. This order is critical for office PCs where user downtime is noticeable.
Work sequence
Before opening the case ensure you have compatible modules and a clear rollback plan.
- Quick documentation: photos of serial numbers, current RAM/drives, record symptoms and configuration (RAM size, SSD model).
- Full power-down: turn off PC, remove power, discharge residual voltage, use anti-static protection.
- Installation: seat RAM until latches click; insert SSD in the slot with correct orientation and secure it.
- Visual check: nothing pinched by the cover, cables not strained, screws in place, no loose parts.
- First boot: enter BIOS/UEFI and confirm new components are detected.
Post-installation checks
Run short checks that are easier to attach to the ticket than to troubleshoot blindly later:
- RAM: verify total capacity and base frequency, then run a simple memory test with a built-in tool.
- SSD: check visibility in the OS, SMART status and run a short read/write test.
- If SSD is the system drive: decide in advance (clone or clean install), prepare a backup and a recovery media.
- If the PC won’t start: reinstall the old RAM/SSD and test components one by one to isolate the issue.
- Removed parts: label them (origin PC, date, reason), pack in anti-static and place in storage.
This takes a little time but reduces the risk of accidental damage and helps prove the upgrade was performed carefully and with checks.
Common mistakes that later become warranty disputes
Disputes usually start not from the upgrade itself but from small details: what was installed, how it was installed, and whether this can be proven. If you don’t want weeks of back-and-forth, keep typical mistakes in mind.
Mistakes that show up later
Problems often originate during component selection. Bought an SSD in the wrong form-factor (M.2 has variants) or memory of the wrong type, and the PC boots inconsistently.
Frequent causes of claims:
- Not checking compatibility: RAM type, maximum capacity, form-factor, M.2 key, supported interfaces and drive length.
- Mixing different RAM modules: different frequencies, timings, capacities or batches. The system may become unstable and later appear as a hardware defect.
- Damaging connectors during installation: snapped RAM slot latches, misaligned modules, stripped screws or damaged M.2 connectors.
- Ignoring ESD: without anti-static protection you can cause latent damage that appears days later.
- Not updating the inventory: no record of what was there before, what was installed, who did it and when.
Mini case from practice
An office PC started blue-screening after a memory upgrade. The records only said “added 16 GB” with no model or frequency. It turned out the new module had a different frequency and the old one remained. The vendor and service saw instability and it was hard to prove the issue wasn’t due to selection/installation.
Simple discipline helps: document the configuration before work, install only compatible parts, use ESD protection and record exact models and serial numbers after the job.
Quick checklist before closing the ticket
Close the ticket only after a final verification. This saves hours investigating “why it got slower” and helps if a warranty dispute arises later.
Before marking “done”:
- Confirm device serial and inventory numbers match the ticket and asset records.
- Check that the installed RAM and SSD are the agreed items: type, capacity, form-factor and interface.
- If the system disk was affected or OS moved, confirm a backup or image exists and note where it’s stored.
- Run short tests: confirm memory and drive are detected, no obvious errors, and a brief 10–15 minute load test.
- Update asset records: which parts were replaced, their serial numbers, date and technician. Attach evidence (screenshots, logs, photos of stickers).
Example: you added an SSD to speed up app launches. Before closing, ensure the drive is visible, partitions created, SMART shows no warnings, and the new serial number is recorded. Then no one will ask later “where did the drive go and who installed it?”.
If any item is missing, return the ticket for completion with a clear comment.
What to record in asset documents after the upgrade
When IT performs an upgrade, warranty disputes often start because “nothing was documented”. One clear entry answers two questions: what was changed and who is responsible.
Minimum to record in the equipment card and the work completion act:
- device identification: model, serial number, inventory tag, department and location;
- configuration before and after: RAM capacity, SSD type/capacity, number of drives, occupied slots;
- data about new parts: manufacturer, model, capacity, serial number (if any), batch/invoice, source (stock/procurement);
- executor and basis: name/position, date and time, ticket/approval number and authorization (if required);
- test results: memory test outcome, SSD SMART status, and if needed BIOS/UEFI version and whether it was updated.
Describe the result simply: “No memory test errors found, SMART OK, system boots, user accepted.” Note anything non-standard (for example, BIOS setting reset) immediately.
Store documents so they can be retrieved later: work act (in ticketing system or department folder), equipment card (CMDB/Excel/asset system), stock records and linking the component serial number to the device.
Example: after replacing an SSD you recorded both old and new serial numbers, attached SMART results and noted who took the old drive to the parts store. Accounting, service and security then see the same history without guessing.
Practical example: upgrading an office PC without downtime
A bookkeeping PC lagged on large spreadsheets and report exports. The bottlenecks were low RAM and a nearly full system SSD.
The ticket was created as an incident but marked “modernization while keeping the warranty.” Symptoms, current config (RAM size, SSD model, OS), work window (30–40 minutes during lunch) and who approves downtime (head of accounting) were stated upfront.
Components were chosen deliberately. IT checked memory generation (DDR and frequency), free slots and drive constraints (form-factor, interface). To be safe they prepared a rollback plan: user profile backup and a system partition image.
Work was done in a short window: power off, anti-static, install RAM and new SSD, migrate system to the new disk, then basic checks. Instability may not show immediately, so they ran quick tests and left the device under observation.
Minimum checks performed:
- BIOS/UEFI detects new RAM and storage;
- OS boots cleanly and there’s enough room for updates;
- SSD SMART has no alarming metrics;
- 10–15 minutes of typical user load show no freezes.
To avoid turning a warranty case into an investigation, they recorded specifics: serial numbers of removed and installed parts, date and technician, ticket number and approval, test results (SMART, successful boot), where the backup is stored and who accepted the work from accounting. If the device is covered by the manufacturer warranty (for example, a GSE PC), this record usually answers the basic questions about what was changed and what remained stock.
How to organize procurement and stock of compatible components
Make a distinction between device warranty and component warranty. Even when IT does the upgrade, it should be clear who is responsible for the PC (vendor or manufacturer under supply terms) and who is responsible for the new RAM/SSD (component vendor and its warranty paperwork).
Practically, don’t buy whatever is available each time. Approve 2–3 standard items for your models and keep a small reserve. This reduces incompatibility risk and speeds up workstation recovery.
Standardize:
- RAM: one type and capacity per PC family, same frequency and form-factor;
- SSD: one or two capacities and a chosen interface (SATA or NVMe) per model family;
- consumables: mounting screws, thermal pads if needed;
- return packaging: anti-static bags for removed parts.
Choose suppliers not only by price but by consistent batches and clear paperwork: fixed SKUs, shipment documents for every delivery and straightforward replacement of defects. For larger organizations request compatibility confirmation for your models (via specs or a sample test) and include it in contracts.
In public sector or large companies add traceability requirements: serial numbers, acceptance acts, linking to inventory numbers, and storage of removed parts until the end of warranty or an internal retention period. In Kazakhstan it’s often important to consider local-production criteria and public procurement rules. For example, when buying PCs and servers from a local manufacturer or integrator like GSE.kz it’s convenient to agree permitted upgrade types and obtain clear compatibility support.
A small example: you keep ten identical SSDs in stock for office PCs. One drive begins to fail by SMART metrics; IT replaces it in 20 minutes and puts the old drive in a box labeled with the ticket, serial number and date.
Next steps: formalize rules and simplify support
To prevent IT-department upgrades from turning into warranty disputes, turn “how we usually do it” into a short clear document. A 2–3 page draft is enough: roles (who approves, who performs, who accepts), basic compatibility requirements for RAM and SSD, the work sequence and mandatory records.
Train the team consistently. Long theory isn’t needed: 30–40 minutes on typical scenarios and common mistakes (wrong SSD form-factor, incompatible RAM frequency, failing to update the asset card). Add a short checklist attached to each ticket so the engineer fills a few fields instead of writing everything from scratch.
To avoid paperwork overhead, prepare templates: work completion act, equipment card and standard phrases for the service log. Then an engineer fills a few fields after replacement rather than writing a long report.
Minimal actions to implement this week:
- a unified upgrade request template with mandatory compatibility fields;
- a checklist to complete before closing the ticket and a record of post-replacement tests;
- rule: work isn’t closed without models and serial numbers of components;
- a clear storage location for documents (shared folder or asset system).
If you regularly procure equipment and want to reduce compatibility risks, agree standard configurations and spare parts with the manufacturer or integrator in advance. In Kazakhstan this can be done with GSE.kz (gse.kz): discuss compatible options for PCs, all-in-ones, workstations and servers and agree documentation practices so upgrades become predictable and low-downtime.
FAQ
Why do we need an upgrade policy if “changing RAM/SSD is simple”?
A policy makes upgrades repeatable procedures rather than one-off “do-it-from-memory” tasks. It records who did what, which components were installed, how the result was verified and where it’s documented — so you don’t end up arguing about causes of failures and responsibility later.
Does upgrading RAM or SSD automatically void the PC warranty?
Usually not, provided the replacement was done carefully, components are compatible, there are no signs of damage, and the work is recorded. Problems most often arise from visible signs of improper installation, torn fasteners, damaged connectors, or missing records about what and when was replaced.
Who should approve the upgrade and who is responsible for the outcome?
Assign four basic roles: who requests the upgrade, who approves (budget and downtime), who performs the work, and who accepts the result. Also agree on the work window, acceptable downtime and a rollback plan so the user isn’t left without a workstation if the new module fails to boot.
When must an upgrade be approved, and when can it be done without extra steps?
Require approval if the device is under warranty, if it’s a critical workstation (cash desk, registry, accounting), or if upgrades affect servers and high-end workstations. Also approve when downtime, OS migration or BIOS/UEFI changes are possible.
What must be done before opening the case to avoid later disputes?
Shut down the OS cleanly, fully power off the device and disconnect cables. Record the initial state: model, serial number, current configuration and, if needed, photos of seals or service stickers. This helps prove there was no pre-existing damage.
How can I quickly tell if new RAM will work and not cause instability?
Check the memory type and form-factor (e.g., DDR4 isn’t compatible with DDR5; DIMM differs from SODIMM). Also check motherboard limits for capacity and slots. The most stable option is identical modules from the same series — mixing frequencies and timings often causes strange freezes.
Why do people often get SSDs wrong and how to avoid buying the wrong M.2?
Clarify the form-factor and interface: M.2 is a connector, not a guarantee of compatibility. An M.2 drive can be SATA or NVMe. Also check the key and length (e.g., 2280) and whether the motherboard slot supports the intended type; otherwise the drive may not be detected or may behave incorrectly.
What checks should be done immediately after replacement to catch problems on the spot?
First check in BIOS/UEFI that the new components are detected, then verify OS-level memory and basic stability. For SSDs record SMART status and run a short read/write check; for RAM run a simple memory test. These results are useful attachments for the ticket and asset records.
What exactly should be recorded after an upgrade so the change history isn’t lost?
Record device identifiers, configuration before and after, exact models and serial numbers of installed parts, date, technician and ticket number. Add a brief summary of checks (e.g., memory passed test, SMART without warnings) and note where removed parts were stored.
How to organize purchase and storage of RAM/SSD so upgrades are fast and predictable?
Standardize 2–3 verified SKUs for your models and keep a small stock so you’re not buying whatever is available each time. Separate responsibility: the device warranty vs. the replacement component’s warranty, and ensure traceability by serial numbers and paperwork, especially in large organizations.