PC Unpacking and Initial Setup Area: Warehouse Procedures
How to organize a PC unpacking and initial setup area: warehouse workflow, safety, kit labeling and completeness control.
What needs to be solved: procedure, inventory and safety
A dedicated unpacking and initial setup area for PCs is not about making the warehouse look neat. It reduces losses, speeds up commissioning and makes inventory clear: whose computer is where, what has already been checked, and what is still in quarantine. When the place and rules are the same for every batch, there are fewer disputes and fewer surprises.
Without a dedicated area, the same problems recur: boxes get mixed, a power supply from one kit goes to another, a cable or mouse is missing, a scratch on the case is noticed only after issuing, and the serial number remained only on a box that was thrown away. Often equipment sits on a shared shelf, and later it is hard to prove at which stage the damage or shortage occurred.
Define a basic minimum for "initial setup" in advance. Usually this is a visual inspection, serial number check, completeness check, first boot, verification of BIOS/UEFI data and basic settings, port and network tests, and preparing a ready-to-issue assembled kit. What usually does not belong here: installing the full set of work software, transferring user data, deep hardware diagnostics and investigating infrastructure incidents.
To keep the process compliant and calm, the institution usually formalizes rules in documents. Agree on a minimum set in advance: acceptance and act procedures, rules for photo documentation, labeling and inventory number requirements, storage conditions for packaging, and access rules to the area (who may unpack and power on PCs). Safety is specified separately: ESD measures when handling components, occupational safety and a ban on connecting to production networks until registration and basic checks are complete.
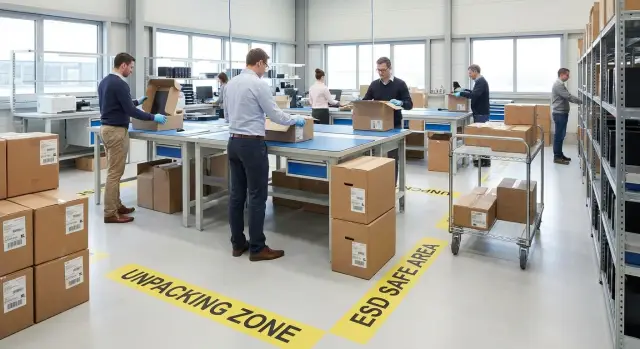
Layout of the area: where things go and how people move
Chaos in unpacking almost always starts with the layout. If people walk back and forth with boxes and components are scattered, lost cables, mixed mice and disputes about completeness will appear quickly.
It's useful to divide the space into clear stages and make the flow one-way: from batch arrival to issuance of ready kits. Then each box follows a single path and does not return "backwards".
Usually four zones are enough: acceptance (unopened boxes and documents), unpacking (tables for opening and initial checks), testing and setup (tables with power and network), packing and issuance (assembling the ready kit and handing it off).
Floor and table markings save more time than you might think. Mark aisles (so boxes don’t block evacuation routes), pallet spots, workbenches and a separate point for empty packaging. Empty boxes and foam should be removed from the work area immediately, otherwise they quickly "settle" on the benches.
Keep basic workstation hygiene: bright, shadow-free lighting, clean surfaces, no drinks or food near equipment. A couple of drops of coffee on a keyboard or PSU can easily turn into a long investigation.
A practical rule for unpacking a batch: one table — one kit. Only items related to one PC should be on the table at a time (tower, monitor, cables, documents). If you need to step away, cover the kit with a sheet labeled with the station number so no one accidentally mixes in other parts.
Roles and responsibilities: who is in charge of what
When several people work in the area, mistakes most often occur at the handover between tasks: a box is opened but the serial isn't recorded, a kit is split across tables. It's better to assign roles and a simple confirmation chain up front.
Usually four roles suffice. The receiver verifies documents, counts items, checks packaging integrity and sends doubtful items to quarantine. The technician opens boxes, performs the initial inspection, assembles the kit and does basic setup per standard. The inventory officer records serial numbers and kit contents in a log or system and issues labels. The quality controller randomly checks ready kits, confirms steps were followed and signs off release.
The responsibility chain should be short: every step is closed with a mark by a specific person. It’s important that the same PC cannot move forward without inventory and control. This disciplines the process and helps resolve disputes without searching for who is to blame.
Shift logs and pace
At the end of a shift record at least: how many PCs were received, how many released, how many in quarantine; list of problematic units (serial, reason, where stored); remaining consumables (seals, stickers, bags); who worked which role; what needs continuation tomorrow.
Plan pace based on reality, not the delivery schedule. For a new batch start with a pilot of 5–10 PCs, measure time and add margin for errors and training. Better to consistently do fewer well than rush volume and then spend weeks finding "lost" components.
Acceptance of a batch before unpacking: quick checks without fuss
Before opening boxes, record the delivery condition. This saves hours of dispute if a shortage or damage is found later and helps keep order: you already know which items can go into the flow and which should be set aside.
Start simple: count the places and compare with the packing list. Inspect each box from all sides for integrity, signs of opening, dents or moisture. Photograph seals and factory stickers immediately before moving the boxes.
Next, reconcile the paperwork: model, SKU, lot number, date and what actually arrived. Serial numbers are often printed on the box and can be scanned or recorded without opening—handy for large deliveries where equipment will go to different offices or branches.
If packaging is damaged, don’t try to "carefully open and check" together with the rest. Isolate such boxes and make a separate report. Do not return them to the batch until a decision is made (replacement, top-up, acceptance with remarks). That way you won’t lose track of which exact unit was problematic.
Short pre-unpacking checklist:
- Reconcile number of places and box labels with the packing list.
- Inspect boxes and seals, take 2–3 photos per item.
- Record serials from labels (or note the batch range).
- Send damaged items to quarantine and sign off.
- Move boxes directly to the intended zone without extra handling.
Example: 40 PCs and 40 monitors arrive. Three boxes have dents. They are marked, photographed and placed in quarantine. The other 37 kits follow the route: acceptance -> unpacking area -> initial setup table.
Safety: ESD, occupational safety and data access
Safety in the unpacking and initial setup area starts with simple steps: you protect people, equipment and data. Mistakes at this stage often cost more than the extra 10 minutes to prepare the workspace.
ESD minimum: protect against static
Static can silently damage components and the problem may show up only when the device is with the user. Minimum measures should be mandatory:
- Anti‑static mat on the table and verified grounding.
- Anti‑static wrist strap for the person working with internal components.
- Store small parts (SSDs, memory modules, adapters) only in ESD bags.
- A separate shelf or container for opened parts, without contact with cardboard or plastic.
Occupational safety and data access
Use safety knives with blade limiters for opening boxes, not ordinary office blades. For heavy boxes set rules for lifting and moving: use a trolley, work in pairs, keep clear aisles free of cables and debris.
Information security matters already at setup: whoever enters credentials can potentially get system access. Helpful practical rules:
- Access to the area is by a list; outsiders are not allowed.
- Only an assigned person enters account credentials; passwords are not written on paper.
- Temporary accounts and USBs for installations are stored separately and issued against a sign-out.
- If needed, maintain a log of entrants or camera footage; disputed boxes and devices go to quarantine until resolved.
Example: when a facility receives workstations for the finance department, quarantine and access control protect against someone "plugging in for a minute" and leaving personal credentials on a device.
Workflow step by step: from box to ready kit
A single standard route for each device reduces errors and speeds up work. Nothing should be done "from memory"—everything must be recorded while the box and components are on the bench.
Minimal route for one PC
First assign an internal inventory number and immediately link it to the serial on the case and on the box. It’s convenient when this number is in the acceptance log and on a sticker that stays with the device long term.
Then unpack the box and arrange items on the table in a single template: tower, cables, PSU (if external), peripherals, documents. This makes missing items and photo documentation obvious.
Quickly check completeness with a short checklist: power and connection cables; keyboard and mouse (if included); documents and warranty cards (if applicable); seals and packaging condition; model and configuration match the packing list.
Next, do an external inspection: case, ports, power connector, impact marks, loose parts. If a defect is found, record it immediately (note + photo) and send the device to quarantine rather than postponing.
Only then power on: basic tests, boot, network, storage check and apply the institution’s standard setup (account, PC name, policies, required apps). Final step: label the kit, pack neatly and move to the issue area so ready devices don’t mix with "raw" batches.
Labeling and inventory: how not to lose serials and kits
In large batches chaos often appears not on day one but on day two, when boxes are cleared and five identical towers sit on a table and nobody is sure which monitor belongs to which PC. A well-organized area should produce one result: every device has a clear label and each kit has a single "passport" in inventory.
A minimal sticker standard should be set: inventory number, department, installation location (room, rack, classroom) and the responsible person. This saves hours locating devices and answering "whose equipment is this and where should it go?"
Place labels so they don't cover ventilation, screws or service panels, and do not obscure factory serials and badges. On towers choose a side panel or the top front; on monitors place it on the back near ports; on peripherals put it on the underside or on the cable near the connector (avoid bends).
To keep a kit together, label the whole set: PC + monitor + keyboard/mouse + key cables. Adding a kit ID and repeating it on each part is convenient.
For barcodes or QR codes include only what you actually use: inventory number, serial, kit ID, department or installation place. Main rule against duplicates: print codes from a single inventory system or template; "manual eye-entry" is forbidden.
Before issue apply the "two matches" rule: the factory serial on the case and the inventory number sticker must match the record in the log. If a monitor ended up in a neighboring room the serial will immediately reveal the swap even if inventory numbers look similar.
Completeness control in the warehouse: documents, photos and quarantine
Even a well-organized process breaks where "everything seems in place" but is not recorded. Check kit completeness at the warehouse before installation and issuance.
Begin with a simple completeness sheet for each unit. It should match the contract and packing list and be easy to mark. Leave space for serial number, the institution’s inventory number and a "kit confirmed" tick.
Avoid confusion by separating checks by models and configurations. Different lines (desktop PCs, all‑in‑ones, servers) need different checklists: cable sets, mounts and documents vary.
What to check per box: device and model conformity to the order; power cable and accessories (keyboard, mouse, mounts if applicable); documents; integrity of packaging and seals; matching serial on box, device and paperwork.
Photos of kits are justified for large batches or expected disputes: a picture of the opened box with items laid out often saves days of correspondence. Store photos in a folder by acceptance date and delivery number; name files clearly: "invNumber-serial-1.jpg".
For shortages create a quarantine shelf or separate slot. Put all disputed items there: missing cable, wrong PSU, damaged packaging. The rule is: quarantine items do not continue down the flow.
Record discrepancies briefly and clearly: date, delivery number, what was expected, what is missing, serial number, photo, signatures of two staff. Such a document is easier to turn into a claim and gives the warehouse a clear story without guessing.
Common mistakes and traps: where time and devices are usually lost
The main cause of chaos is not faulty equipment but small organizational mistakes. They look harmless but later become lost cables, serial confusion and extra hours of investigation.
The most frequent problem is mixing kits on one table. You might open 3–4 boxes next to each other, then not know which PSU, mouse or cable belongs to which PC. Short adapters and short cables disappear fastest. If you must open several boxes, keep only one kit on the table and leave the others in closed, labeled boxes nearby.
The second trap is starting setup before acceptance and inventory are complete. Once a PC is switched on, software installed and issued, fixing serial mismatches or missing parts becomes much harder. Rule: inventory first (serials, model, completeness), then setup.
Third issue — careless handling of packaging films. Cutting or ripping protective film with a knife can leave scratches on a case or screen. Remove film by hand, not with a blade, and dispose of it immediately.
Another risk is lack of ESD measures. Equipment may work initially but failures can appear later: random reboots, port failures, odd errors. Minimum steps: anti‑static mat, grounding and a habit not to place boards and components on ordinary surfaces.
A further common trap is storing boxes in aisles "temporarily". People trip, trolleys snag packaging, devices fall and injuries increase. Keep aisles clear and predefine space for empty packaging and incoming boxes waiting acceptance.
If you can’t see where the kit "starts" and "ends" on the bench, the area is already improperly organized.
Short checklist: what to check in 2 minutes
When a batch is large, one principle helps: check the same things in the same order. Then the process becomes predictable and errors are easier to spot.
Before shift start
A quick workspace check prevents interruptions: benches are clean, aisles clear; ESD protection is in place and there is a safe place for components; tools at hand (box cutter, ties, wipes, spare batteries if needed); consumables ready (stickers, markers, acceptance and quarantine forms).
For each PC (1 minute)
- Match the serial on the case with the box and enter it in inventory.
- Check completeness against the sheet: power, cables, peripherals, documents.
- External inspection: seals, chips, signs of opening, bent ports.
- Quick power on: power, indicators, screen output (or beep), noise and smell.
- Mark status: “OK”, “incomplete”, “damaged”, “won’t power on”.
Before issuing, make sure the label is readable and the kit is packed together (nothing left "separately on the table"). The kit ID in the log should match the sticker on the device and the box.
At the end of the day reconcile numbers: how many received, how many ready for issue, how many in quarantine and why. Separate and record all disputed units with what needs investigation (missing cable, serial mismatch, damage).
Practical example: how to process a batch without chaos
A school receives 50 PCs for different rooms: computer lab, library, staff room, accounting. Each room has its own responsible person and the accounting department needs serials and acts. If you start unpacking without a plan, boxes will mix and "whose PSU is this" becomes the main question.
First prepare the unpacking and initial setup area: two tables for acceptance and labeling, one table for setup, a separate shelf for quarantine. Assign one warehouse person and one IT representative to acceptance so documents are checked and you see what is entering the flow.
Divide the batch into sets by room. A set = tower (or all-in-one), monitor (if present), keyboard, mouse, cables and a completeness sheet. Spare cables and adapters are not put into sets but collected as spares (ZИП) so they don't get distributed without record.
Work in waves of 10 kits: acceptance and initial labeling; unpacking and completeness check; basic setup and boot test; repacking or assembling the ready kit for issue. This avoids a pile of 50 open boxes.
Record exceptions during unpacking right away. Example: 2 PCs missing power cables, 1 box with a dent and signs of opening. These units go to quarantine, get a red tag, and have a separate record: what was found, photos, who inspected and what happens next (top-up, replacement, claim).
At the end you get a clear report for management and accounting: how many kits are ready and where they go (room, responsible person); inventory and serials recorded; completeness control at acceptance (which items were missing and in which positions); list of damages and status; remaining spare parts as a separate line. The batch is distributed to locations without confusion and disputed cases do not disappear into the flow.
Next steps: standardize the process and simplify support
Once the basic flow is clear, formalize it in a short standard. The goal: any shift can handle a delivery the same way and the unpacking and initial setup area works predictably.
Condense rules into 1–2 pages: acceptance checklist, initial setup checklist, labeling template, box and quarantine storage scheme, roles and deadlines (who unpacks, who records serials, who applies the image, who signs the act). The fewer oral rules, the fewer losses.
Run a short 20–30 minute briefing: where consumables are, how to fill the log, what to do if something is missing or damaged, who makes decisions. One person does an action and another confirms critical points (serial, completeness, status) works well.
Before large work run a pilot of 5–10 PCs and walk the full route from box to ready kit. After the pilot adjust small things: where space is lacking, which fields in the log are redundant, which cables or PSUs are most often confused.
If you buy domestic PCs, agree with the manufacturer in advance on kit completeness and labeling (for example, where to place the inventory sticker and how to reflect the serial on the box and device). This saves time at acceptance and reduces disputes.
When the process is stable, discuss with the supplier what can be handled on their side: standard configs, labeling rules and support. For example, GSE.kz as a manufacturer and system integrator in Kazakhstan supplies L200 desktops, M200 all‑in‑ones and S200 servers, and offers system integration and 24/7 support — this helps reduce the load on internal IT staff.
FAQ
Why allocate a separate unpacking and initial setup area if there is already a warehouse?
A dedicated unpacking and initial setup area reduces confusion with boxes and components, speeds device commissioning and makes inventory transparent. The most important thing is that every device has a clear status: received, inspected, quarantined, or ready for issue.
What is usually included in initial setup, and what should be avoided in this area?
The basic minimum includes visual inspection, serial number check, completeness verification, first boot, checking BIOS/UEFI data and basic settings, port and network tests, and assembling a "ready kit" for handover. Complex tasks like transferring user data or deep hardware diagnostics should be handled in a separate process so they don't block the flow.
How to organize movement of boxes and people to avoid chaos?
Make the workflow one-way: acceptance of unopened boxes, unpacking and initial check, testing/setup, then packing and issue area. When a box follows a single route and never goes "backwards," the risk of losing cables or mixing kit parts drops sharply.
Why is the "one table — one kit" rule so important when unpacking a batch?
A practical rule is "one table = one kit": only items belonging to one PC and its accessories should be on the table. If someone needs to step away, cover the kit with a sheet or tag with the station number so nobody accidentally mixes parts.
What roles are needed in the area if multiple people are working?
A simple role split works well: an acceptance clerk for documents and packaging integrity, a technician for unpacking and basic tests, a person responsible for inventory and labeling, and a quality controller for spot checks and release. Each step should have a named person and a sign-off so devices cannot move on without tracking.
What should be checked before opening boxes to avoid later disputes with the supplier?
First count the items and compare to the delivery note, inspect every box for dents, signs of opening or moisture, and photograph them. Serial numbers on box labels can be recorded before opening, which helps start inventory immediately.
What to do with boxes if packaging is damaged or shows signs of opening?
Damaged or suspicious packages should be separated and not mixed with the main batch. Label them, photograph, create a separate record/act and place them in quarantine until a decision is made: accept with remarks, exchange, or additional delivery.
What ESD measures are really needed to avoid killing components with static?
Minimum anti‑static measures: an anti‑static mat and reliable grounding; when handling internal components use a wrist strap; store small parts (SSDs, RAM, adapters) only in ESD bags. These steps often save more time and money than they cost because ESD damage can appear days later.
How to avoid losing serial numbers and mixing kit parts in a large batch?
Start by linking an inventory number with the serial number and record it while the box and device are still together. Use a common kit ID printed on stickers for the PC, monitor and key peripherals so the kit stays intact during storage and issue.
Which mistakes most often lead to time loss and shortages in the warehouse?
Follow the rule: complete inventory and confirmation first, then setup and issue. At the end of a shift compare simple numbers: how many received, how many ready, how many in quarantine and why. This prevents issues from being lost between days.