Standardizing Cable Kits for Mass Installations
How to standardize cable kits—HDMI, DP, power, ties, labeling and reserves—so your crew doesn’t stall over small things.
Why crews lose time on cables and ties
Install delays rarely start with a "big" problem. More often, work stalls because of a triviality: a short cable is missing, an adapter is gone, ties are used up, or one power plug is lost. While one person runs to the warehouse or a store, the rest wait and time gets wasted.
Consumables have an annoying trait: they’re cheap, so they’re rarely planned with the same care as hardware. That’s why they run out at the worst moment. Usually the suddenly missing items are HDMI or DisplayPort cables of the needed length (especially short 1–1.5 m ones), power cords and surge protectors, adapters for a mixed device park, cable ties and mounting clips for trunking, and markers/labels.
A one-off setup for 10 workstations often relies on luck: you can buy something on the way, borrow, or improvise. But at 100 workstations any small shortage becomes a task queue. At 1,000 seats it’s no longer a supply problem but a process stop: the same mistakes repeat on every floor and in every city.
That’s where standardizing cable kits makes sense. The goal is simple: set up workstations faster, know in advance that the box contains everything needed, and track stock before it hits zero. When the kit is uniform and clear, the crew doesn’t argue about what to take, the warehouse knows what to restock, and the manager controls the little things that actually determine deadlines.
What it means to standardize a kit in practice
To standardize a kit means to decide in advance what usually gets decided on site: which exact cable, which length, which connectors, where it’s stored and what can replace it. That way the installer doesn’t pick from a pile of similar wires or run off for a minor part.
In practice it’s a single parts list (BOM) for one workstation or one installation point. For each item record the type, length, sometimes color, and minimum quality requirements (for example, shielding or power-cord class). One standard covers many identical installations.
A basic kit usually includes:
- Video: one chosen standard (HDMI or DisplayPort) and one spare adapter if truly needed.
- Power: power cord(s) and the chosen extension/surge protector type (or a strict ban on extensions).
- Network and peripherals: a patch cord of the required length and a USB cable if the scenario requires it.
- Consumables: cable ties or Velcro straps and 1–2 small fasteners matching your furniture.
- Labeling: stickers or tags with the kit number and a short "what goes where" hint.
The most important thing is to agree on lengths. For example: "video 2 m, power 1.8 m, network 3 m" for 90% of seats. If a nonstandard length is sometimes needed, handle it as a separate "long kit," not chaos inside the main box.
Another key point is a replacement rule. It removes disputes and saves time: replacements must be equivalent (same type, length and class); you can’t install whatever you find without checking. For adapters the rule is usually stricter: one approved adapter is better than a chain of two.
This approach is especially helpful for mass deployments in typical scenarios — for example, rolling out identical PCs in a government office or school.
Video: how to agree on HDMI vs DisplayPort without arguments
To stop the debates about "which cable is needed," record a short 3–5 minute video guide and fix it as the standard. It should contain only practical points: which connectors are considered baseline, which lengths you always keep, and what to do if the monitor is "silent."
For mass deployments a minimal set is usually enough: one main video cable (HDMI or DisplayPort) and only the adapters that actually appear in your typical tasks. Excess adapters often cause more trouble than they solve: people try to "fix" the wrong connector and waste time.
How to simply decide: HDMI or DP
It’s convenient to lock the rules once and follow them:
- DisplayPort — the default for office PCs and docks when high-resolution monitors or dual-monitor setups are common.
- HDMI — the default if you more often connect to TVs, meeting-room panels and simple monitors.
- Put adapters only for legacy devices (e.g., DVI or old projectors) and keep them in an emergency kit, not in every single kit.
- Tie lengths to typical distances: "short" for a PC under the desk, "medium" for a unit in a cabinet, "long" for meeting rooms.
A practical example: in a classroom PCs are in desks and monitors are on mounts. If everyone grabs "whatever," some setups will be tight and others will have loops on the floor. A standard of 2–3 lengths solves this.
When a cable is present but no picture
Show a short checklist in the video so crews don’t run to the warehouse for "another cord":
- Make sure the monitor input is set correctly (HDMI1/HDMI2/DP).
- Reseat the cable until it clicks, especially DP (it often has a latch).
- Remove the adapter and connect directly if the correct port is available.
- Ensure the cable is not a "power-only" cable and not excessively long for your setup.
- Replace with a known-good cable from the team leader’s test kit.
This cheat sheet is especially useful when multiple crews work simultaneously: an extra 5 minutes per seat quickly becomes a lost day.
Power and extension leads: so everything powers on first time
Most time is lost on small power mismatches: wrong plug, short cord, one extension shared by two seats. Power rules should be as strict as PC model rules.
First, document which plugs and sockets actually occur in your fleet. In most offices it’s Schuko (European plug) on 220 V, but surprises come from monitors, printers, UPS units and older devices. Keep one format of power cord in the kit for typical devices; rare adapters go in the emergency kit.
What to include in the standard power kit
To prevent installers from sourcing power on the spot, decide in advance what counts as normal:
- Power cords of the right type for each device (PC, monitor, AIO, etc.) and a small reserve on site.
- Extension or surge protector per site rules (some sites require filters, some forbid them).
- A simple load check: the total power of a workstation must fit within the extension’s rating.
- A unified color and marking so "foreign" extensions don’t disappear into other zones.
For lengths, keep two fixed options: the cable should not be taut but also not a tangled coil under the desk.
Mini replacement kit for on-site fixes
Keep a small "fix-now" kit with the team leader: a couple of most-used power cords, one spare extension/filter, a few adapters (only if they are common), and a simple outlet tester.
Cable ties, fasteners and labeling: small things that matter
When a single tie or label is missing, installation turns into a search. In mass deployments this almost always leads to delays: someone runs to the warehouse, buys a cheap part, or removes it from a neighboring seat.
You need a simple standard that’s the same for every workstation. Then any installer opens the kit and sees the familiar set.
Small items to standardize
A short repeated set usually suffices:
- Two sizes of cable ties: short for peripherals and long for under-desk runs (one color per project).
- A pair of reusable Velcro straps for frequently handled cables.
- Self-adhesive pads or clips where drilling is not allowed.
- A few spare screws and washers of common sizes.
- A mini kit: insulating tape, alcohol wipes for adhesive pads, several blank labels.
Single-use ties are handy for final routing, while Velcro stays where cables are likely to be removed for upgrades or moves.
Labeling without fuss
Labeling isn’t decorative — it helps quickly find the right cable end and return everything after maintenance. For mass work, identical stickers or tags with short codes are usually enough.
- Label both ends of each cable the same way.
- Keep 3–5 label types (power, video, network, peripherals, spare).
- Write large and consistent codes (e.g., PC-01, MON-01).
- Include a couple of blank tags in the kit for surprises.
One clear labeling scheme saves hours, especially when a new shift arrives on site.
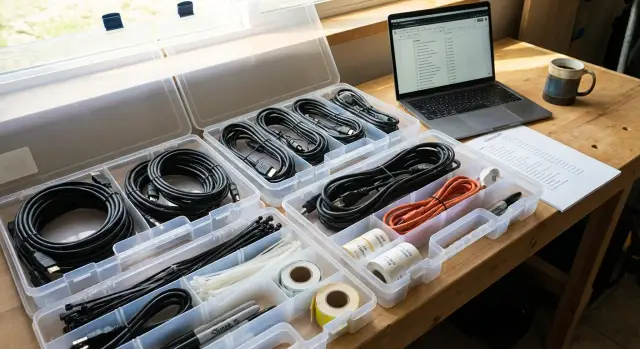
Packaging and kit labeling so you don’t search boxes
For mass installs use a simple rule: one workstation — one sealed kit. Once assembled and closed, the kit isn’t "completed on the fly."
Two packaging options usually work: clear bags for light kits and transparent boxes when the kit contains an extension, fasteners and small items that are easy to lose. Packaging should survive repeated warehouse issue and be understandable without opening.
Color coding by workstation type helps the crew pick the correct kit fast: office one color, classroom another, POS/desk a third. Repeat the color on the label and in warehouse records.
The label should be readable from an arm’s length. A useful template:
- Kit type and purpose (e.g., "Office PC + 1 monitor")
- Contents and lengths (video, power, network, extension)
- Number of small items (ties, Velcro, clips)
- Assembly date and batch number
- Responsible person (assembler or warehouse)
If some monitors have only DP and others only HDMI, don’t decide this on site. Make two kit types with different colors and clear labels and issue them by room specification.
Step-by-step: how to roll out a kit standard in 1–2 weeks
A quick way to eliminate delays is to create one clear standard and make it work in the field. Don’t start from perfection. Start with what actually breaks the schedule: "missing short power cord," "wrong adapter," "DP instead of HDMI," "ties ran out."
A plan that usually fits into 1–2 weeks:
- Collect facts from past trips: 10–20 most common "runs to the store" and forced swaps with reasons.
- Reduce dozens of variants to 2–3 profiles (e.g., "HDMI seat", "DP seat", "dock station seat"). Treat the rest as exceptions.
- Approve the specification: types and lengths, and acceptable equivalents (what can be substituted without approval and what cannot).
- Set up assembly and checks: a visual check of connectors and a quick functional test. Catch defects at the warehouse, not at the 30th workstation.
- Organize issuing and returns: issue and accept the kit as a unit by code. Losses usually happen here.
If you mass-supply equipment through an integrator, include the kit standard in shipping documents and acceptance. Then identical kits arrive each time, not "what was assembled today."
Common mistakes that make standardization fail
A kit can exist on paper but still not solve typical issues. Then installers rummage through boxes again, argue about what’s "right," and waste time.
Typical failures:
- Putting too many adapters "just in case." The kit becomes chaotic and needed items are harder to find.
- Mixing lengths and types in one package without labeling. Then it becomes a guessing game.
- Not allowing for defects and losses. One broken plug can halt an entire seat.
- Buying cables of random quality without control. They look the same but cause problems during deployment.
- No simple solution for edge cases (distant outlet, different monitor input, a longer extension needed). If rules aren’t set, improvisation begins.
A sign of a weak standard: the warehouse shows "everything is available," but the team leader still brings a separate mixed box.
To avoid on-site arguments, lock short replacement rules. For example: for a different monitor use the selected connection type and one approved adapter; for a distant outlet use a fixed-length extension; replace a damaged cable with a spare from the same batch and immediately mark and return defects; if the situation isn’t covered, one responsible person decides and the rule is added to the standard.
Short checklist for the warehouse and team leader
Warehouse and team leader must check the same things the same way every time. Before issue, verify quantities: there should be exactly as many kits as workplaces plus reserve. A practical rule for mass installs is one spare kit per 10 workstations, but no fewer than 2 spares per site.
A pre-departure quick check:
- Video: required types and lengths, plus 1–2 adapters from the standard set.
- Power: cords, extensions/surge protectors of the right length, spare power cord.
- Consumables: ties, Velcro, labels, spare clips/holders (if used).
- Labeling: identical tags on each cable and on the kit pack (workstation, kit number).
- Tools: minimal set for the team leader (side cutters, marker, outlet tester, screwdriver).
On site, follow this order: lay out kits by workstation, connect devices, tidy and secure leftovers. Pack empty packaging immediately into one bag or box to avoid it ending up underfoot.
After work, record what was returned and what changes the standard needs: unopened kits return to stock, damaged items are written off, missing items noted, any recurring fix added to the standard, and tracking tied to rooms/zones so you don’t later ask "whose cable is this?".
Example: mass workstation install with no downtime
You need to install 50 workstations in a classroom in one day: PC, monitor, keyboard/mouse, network and power. On past jobs the crew lost hours on small things: some monitors had only DP, others needed HDMI, a power cord was missing, and ties ran out mid-row.
Before departure the warehouse assembles and seals kits, one per workstation. The team leader receives not a big mixed box but 50 identical packages and a small reserve.
Which kits cover almost all cases
Usually 2–3 kit types cover 90% of installations:
- Kit A (basic): power for PC and monitor, one video cable per site standard, 2–3 ties, 2–3 labels.
- Kit B (video alternative): same as A but with DisplayPort instead of HDMI.
- Kit C (extended): A or B plus a power extension of the required length.
Fix lengths in advance (for example, 1.8 m as "normal", 3 m as "long") and don’t mix them without labeling.
Reserves and recording deviations
A 5–10% reserve by type saves schedules. For 50 seats that’s 3–5 extra Kit A/B and several "long" cables.
After deployment the team leader logs deviations in a simple journal: what didn’t fit, at which seat, and what was used instead. For example: "seat 12, monitor DP-only, used Kit B instead of A" or "seat 27, outlet far, used Kit C." These notes become standard updates and the next site goes faster.
Next steps: lock the standard and scale it across projects
It’s easiest to lock the standard with a pilot: one site of 20–50 workstations and a single clear kit variant. Include procurement, warehouse and the team leader from the start. Procurement needs repeatable items, the warehouse needs clear assembly and tracking, and the crew needs defined lengths, connectors and packaging logic.
To scale without constant rework, tie kits to typical configurations: "PC + monitor with DP", "PC + HDMI-only monitor", "all-in-one", "dock station seat." Define the minimally sufficient set for each type.
If equipment delivery and deployment happen together, it’s simpler when one contractor owns both: fewer mismatches in kit contents and easier enforcement of a single standard. For example, in Kazakhstan GSE.kz as a manufacturer and systems integrator can supply PCs/workstations and deployment services, and simultaneously fix the same cable kits to typical configurations for all sites.
FAQ
Where do I start standardizing if the warehouse is a "zoo" of cables?
Start by listing the 10–20 most frequent "runs to the store" from past jobs: which cables were missing, which adapters people searched for, which lengths didn’t match. Then reduce this to 2–3 typical kit profiles and approve a single BOM (bill of materials) per workstation.
How many cable lengths should we keep so the warehouse doesn’t bloat?
Normally 2–3 length options cover about 90% of cases, plus one dedicated "long" kit for exceptions. The key is not mixing lengths in the same packaged kit and defining a default length for video, power and network so installers don’t decide on site.
Which is better as a standard: HDMI or DisplayPort?
Choose one baseline according to your typical use and make it a rule; treat the other as a separate kit type rather than relying on adapters. If your fleet is mixed, keep two clearly labeled kit types and issue them by room/zone specification.
Should adapters be included in every kit?
Keep one approved adapter for real legacy cases in the emergency kit, not in every kit. Fewer adapters in the standard box means fewer attempts to "fix" the wrong connection and faster diagnosis on site.
Cable is connected but no picture — what does the standard say to do?
First check the monitor input selection (HDMI1/HDMI2/DP) and reseat the cable fully; DP often has a latch. Remove any adapter and connect directly if possible. If that fails, replace the cable with a known-good one from the team leader’s test kit to avoid wasting time on guesses.
How to standardize power and extension leads so everything powers on at once?
Fix one plug/cable format for typical devices and decide on a single extension/filter type (or ban them) based on site rules. Also set a load rule: the workstation’s total power must be within the extension’s rating, otherwise outages and overheating will repeat across rows.
What must be in the team leader’s emergency kit?
The crew leader should carry a small "fix-now" kit: a couple of the most common power cords, one spare extension/filter and a simple outlet tester. This doesn’t replace the standard but saves the schedule when you run into defects or unusual sockets.
Which small items are worth standardizing and which can be ignored?
Agree on a minimal repeated set that appears in every kit and don’t change it between sites unless there’s a reason. Usually two sizes of cable ties, a pair of reusable Velcro straps, and simple labels are enough.
How to make cable labeling simple and useful rather than "for show"?
Mark both ends of each cable the same way and use a single label format across the project. Good labeling speeds up replacements and fault-finding, and helps return cables to their places after rearrangements or shift changes.
Who should be responsible for kit assembly: our warehouse or the integrator/manufacturer?
It’s easier when one contractor handles both supply and deployment: standards for kits can be fixed in shipping, warehouse assembly and acceptance. For example, GSE.kz as a manufacturer and integrator can tie cable kits to typical workstation configurations and keep them consistent across sites.