Server rack acceptance: checks before installing equipment
Server rack acceptance: what to check for geometry, grounding, PDUs, hot-swap access, labeling and documentation before installing equipment.
What it means to accept a rack as a finished solution
Accepting a server rack is a check not only of the cabinet itself but of everything already installed and prepared for equipment. The idea is simple: you accept a ready workspace for servers, not just “a box with rails.” If you skip this step, problems often surface later when fixes are more costly and time-consuming.
If a rack is treated only as a piece of hardware, risks are easy to miss: overheating from incorrect airflow or blocked paths, unexpected outages due to errors in power and PDUs, and painful servicing if hot-swap components (disks, power supplies) are hard to reach or the door won’t open far enough. Another risk group is safety: missing proper grounding, unsecured cables, and unauthorized access.
A “finished” rack delivery typically includes: the cabinet with doors and locks, installed PDUs and a clear power distribution with redundancy, organized cable routes and entries, a grounding conductor and connection point, basic labeling (power, ports, U positions), and a set of documents. Documents are as important as hardware: power schematics, a list of installed items, certificates, user instructions and maintenance rules.
Acceptance normally involves different roles, and that’s fine. IT checks installability and service access, electricians are responsible for power and grounding checks, the contractor confirms compliance with the project and fixes issues, and security assesses physical access, locks and entry procedures. If the rack and integration are supplied as a single solution (for example, by an integrator like GSE.kz), agree in advance who will record results, who signs the acceptance report and which items are critical before commissioning.
Preparing for checks: documents and tools
Before starting rack acceptance on site, gather a basic document package. Without it you can easily miss things: an extra PDU, the wrong number of outlets, confusion with ports and labels. It’s better to spend 30 minutes matching papers than to redo a rack after servers are installed.
Minimum useful documents:
- Rack plan (U-layout showing heavy devices, shelves, organizers and free slots)
- Bill of materials (cabinet, PDUs, breakers, sensors, fan modules, rails, panels, KVMs, etc.)
- Power diagram (which feed, A/B redundancy, breaker ratings, plug and socket types)
- Port and connection list (which lines come in, what goes to switches and patch panels)
Also prepare a simple toolkit. You don’t need a lab, but at least have items to record measurements and confirm obvious things immediately:
- Tape measure and level (check dimensions, verticality, door gaps)
- Multimeter or tester (power, grounding continuity, voltage presence at sockets)
- Thermometer (quickly assess heat during a test run of fans or PDUs)
- Marker and labels (temporary marking of questionable spots)
- Phone or camera for photos (overview, close-ups of labels, terminals, serial numbers)
Agree on a work window and a sequence for switching power. A common mistake is turning everything on at once. A better sequence is: check feed presence first, then power PDUs A and B in order, then auxiliary devices. If building staff operate breakers, coordinate who and when will switch them.
Record results not verbally but in a clear format: an acceptance report, a prioritized list of findings (critical, can be fixed later), photos tied to items and updates to documentation. That way the equipment installation step will have fewer surprises.
Geometry and mechanics: frame, doors, mounts
Start with the basics: the rack should stand level, not wobble or flex when you push the top slightly. If the project calls for anchoring to floor or wall, confirm it’s done and doesn’t obstruct door opening or cable entries.
Place a level on the top frame and on the mounting rails front and rear. Twisting often appears as uneven door gaps or rails skewing when test-fitting. Check feet: one sunk foot can twist the frame and later cause issues installing units.
Next verify usable capacity. Count free U and compare to the plan, then measure actual depth: is there room for the server, rails and cable bend radius at the rear? A practical test is to place a rail or depth template and ensure rails mount without forcing or improvised spacers.
Doors and side panels must open fully and without binding. Check locks, hinges and gaps, and whether panels can be removed without tools if that’s claimed. After equipment is installed, doors must not hit handles, cable organizers or protruding elements.
Check loading separately: ensure capacity matches the datasheet and plan weight distribution. Heavy UPS units, battery modules and servers are safer installed lower to avoid a top-heavy rack.
Quick pre-mount checklist:
- Stability and correct mounting (anchors as required by the project)
- Level and no frame twist
- Real U count and depth for rails and cables
- Door motion, locks and removable panels
- Load rating per datasheet and heavy items placed low
Grounding: what to check and how to document it
Grounding must be verified before installing servers and switches. It’s essential for personnel safety and equipment protection from interference and faults. If you skip it, it’s hard to trace why a door shocks someone or why there are odd faults.
First locate the main rack grounding point — normally a bolt or terminal on the frame where the PE conductor attaches. The point should be labeled (PE), accessible for maintenance, and the conductor should be of proper gauge and securely fastened.
Then continuity-test PE to every touchable element: frame, doors, side panels, rails, busbars and mounting hardware. Problems often appear where contact passes through paint or via hinges.
Checklist for connections:
- Are tooth lock washers or similar used to bite through paint?
- Is there paint or lacquer under the clamp or contact pad?
- Is the nut tightened properly with no play?
- Is the PE routed neatly without excessive tension around bends?
- Are jumpers present on doors and panels where required by the construction?
Pay attention to racks with painted hinges, removable panels or insulated doors. Visually it can seem there’s contact when electrically there isn’t. The easiest way to catch this is with a continuity tester while opening and closing the door — readings should not fluctuate.
To protect the acceptance process in writing, log what you measured, the instruments used and the values obtained. At minimum record:
- Location of the main PE point and connection method
- Measurement points (frame, door, panel, busbar)
- Continuity results and contact issues
- Photos of problem areas before and after fixes
- Signatures of responsible parties and date
Power and PDUs: components, redundancy, safety
Power checks are done before installing servers. Errors here almost always cause downtime, and fixes are disruptive. At acceptance, ensure PDUs and power feeds match the design and actually allow safe servicing.
First confirm the inventory: how many PDUs are installed, vertical or horizontal, where outlets face and which way plugs will point. A common small issue that becomes big: stock cable lengths don’t reach the desired side, and temporary extenders appear and stay.
Check redundancy. If the design requires A and B feeds, make sure they aren’t two PDUs connected to the same input or breaker. In proper implementation, feeds are on separate breakers (and, if required, separate sources), and PDUs are clearly labeled which is A and which is B.
Minimum checks before signing off:
- Confirm socket types and counts match the plan and that server plugs fit without adapters.
- Ensure A and B go to different breakers (and sources if required) and are labeled accordingly.
- Check protections: breakers, indicators, meters; for “smart” PDUs confirm the network module is present if listed.
- Assess load distribution: one line shouldn’t be overloaded or phases unbalanced (for three-phase power).
- Verify accessibility: switches, breakers and indicators should be visible and reachable without risking contact with adjacent equipment.
Also assess accidental shutoff risk. A PDU’s master switch shouldn’t be in a spot where doors, cables or hands can accidentally hit it during service. A good test is a “service simulation”: open doors, pull rails, route a cable and see if anything catches on power elements.
If the integrator claimed monitoring, ask to show readings (on-screen or in the interface) and record in the report: PDU serial numbers, A/B mapping and list of breakers. That saves hours of troubleshooting after the first incident.
Cable management: neatness and maintainability
Good cabling is judged not by appearance alone but by whether the rack can be serviced without pulling connectors, crushing fiber or cutting fingers on sharp edges. This is one of the most practical acceptance items—cable mistakes quickly turn into downtime.
Check organizers and bend radii first. A cable must not pull on a port even at rest, and there must be no kinks at bends—especially on fiber and thin patch cords. Cable ties should secure without crushing: if the jacket is flattened after tying, that’s a problem.
Power and low-voltage lines should be routed separately. That makes faults easier to locate, reduces interference risk and keeps harnesses manageable for future changes.
Confirm each server has service slack. If a server is on rails it should be pulled forward without tugging cables or removing adjacent patches. A practical test is sliding a representative server to service position and checking that slack is sufficient and nothing snags.
Ensure access to switching points: patch panels, switches and any installed KVM should be serviceable without dismantling half the harness.
Signs of acceptable installation:
- No sharp edges or chafing points
- No over-tightened or twisted ties; harnesses are neat
- Service loops where equipment moves or is removed
- Cables don’t block handles, latches or mounts
- Doors and panels close without pinching cables
Example: placing a switch on top of servers with short patches below often yields patch cords pulled down when a server is slid out. That’s grounds to require rerouting or longer cables and a side organizer before acceptance.
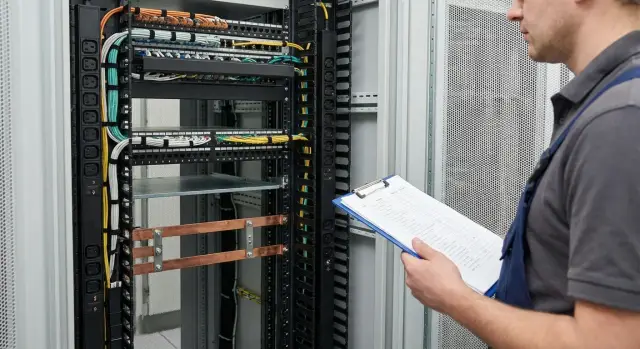
Hot-swap and service access: hands-on checks
This seems trivial until you urgently need to replace a disk or PSU. Don’t judge from photos—test by hand: open doors, release latches, slide rails and extract modules.
Start from the front. Nothing should block disk trays, handles, latch buttons or indicators: not vertical cable channels, stray patch cords, or door features. If the rack has perforated doors, ensure handles and locks don’t interfere with chassis extraction or access to bays.
Then test service access without removing neighbors. A common mistake is a server can be slid out but the hot-swap drive cannot be removed because a PDU, panel or organizer sits too close. For typical 2U–4U servers (including S200-class) drive, PSU and fan access should remain free in normal configuration.
A 10-minute practical check:
- Slide a server fully on its rails and confirm doors and handles don’t obstruct.
- Remove and replace one module (disk or PSU) without uninstalling adjacent equipment.
- Check cable service loops so nothing tightens or pops out of ports.
- Ensure power and network cords have slack and do not rub on edges.
- Note where spare screws, clamps or filler panels are stored — it’s handy when there’s a small labeled kit or container inside the rack.
If any step requires “lift a bit,” “remove temporarily,” or “rearrange later,” log it. These almost always become a costly downtime.
Labeling and documentation: so you don’t hunt later
Good labeling and a clear document set save hours when something needs replacement or tracing. For acceptance they’re as important as power and grounding.
Agree on naming rules first. Labels must match across stickers, diagrams and tables. Usually a simple set suffices: rack name, U positions, PWR-A/PWR-B, ports and cable IDs.
A practical on-site format:
- Rack: RACK-01 (or by room: DC1-R01)
- U numbering: either bottom-to-top or top-to-bottom—pick one and stick to it
- Power: PWR-A and PWR-B plus PDU outlet number
- Ports: SW1-1/24 or another clear format
- Cables: indicate type and purpose (LAN, iDRAC, SAN, MGMT)
Check cable labels by hand. Each cable should be labeled on both ends so markings are readable when bundles are dressed and should survive heat and dust. A label hidden under a tie or under an organizer that can’t be read without dismantling is a defect.
Also request a mapping table: device – U – power (A/B and outlet) – switch port – IP (if already assigned). Spot-check 5–10 lines in the rack. Any mismatch commonly leads to operational errors.
A rack “passport” is useful: list of installed items (PDUs, shelves, rails, fan modules), serial numbers of key parts, warranty data and support contacts. If an integrator assembled the rack, it’s helpful when changes from the project are noted in the passport.
Finally, photo documentation: at minimum take front and rear overviews, close-ups of PDUs with visible outlets and labels, and a photo of the grounding point. These images help reconstruct the setup later.
Step-by-step acceptance: order tasks from simple to critical
Acceptance is easier if you progress from basic items to those affecting safety and downtime. This order helps filter out small issues that later block installation or conflict with warranty obligations.
Start by checking documents and completeness. Match the cabinet, accessories, rails, panels, locks, keys, PDUs, fasteners and datasheets to your specification. If something is missing, stop deeper checks and record the discrepancy.
Then follow a simple flow: mechanics -> safety -> electrical -> maintainability -> documentation. A short route helps ensure nothing is forgotten:
- Completeness and model match: height, depth, load rating, mounting kit
- Geometry and mechanics: level check, door and lock operation, no frame skew, correct floor anchoring
- Grounding: presence of busbars, door and panel jumpers, contact reliability and a clear building earth connection
- Power and PDUs: wiring, A/B redundancy, breakers, cable orientations; then a trial power-up of the empty rack
- Maintainability: cable channels don’t obstruct rails, hot-swap access and controls remain free
After powering, do a simple group calculation: which outlets map to which feed, where load peaks are expected and whether one PDU risks overload if the other fails.
Final acceptance step is documentation: photograph nodes (grounding, power feed, PDU, labeling), collect the list of findings with responsible parties and deadlines, and prepare the report. That protects operations, installers and suppliers—everyone knows what was accepted and what must be fixed before server installation.
Example scenario: accepting a rack before installing servers
The rack is assembled and placed in the room. The plan: install two rack servers, two switches, a UPS and a patch panel, then connect workstations and lines. Before bringing gear in, the technician accepts the rack as a finished solution: mechanics, power, grounding, service access, labeling and documents.
They first check mechanics. The frame is level, front and rear doors close without skew, rails align at the same depth, cage nuts are present and the UPS and servers have proper mounting points. They test empty rails and slide them: nothing snags and there’s room for cables and airflow at the rear.
Next, power and PDUs. The design specified two feeds A and B so servers with dual PSUs can be separated. At acceptance the PDUs are labeled correctly but both are actually on the same feed—easy to miss if you only look at stickers. Another finding: power cord lengths have almost no slack, cables tense when a server is slid out.
Then grounding. The rack has a connection point, but doors and panels do not show continuity. Measurements reveal one door lacks reliable contact. Without a jumper this can cause static shocks or servicing issues.
Finally serviceability: full door opening, hot-swap access to drives and PSUs, the ability to replace fans without removing cable ties. Here tight cabling shows up as a problem.
Corrections are made immediately: power is rewired so A and B come from distinct lines, door and panel grounding jumpers are added, some cords are replaced with longer ones and slack is formed. PDUs and power cables are relabeled to match reality.
An updated power and port diagram, the patch table and grounding test protocol are attached to the rack. If rack and servers are delivered as a combined solution, keep everything in one acceptance package with serial numbers and equipment list.
Quick checklist, common mistakes and next steps
If time is short, still do a brief acceptance before bringing servers in. These 10 minutes often save days of rework.
10-minute checklist
- Stability and geometry: rack stands without skew, anchors tightened, doors and locks operate smoothly.
- Grounding (PE): visible connection, door and panel jumpers present, contact surfaces not painted over, PE point labeled.
- Power A/B and PDUs: inventory matches the plan, feeds are separated A/B, breakers labeled, PDUs secured and not blocking cables.
- Service and hot-swap access: open doors, verify you can remove drive trays, PSUs and fans without hitting organizers or PDUs.
- Labeling and records: U numbers, power and port labels exist; take 6–8 photos (front/rear, PE, PDU, cable entries, key nodes).
Common mistakes usually surface in two areas. First, missing grounding test protocol or a generic building-level test that doesn’t tie to a specific rack. Second, PDU checks reveal project mismatches: wrong sockets, no true A/B separation, or cable lengths so short they tension under service. Another frequent issue is cables installed with no service slack and no clear routing, turning maintenance into full harness disassembly.
How to file findings so they get fixed
- Specify exact location: rack, side (front/rear), U-level and the element.
- Attach a photo with a clear angle and highlight the issue.
- State the required fix (e.g., “move PDU to rear-right rail to free hot-swap access”).
- Request a deadline and a responsible party and a recheck after corrections.
- Indicate whether partial installation may proceed or if the item is a stop-factor.
Next step: agree the U-level installation plan and power-up sequence, then perform a test load (at least verify A/B feeds and run a trial with temperature and power monitoring).
If you want a turnkey package, it’s convenient when one contractor is responsible for hardware and integration. For example, GSE.kz as a manufacturer and systems integrator supplies servers, workstations and racks and performs integration and support. In such projects it’s easier to keep one acceptance package (schematics, serial numbers, measurement protocols) and one point of responsibility for solution compatibility.
FAQ
What does it mean to "accept a server rack as a finished solution" rather than just a cabinet?
Acceptance “as a solution” means you check not only the rack cabinet itself, but that the cabinet is ready for safe installation and maintenance of equipment: power, grounding, cable routes, hot-swap access and a complete set of documents. The idea is simple: you accept a ready workspace for servers, not a collection of hardware that still needs to be prepared for operation.
Which documents are essential for rack acceptance?
At minimum have a U-layout plan, a bill of materials, a power diagram showing A/B feeds and breaker ratings, and a list of ports and incoming lines. Without these documents it’s easy to miss small but critical items—wrong PDU sockets, missing accessories or fake redundancy—and then rework starts after servers are already installed.
What tools are realistically needed to avoid a verbal-only acceptance?
A basic toolkit is enough: a level and tape measure for geometry, a multimeter or tester to verify power presence and PE continuity, a simple thermometer for quick heat checks when powering ventilation or PDUs, and a camera to record serial numbers, labels and problem areas. The key is to back up findings with measurements and photos, not just verbal notes.
How can I quickly tell if the rack’s geometry and mechanics are OK?
Quick checks: the rack should not wobble or rock when pushed. Use a level to confirm the frame is not twisted, doors close without binding, and there’s real depth for rails and cable bend radius at the rear. Geometry issues usually show up later as problems installing rails, doors catching, or lack of space for cable bends.
How do I properly check rack grounding and what counts as a problem?
Find the PE connection point on the frame and verify it’s accessible, labeled and connected with a conductor of the correct cross-section. Then continuity-test PE to any touchable metal parts: frame, doors, side panels, rails, busbars. If readings jump when the door is opened or if contact is through paint only, that’s a problem and must be fixed before installation.
What exactly should be checked in power and PDUs before installing servers?
Verify socket types and counts against the design, and make sure A and B feeds are actually wired to separate breakers—and, if required, to separate sources—not just labeled that way. Check that PDUs don’t obstruct maintenance and that a common switch isn’t placed where it can be hit by doors or cables. If monitoring is claimed, record PDU serial numbers and show that readings are visible in the interface.
How do I know the cable management is done right and the rack will be maintainable?
Practical criteria: cables must be routed so maintenance doesn’t require dismantling harnesses or risk pulling connectors. Check bend radii, absence of chafing, separation of power and low-voltage runs, and then slide a typical server to service position to confirm there’s enough slack in power and data cables. Anything that tensions connectors during service must be corrected now.
How to check hot-swap and service access so I don’t get downtime later?
Do the hands-on test: open doors fully, slide a server out on its rails and try to remove and replace a hot-swap module without moving neighboring equipment. Common hidden problems are hot-swap access blocked by vertical organizers, PDUs placed too close, or cords that are too short. Anything that requires “temporarily removing” another element should be logged as a finding.
What labeling and documentation is really useful in operation?
Use consistent naming across labels, diagrams and tables. Typical format is enough: rack name, U numbers, PWR-A/PWR-B and PDU outlet numbers, and port IDs. Labels should be on both ends of the cable, readable without disassembling the bundle, and durable against heat and dust. Also request a device-to-U-to-power-to-port table and spot-check 5–10 rows against the actual rack.
How do I file acceptance remarks so they actually get fixed?
When documenting findings, specify the exact location: rack, side (front/rear), U position and the element. Add a photo with a clear angle and state the required fix (for example: “move PDU to rear-right rail to free hot-swap access”). Ask for a deadline and a responsible party, and note whether partial installation may proceed before the fix or if the item is a stop-factor.