Secure equipment decommissioning: how to destroy data on drives
Secure equipment decommissioning: methods for sanitizing and physically destroying disks, which acts to prepare, who is responsible and the most common mistakes.
What “secure decommissioning” means
Securely decommissioning equipment means taking a device out of service so that no accessible data remain on it, and the process is verifiable and documented. It is not just “delete files” but a controlled procedure: inventory of media, choice of sanitization method, validation of the result and proper paperwork.
Files remain on drives even after deletion because the system usually removes only the pointer to the data. The contents of memory blocks can persist until overwritten. Devices also often contain hidden recovery partitions, caches, temporary files and application data: mail archives, browser profiles, messengers. That is why “empty the recycle bin” or “reset Windows” is not equivalent to secure data destruction.
Risks when selling, handing to a contractor or disposing without sanitization are tangible and costly: leaks of personal data of employees and clients, exposure of contracts and correspondence, compromise of accounts, fines and regulator attention. Sometimes this leads to downtime after an incident. There is also reputational damage: stories about “a disk with a client database sold at a flea market” last for years.
This is especially critical for organizations handling regulated or highly sensitive data: government bodies, finance, healthcare, education, and companies with trade secrets (procurement, manufacturing, R&D). In Kazakhstan there is a practical nuance: equipment often moves between departments and contractors, and without strict rules it’s easy to lose track of where a storage device ended up.
Most problems during secure decommissioning arise from simple mistakes: assuming formatting or reinstalling the OS is enough; forgetting about additional media (second disks, SSDs in laptops, memory cards); handing equipment “as is” to a warehouse or contractor without recording serial numbers; not verifying the result and not keeping proof; or completing paperwork retroactively when it’s impossible to reconstruct the chain of responsibility.
Imagine a scenario: an accounting PC is sent “for parts,” but scans of IDs and payment registers remain on the drive. Formally the device is decommissioned, but in reality the data left with the hardware. Secure decommissioning prevents such cases: information is destroyed before equipment leaves organizational control.
Preparation: what media exist and what data is on them
The process starts not with “delete files” but with understanding exactly what you are handing over and where data actually lives. Leaks most often occur because a media item was missed or its contents were underestimated.
Begin by inventorying the devices to be decommissioned and their components. Consider not only the desktop or server chassis but what’s inside: individual drives, additional storage modules, sometimes removable modules. This is especially relevant if you have desktops, workstations and rack servers at the same time.
Then record types of media that may appear in the decommission batch: HDD, SSD/NVMe (including M.2), USB flash drives and external disks, memory cards, and built-in storage in specific devices (for example, some all-in-ones, terminals, network equipment).
Next, note the categories of data that might be on each device. In finance it’s financial documents and credentials; in HR — personal data; in a clinic — medical records; in a bank — client data and transaction logs. Government organizations may have access-restricted data and those should be handled with the strictest approach from the start.
Assess not only “files on the desktop” but hidden traces as well: 1C databases, mail archives, browser cache, update files, backups, logs, and sometimes access keys, tokens and VPN configurations.
At this stage decide for each media whether it will be sanitized for reuse or slated for destruction. If equipment is being sold, outsourced, donated or disposed of without return, it is often safer to destroy the media. If the device stays in the company (for example, moved between branches), plan a sanitization with validation.
Immediately assign responsibilities and formalize the internal procedure. The minimal set of roles is usually: IT identifies media and selects the method, security defines requirements by data category, and accounting or the custodian controls the decommissioning in asset records. If an integrator or service partner handles equipment, clarify in advance who records operations so you don’t have to reconstruct events later from memory.
HDD and SSD: why sanitization methods differ
The same command “erase disk” yields different results on HDD and SSD. If you choose the wrong approach, data can remain in hidden areas while reports state the disk was “cleared” only on paper. For secure decommissioning this is one of the main pitfalls.
HDD: overwriting works but needs verification
HDD stores data on magnetic platters. When the entire volume is overwritten, old blocks are typically replaced by new ones, so full overwriting (one or multiple passes) often suits HDDs. But two conditions matter.
First — the overwrite must cover the entire disk, including recovery partitions and free space. Second — you need to verify the result: utility logs, recording the disk’s serial number and final status, and checking at least a sample of data. Without that you can easily miss a disk with read errors or faulty sectors.
SSD and NVMe: overwriting often doesn’t guarantee erasure
SSDs work differently. The controller distributes writes across cells (wear leveling), reserves part of memory for over-provisioning, and may remap data from failing blocks to others. Therefore, ordinary overwrites or even writing across the whole disk sometimes do not affect areas where old data physically resided. Commands like TRIM often mark blocks as free but don’t always erase them immediately.
For SSDs use controller-native procedures (Secure Erase, Sanitize) or cryptographic erase when supported. If the drive is damaged, not recognized, or your risk requirements are strict (for example, in finance or healthcare), plan physical destruction of the media.
Self-encrypting drives (SED) are a special case. If encryption was actually enabled and the key resides on the drive, crypto erase (changing or removing the key) can quickly render the data unreadable. However, this must be validated: “supported by the specs” does not mean “enabled.”
Practical rules boil down to:
- HDD: overwriting is acceptable, but always perform verification and keep a report.
- SSD/NVMe: prefer Secure Erase/Sanitize or crypto erase (for SEDs).
- Faulty media: move immediately to physical destruction.
- Reporting: tie the result to serial number, model and method.
And don’t forget about the broader perimeter of storage. Besides drives in PCs and servers (including workstations and racks), include removable USB media and external disks, memory cards in cameras and terminals, smartphones and tablets, second SSDs in older laptops, and devices with embedded storage (for example, some printers/MFPs and mini-servers).
Main methods for sanitizing and destroying data
To securely decommission equipment you must choose a method suitable for the specific media and your risk level. Sometimes it’s cheaper and safer to destroy the media physically than to attempt an “ideal” erase that covers all edge cases.
Logical wipe
This is overwriting the media with verification. For standard office HDDs this method often suffices if a trusted tool is used, the correct overwrite mode is set and the result is recorded.
Don’t confuse a wipe with a quick format. Formatting most often only resets the directory structure while data remains recoverable.
Cryptographic erase, Secure Erase and controller commands
There are methods executed by the drive’s electronics that are usually faster than full overwrites.
Crypto erase: if the drive was encrypted, destroying the encryption key is sufficient. It’s fast but you must confirm encryption was actually enabled and the key is not recoverable.
Secure Erase (ATA) / Sanitize (NVMe): controller-level commands that clear memory in the drive’s recommended way. After execution check operation status and perform control checks (for example, read random blocks).
If your organization has a standard (for example, for a government body, bank or medical facility), record in the regulation what commands are run, by whom and how the result is confirmed.
Degaussing and physical destruction
Degaussing works only for magnetic media (HDD, tape). It is useless for SSDs. Also, a degaussed HDD is usually unusable afterward and should be accounted for accordingly.
Physical destruction is the clearest option when risk is high: media containing personal data, financial databases, access-restricted information, or when you cannot guarantee a proper erase. Common methods include shredding, crushing, puncturing HDD platters or destroying memory chips in SSDs.
To make the method acceptable during audits, decide beforehand what you will record: serial number and media type (HDD/SSD/NVMe), chosen method (wipe, Secure Erase, crypto erase, destruction), date, executor, equipment used, verification result or mark of physical destruction, and where proof is stored (logs, photos, act).
Step-by-step process: how to organize sanitization in practice
An organized process matters more than a single “perfect” method. When steps are repeatable and recorded, leakage risk drops and accounting and security have fewer questions.
Step 1. Inventory: what exactly you will sanitize
Start with an asset list. Record serial numbers of the device and, if possible, of each media (disk, SSD, separate drives in a server). Note model, capacity and where the equipment was located (office, rack, department). This prevents mixing a cleaned and an unclean disk, especially when decommissioning in batches.
Step 2. Choose a method: by media type and data sensitivity
Decide for each media whether to sanitize with validation or to destroy it. The choice depends on the storage type (HDD or SSD) and the sensitivity level of the data (personal data, financial, medical, procurement).
A practical guideline: for reuse — software sanitization with verification; for critical data or when the disk won’t be needed — physical destruction. For servers, consider RAID and hot spares separately: an overlooked hot spare is a common weak point.
Step 3. Execution: controlled area and clear roles
Perform sanitization or destruction in a controlled area: restricted access, minimal movements of media, and a clear log. Assign an operator (who performs) and a controller (who verifies). If equipment goes to an external service, define the transfer chain and proof format in advance.
Step 4. Validate the result: per company rules
Validation should not be “by eye.” At minimum record the procedure outcome and ensure all serial numbers were processed. Internal rules may call for spot checks (for example, 10–20% of media in a batch) or full verification for critical categories. Consistent criteria are essential.
Step 5. Documents and proper flows: reuse or disposal
After sanitization the media must be sent to the correct flow. If a disk is reused, label it as sanitized and store it separately from unprocessed items. If it goes to disposal, package and transfer it with acts so media are not “lost.”
Simple storage zones help: “to sanitize,” “sanitized,” and “for destruction/disposal.” When decommissioning many PCs or servers, such discipline often provides more security than rare complex procedures.
Documents: which acts and records are needed
If data are erased correctly but there is no proof, during audits or investigations it is almost the same as doing nothing. Documents show that secure decommissioning followed the rules and responsibilities were assigned.
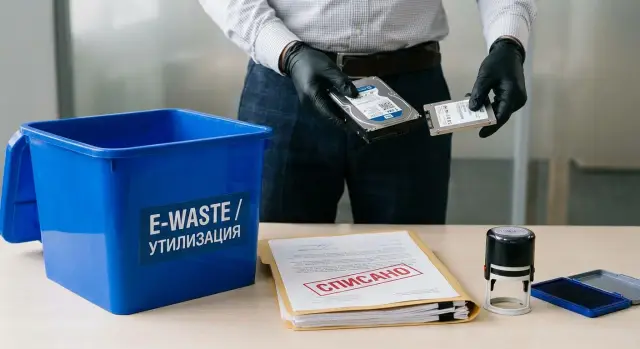
Decommissioning act
This act records the decision to retire equipment and lists what is being decommissioned. Typically it states the device type (PC, server, all-in-one), inventory and serial numbers, owning department, reason for decommissioning and the component list.
List drives separately even if they are internal. For servers it’s useful to specify drive trays and quantities to avoid later discovering that an SSD went to disposal “without a trace.”
Act of transfer to disposal
When a batch is handed to a contractor or an internal disposal area, a document confirming transfer and the batch composition is needed: date, location, responsible person from the organization, receiving party and a list of items with identifiers.
You can add a batch number and sealing (tamper-evident seal, packaging) if media are transported. This reduces the risk of swapping drives between warehouse and recycler.
Act of data destruction or sanitization
This is the key information security document. It is required for both software sanitization and physical destruction.
The act should indicate which media were processed (type, model, serial number, capacity); where they came from (device, inventory number); the method (software wipe, crypto erase, shredding); date and time, executor and verifier; the result (successful/failed) and utility report number if available.
Media registry and storage of evidence
A registry maintains the chain: who took a disk, where it was sent, when it was wiped and where it is stored before disposal. Records may be paper or electronic but must be immutable and clear.
Store acts, utility reports and recycler confirmations centrally (for example, with security or accounting) with unified access rules. Define retention periods in internal regulations tied to industry and contractual requirements. Most important are proofs for media that held personal, financial or trade-secret data.
Typical disposal mistakes and how to avoid them
A common issue is treating sanitization as a single quick step. Errors usually occur at the intersection of IT, accounting and contractors, when each party assumes “someone else already handled it.”
Where mistakes most often happen
A first trap is sanitizing only the “C: drive” and stopping there. A PC may have a second physical drive, hidden recovery partitions or a separate data partition. On servers the risk is greater: RAID arrays, logging drives, caches, and virtual machine storage.
Second mistake — formatting instead of destroying data. Quick formatting and OS reinstall rarely mean data are gone.
Third problem — applying HDD methods to SSDs. Overwriting like on HDDs may not affect all cells due to controller behavior. A report that “overwrite succeeded” can create a false sense of security.
Fourth — lost custody chain. Between decommissioning and actual disposal media often travel through warehouses, offices and vehicles. If it’s unclear where a drive was and who was responsible, secure decommissioning becomes risky even if the method was correct.
Fifth — missing evidence. Without acts, logs, serial numbers and procedure results you cannot prove data destruction.
Another simple but dangerous situation: mixing sanitized and unsanitized media in the same container. After that it’s impossible to distinguish clean from dirty and the whole effort loses value.
How to safeguard the process
Discipline, not heroics, helps.
First inventory every media on the device (physical drives, partitions, removable media, server modules) before work begins. Then use the correct method for each media type: for SSDs employ Secure Erase or crypto erase, not just multiple overwrites. After that assign responsibilities and record transfers: who removed the disk, who stored it, who delivered it for destruction.
Always separate flows: label sanitized media and store them separately from unsanitized ones. Preserve evidence: serial number, date, method, result, signatures, and if necessary an utility report or destruction certificate.
A real-life example: a school decommissions 20 PCs, and in two of them a second disk contains teaching materials. If only the system partition is wiped and then all disks are placed in one box “for disposal,” those two drives commonly become the source of a leak. Checking configurations and keeping serial-number records removes such surprises.
Quick checklist before handing equipment for decommissioning
Before equipment leaves storage or the server room, run a short check. It takes 10–15 minutes per batch but often prevents leaks and disputes about who did what and when.
First ensure you found all possible data locations. Besides HDDs and SSDs in PCs and servers, consider removable media (USB sticks, external disks, memory cards), second drives in desktops and laptops, storage modules in workstations and server trays, drives in old printers/MFPs and network devices (if they have storage), and backup drives kept in safes or drawers “just in case.”
Next split equipment into two groups: those safe to reuse and those that must be destroyed. For example, PCs for a training class can remain in circulation if data are correctly sanitized and proof exists. Drives from systems with personal data or financial databases are often simpler and safer to destroy physically if the device history isn’t certain.
Check that the sanitization method matches the media type. For HDDs prefer overwriting; for SSDs remember controller specifics and that simple multi-pass overwrites may not suffice. If in doubt, choose a method that gives a verifiable result and matches your risk appetite.
Before transfer assign responsible persons and check documents: who initiated decommissioning, who performs sanitization, who accepts the result. This prevents chaos and situations where a disk is already taken while the act is still “in progress.”
Separate storage flows so devices are not mixed:
- Zone “before sanitization” (access by list, sealed boxes);
- Zone “after sanitization” (labelled and dated, awaiting transfer);
- Zone “for destruction” (separate, controlled issuance).
Finally perform a spot check and record the result. For example, inspect 1–2 devices from the batch to confirm the disk is empty and the old OS or files are inaccessible. In the act or registry note the method, date, serial numbers and who verified.
Example scenario: decommissioning a fleet of PCs and a few servers
An organization decommissions 50 office PCs and 5 servers. The goal is simple: keep accurate records and not expose client data, correspondence, accounting or passwords often stored in browsers and user profiles.
First the batch is split: 20 PCs will be reassigned to a training class, the remaining 30 PCs and all 5 servers go to disposal. Reassigned devices must remain operational after sanitization. For disposal, harsher measures up to physical destruction are acceptable.
Then inventory media rather than just chassis. Each PC may have an SSD; servers may have multiple drives in RAID trays. Often a mix appears: some HDDs, SATA SSDs and NVMe drives.
A short operational scheme:
- Assign a responsible person and compile a registry: device, serial number, media type (HDD/SSD), capacity and location.
- Mark status: “for reassignment” or “for disposal,” and decide the processing method.
- For HDDs intended for reuse choose software wipe with verification.
- For SSDs prefer Secure Erase/crypto erase when supported.
- For high-risk disposal plan physical destruction.
- Record the outcome: who performed the work, when, method used, and results.
While work is ongoing control access. Store drives and servers in a separate room or safe, enforce access by list, issue items under signature, and use seals or unique labels. This reduces the chance of a single missing drive becoming an audit issue.
Prepare a document package understandable to both internal security and external auditors: decommissioning act and act of transfer for disposal (per your accounting form), a registry of media with serial numbers and method marks, act of destruction/sanitization with dates, responsible persons and verification results, custody and transfer logs (chain of custody), and when working with a contractor — their confirming documents (protocols, certificates, batch labeling).
This scenario turns secure decommissioning into a managed process: from inventorying media to closing acts.
FAQ
What does “securely decommission equipment” mean versus just deleting files?
Secure means **data is guaranteed to be inaccessible** and the process can be proven with documents. Minimum includes: - inventory of all storage media (including secondary drives and removable media); - the correct method for the media type (HDD/SSD); - validation of the result; - acts/logbook tied to serial numbers.
Why is emptying the recycle bin, formatting or “resetting Windows” not enough?
Because deletion usually removes only the pointer to data, while the blocks remain until overwritten. Also, often remain: - hidden recovery partitions; - cache and temporary files; - mail archives, browser profiles and messenger data; - logs, backups and configurations (including tokens/VPN).
What should I check before decommissioning to know which media need processing?
Start with a list of **all storage media**, not only the computer case: - HDD, SSD/NVMe (including M.2) in PCs/laptops/servers; - disks in RAID and hot spares in servers; - USB flash drives and external disks; - memory cards; - built-in storage in devices (some all-in-ones, terminals, network gear, sometimes MFPs). Then link each media item to the device and its serial number in the registry.
When to wipe a disk and when to destroy it physically?
A practical rule: the more sensitive the data and the less you need the disk, the more you should lean toward physical destruction. - For **internal reuse** a verified software wipe is usually acceptable. - For **sale/transfer outside/irretrievable disposal** it's often safer to physically destroy the media. - If the disk is **faulty** or not detectable — plan for physical destruction (a correct erase may be impossible).
How to properly wipe an HDD before decommissioning?
For HDDs, overwriting generally works if two conditions are met: - the **entire capacity** is overwritten (including free space and recovery partitions); - there is **proof**: utility logs, serial number and verification result. Without verification it's easy to miss a disk with read errors or to process the wrong media.
Why isn’t multiple overwriting sufficient for SSDs/NVMe?
SSDs behave differently: the controller spreads writes across cells (wear leveling), there are hidden areas (over-provisioning) and remapped blocks. So conventional multi-pass overwrites may **not affect** regions where old data physically resided. Common approaches: - **Secure Erase / Sanitize** (controller commands); - **crypto erase** for self-encrypting drives, if encryption was actually enabled; - physical destruction if the drive is damaged or requirements are strict.
Which data destruction methods are commonly used and how do they differ?
The common methods are: - **Logical wipe**: overwrite + verification (usually for HDDs when reusing); - **Secure Erase (ATA) / Sanitize (NVMe)**: controller-based erase (often best for SSDs); - **Cryptographic erase (crypto erase)**: destroy or change the key if the drive was encrypted; - **Degauss**: demagnetization for magnetic media (HDD/tape) only, not effective for SSDs; - **Physical destruction**: shredding/crushing/plate destruction for HDDs or chip destruction for SSDs. Choose a method that can be documented in the act.
What is the step-by-step process for secure decommissioning to avoid mistakes?
A minimal reproducible process: 1. **Inventory**: registry of devices and every storage medium with serial numbers. 2. **Select method** according to HDD/SSD and data sensitivity. 3. **Execute in a controlled area**: clear roles, minimal movements. 4. **Verify the result**: reconcile against the registry + log/verification note. 5. **Separate flows**: “for wipe”, “wiped”, “for destruction” so media don’t get mixed. This reduces the chance that a disk is “lost” between warehouse and disposal.
Which documents are needed to prove data was actually destroyed?
You need a package of documents proving both decommissioning and data destruction: - **Decommissioning act** (what is retired from service); - **Act of transfer to disposal** (what, to whom and when, with a list); - **Act of data wipe/destruction** tied to the media (type, model, serial number, method, date, executor and verifier, result); - **Log of custody/chain of transfer** (who stored and moved the media); - **Evidence** (utility logs, verification notes; for physical destruction — record of destruction). The key is linking the result to the specific serial number.
What common mistakes during disposal lead to leaks and how to avoid them?
Typical failures come from organizational gaps: - only wiping drive C: and forgetting a second drive or hidden partitions; - formatting or reinstalling OS instead of destroying data; - using an HDD method on SSDs (overwrites without Secure Erase/Sanitize); - overlooking RAID/hot spare drives in servers; - losing the custody chain (media moving between rooms and warehouses); - mixing wiped and unwiped media in one container; - missing logs/acts and serial numbers. Best remedies: a media registry + separated storage zones + mandatory evidence for each drive.