SAT on-site equipment acceptance: a 10–15 minute procedure
SAT on-site acceptance catches defects immediately at the delivery site. A 10–15 minute procedure, checklist and rules for recording issues so they don’t carry over into operation.
Why SAT matters and why out-of-the-box checks solve problems
SAT on-site equipment acceptance is a short check at the customer's location. It confirms a simple fact: what was delivered is what was ordered, and the equipment looks and behaves as operational. No deep tests or lengthy configuration, but a clear record of the result.
The point of an out-of-the-box check is to catch problems before the equipment goes into service. Once a server is racked, a PC is handed to a user, or a system is connected to the network, any small issue turns into a chain of events: downtime, urgent tickets, blame, removal and re-delivery.
A standard document check answers "what was delivered on paper." SAT answers "what was actually delivered and can we work with it." On paper everything may be perfect: quantities match, items are the same. But the box may be dented, seals broken, parts missing, the serial number wrong, or the device may fail to start at first power-on.
If a defect is not recorded immediately, the risks are almost always the same:
- The supplier may claim the damage occurred after delivery.
- A warranty case becomes disputable without initial evidence.
- Project timelines slip because replacement or repair starts later.
- The operations team inherits a problem that’s hard to roll back without downtime.
- Costs appear for repeated work: moving, removal, reconfiguration.
Real example: a batch of workstations arrives and one unit won’t power on. If caught at SAT, the unit is immediately replaced and the rest are put into service. If noticed a week later, after software and accounts are set up on the PCs, you lose time migrating data and troubleshooting.
For commonly supplied equipment (PCs, all-in-ones, servers), a quick SAT is especially useful: it gives clarity to the customer, the integrator and the supplier about the condition of the hardware that changed hands.
Preparation before opening: documents, roles and place
To keep SAT calm, start with preparation, not boxes. These 5–10 minutes often save hours of disputes and emails: you immediately record what arrived, who is responsible for what, and where it can be checked properly.
What to have on hand
Collect documents and data before the vehicle arrives or before unloading, while all participants are present and access to the warehouse is unrestricted:
- delivery note and/or UPD, contract specification, item completeness by position
- warranty terms, RMA/return rules, notification deadlines for discrepancies
- contact details of responsible persons from the customer, warehouse, IT, supplier or integrator
- list of sites and rooms where entry and opening are allowed
- tools and consumables: marker, stickers, clean bags for small parts, gloves, phone charged for photos
Agree in advance where the "reference" specification is stored: a printout or a file. There should be no "version will come later" situation on site.
Who participates and who decides
Appoint one person who will make decisions on disputed points and sign off on recorded remarks. Others assist but should not derail the process.
Typical roles:
- the customer (asset owner) confirms supply matches the order
- IT specialist verifies models, configurations, ports, seals, serial numbers
- warehouse or materiel-responsible person accepts quantity, packaging and delivery conditions
- integrator or supplier comments on completeness and helps with replacement
- security or access control (if required) handles admission and photo rules
The unpacking area should be clean, well lit and have a flat surface. There must be a possibility to take clear photos of serial numbers and damages — not in a corridor or outside.
Simple care rules: do not tear boxes, preserve seals and labels, and keep packaging until acceptance is complete. Use a knife carefully to avoid cutting cables or scratching the case. If the equipment is for racks or a server room, check in advance that there is space for temporary placement and that access is agreed.
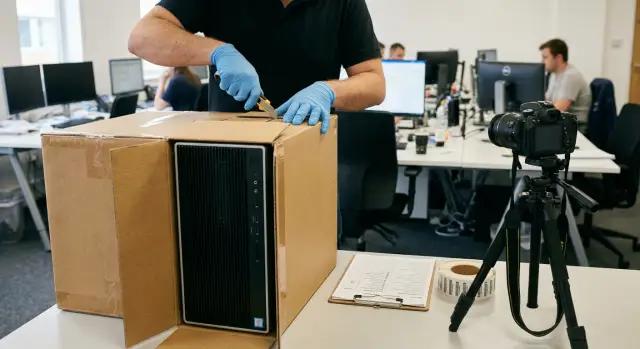
A 10–15 minute out-of-the-box SAT scenario: step by step
This mini-SAT aims to filter out obvious problems before equipment goes into mounting, configuration and operation. It can be done at the receiving location even when it’s noisy and time is limited.
Timebox: 10–15 minutes per unit
-
Do not open the box immediately. Inspect the packaging all around: punctures, signs of moisture, crushed corners, re-taped seams, damaged seals. If you suspect an issue, stop and record the condition before unpacking.
-
Match the markings on the box with the delivery documents: model, configuration (if listed), number of items, part number, serial number. It’s important to tie each box to a specific position on the delivery note, especially when similar PCs, all-in-ones or servers arrive.
-
Carefully unpack and perform a quick visual inspection of the unit. Check the case for cracks and dents, integrity of connectors and ports, absence of play and misalignment. For all-in-ones or devices with a screen, check for chips, scratches and cracks. For servers and rack hardware, check rails, ears and fasteners.
-
Verify completeness: power supply, cables, rails and fasteners (if expected), accessories, quick documentation. A common situation: the device works but the power cable or mounting hardware is missing, so installation stops on the spot.
-
Do a short power-on. Apply power, confirm that indicators behave normally, there is no smell of burning, no unusual noises, and no error messages. Enter BIOS/UEFI: the device should be detected, date and time reasonable, and no obvious warnings. Save deep tests for an extended SAT — the goal here is different.
-
Record the result for each unit. Minimum to log immediately:
- serial number and model (with a photo of the label)
- status: accepted without remarks or with remarks
- brief description of the defect and where it was found
- photo before opening (if there was packaging damage) and a photo of the defect
- who was present during the check and the time of the check
If there are remarks, do not move the unit further along the chain (to the rack, a workstation, or the operations warehouse) until they are resolved. The point of SAT is to avoid hiding problems under subsequent stages.
What counts as a defect or non-conformity: avoid arguments on site
Agree terms in advance. On site people usually argue not about facts but about words: is it a "defect", "transport damage" or "wrong item". If categories are clear to everyone, decisions are faster.
Defect vs non-conformity: a simple boundary
Defect — a problem with the condition or functionality of a specific specimen.
Non-conformity — a mismatch with the delivery documents or specification, even if the device powers on and appears normal.
In practice it helps to keep a few typical groups in mind that almost always justify a remark:
- external damage to the case and connectors (dents, cracks, impact marks, misaligned ports)
- signs of opening or prior use (broken seals, stripped screws, unexplained service stickers, dust)
- power-on problems (won’t start, no display, unusual noises, smell)
- startup errors (BIOS/UEFI messages, storage failures, incorrect memory detection, boot loops)
- completeness and conformity (missing cables/PSU/mounting or a different model, configuration, marking)
What matters in “borderline” cases
If a device powers on but shows a startup warning, this is not a "minor issue." Such a signal often becomes downtime after deployment. The same goes for completeness: missing one cable can stop rack mounting or setting up a workstation.
Useful rule: anything affecting safety, warranty, installation, or the ability to reproduce configuration per documents is a non-conformity and should be recorded.
Example: a workstation powers on, but BIOS shows a disk with smaller capacity than specified and the box has a different part number. Even without full testing, this is a non-conformity to resolve before handing to operations.
Rules for documenting defects: photos, serials and a remark report
Any remark must be tied to a specific unit and supported by facts. A note like "scratched" without a serial and photo almost always ends in dispute.
First record identification: serial number from the nameplate, model and link to the documents (position in the delivery note or spec). If the customer has an inventory tag, note it too. For batches of identical devices this is critical: otherwise you can’t prove the defect belonged to that exact unit.
Take photos using a simple scheme so they are hard to dispute:
- overall shot of the device in the inspection location
- close-up of the defect
- separate shot of the nameplate or serial number
- packaging showing corners, seals and impact marks (if any)
- laid-out kit to show completeness (if the question is missing parts)
Write descriptions in plain language and avoid guessing causes. Not "damaged in transit" but "dent on right side of chassis, 3 cm, scratch nearby." For power issues record symptoms: "power applied, indicator does not light, fans do not start." For non-conformities specify what differs from the spec: model, disk capacity, screen type, number of drives.
It’s helpful to categorize remarks immediately: damage, missing parts, non-conformity, won’t power on or self-test failure. This makes it faster to decide what can be accepted with caveats and what cannot go into service.
Fill the remark report or sheet during the check while everyone is present. Minimum: date and time, place, who was present, conditions (e.g. "check without rack installation", "powered from temporary line"). Each entry should reference photos (file names) and serial numbers. Collect signatures on site if possible before dispersing.
Do not discard or mix anything until the issue is resolved. Keep packaging, seals and the full kit separate for each unit. Example: a server has a bent rail. If rails are piled into a common box, an hour later it’s hard to prove which server they belonged to.
How to interact with supplier and integrator when issues are found
The goal when an issue is found at SAT is to stop it before commissioning and record facts so there is no "he said, she said." Agree in advance who decides on site and what statuses are possible: accept with reservations, postpone acceptance, request replacement, send for diagnostics.
A simple scheme usually works best: one responsible person from the customer, one from the supplier, and one from the integrator. All communications go into a single agreed channel and response times are pre-agreed. Otherwise you waste hours on parallel threads and ping-ponging the question.
What to send immediately so they believe you
Suppliers typically ask for the same set of evidence. It’s simpler to collect it in one message:
- serial number and model from the nameplate, plus delivery or spec position
- 3–5 photos: overall view, nameplate, packaging, the damage or screen error
- short video (up to 30 seconds) if the problem appears during operation (noise, reboots)
- symptom description: what was done, what was expected, what happened and at which step
- conditions: how items were stored, who opened them, how they were connected (power, cables)
This is usually enough to start RMA, replacement or an engineer visit without unnecessary questions.
How to divide responsibilities without conflict
On site it’s important to separate product defects from the consequences of handling. Roughly: logistics and package integrity before handover, storage on site, mounting and cabling, initial power-on and basic checks.
If the integrator did installation and connection, record that in the report: who powered on, which cables were used, whether a UPS was present.
Example: a server won’t start at SAT and the power LED blinks. You photograph the nameplate and packaging, record a short video showing the connection to the outlet and the button response. In the report you note: the integrator’s engineer connected power, supply from the mains line, no additional devices. The supplier sees the context and more quickly decides: replace the PSU, send diagnostics or provide a loan unit.
To save time, agree a SAT report template in advance: fields for serials, photos, test steps, status (accepted, accepted with reservations, rejected) and who is responsible for the next step.
Typical SAT mistakes and how to avoid them
The most costly problems start from small slips: failing to take a couple of photos, not recording serials, throwing away seals. Then it’s unclear whether the defect occurred in transit, at the warehouse or on site.
A common mistake is opening boxes immediately without documenting the packaging. If there are dents, tears or signs of opening, photograph them before and after opening, and separately document the internal protection and arrangement.
Second problem — loss of completeness. When multiple boxes are opened, cables, PSUs, fasteners and documents often get mixed. Simple rule helps: one box — one table (or one dedicated area); place accessories next to the box and do not move them until the checklist is filled.
Third mistake — checking only quantities but not verifying that the items match what was ordered. Similar models can differ in configuration, ports or revision. Compare the model and serial on the unit with the documents and the box label. This is especially important for batches of servers, PCs and all-in-ones.
Another risk is starting full installation or commissioning before closing remarks. After mounting and network connection it’s harder to argue: someone may say the device was damaged during installation. Correct order:
- record remarks tied to serial numbers
- agree status: replacement, repair, completion
- only then proceed to installation and commissioning
Finally, it’s useless to record a defect in words without evidence. The phrase "won’t power on" without photo/video, test conditions and serial number is nearly worthless.
If you perform acceptance with an integrator or manufacturer (for example, in projects with equipment from GSE.kz), agree in advance who is responsible for photos, serials and filling the report. When roles are clear, there are fewer errors.
Quick on-site checklist: 2 minutes so you don’t forget anything
This mini-checklist helps when time is short but fixing a mistake later takes long. Use it per unit before you sign documents and send equipment to installation or users.
Simple rule: inspect one device at a time and log the result immediately. If 20 identical PCs arrive don’t assume "the first was OK so all are OK."
1) Box and labeling (30–40 seconds)
- Packaging intact: no tears, severe dents, moisture marks, or messy re-taping.
- Seals and factory stickers are in place, no signs of opening.
- Model and quantity match the specification.
- Serial number and markings on the box and device are readable and match.
- If transport indicators (shock/tilt) are present, check their state.
Practice: if the bottom of the box is wet, don’t power on the device "just in case." Record and agree status with the supplier first.
2) Kit, visual check and power-on (60–90 seconds)
- Completeness: PSU, cables, mounting hardware, documentation and declared accessories.
- Case inspection: no cracks, chips, misalignments, bent grills, or damaged connectors.
- If there’s a screen (all-in-one): no cracks or pressure marks.
- Quick start: device powers on, display or indicators appear, no critical errors.
- If you hear abnormal sounds (crack, heavy fan scraping) stop and investigate.
3) Record the result (10–20 seconds)
For each unit take 2–3 photos (box, nameplate/serial, close-up of defect) and a short note: "unit №, serial, status: ok/remark, what exactly." It takes minutes but saves days of disputes.
Example on a customer site: what SAT looks like in practice
Delivery: 30 PCs and 30 monitors for a school computer lab. Machines arrive boxed on pallets, some assembled, some separate. On site are the storekeeper, IT responsible and a supplier or integrator rep.
They organize the space: a table by the entrance for unpacking and inspection, and a separate quarantine area (2–3 sq. m.). Place markers: "CHECKED", "QUARANTINE", "REJECTED" so acceptance doesn’t turn into arguing at the door.
Order of work is simple: take one box, inspect, record the result, move to the next. Don’t mix boxes, and do not discard film and stickers until acceptance is complete so you can trace the batch and position.
How 10–15 minutes per unit go in real pace
Open the box, verify model and kit against the delivery note: system unit/monitor, power and video cable (HDMI/DP), documents. Record the serial and apply a "CHECKED" sticker.
Then check off the table: visual inspection, then power on at the table. The monitor should show an image; the PC should at least reach a boot or initial setup screen.
In this delivery they found three common issues:
- one monitor had a bent HDMI connector (cable won’t latch)
- one box was missing the power cable
- one PC would not boot: fans spin but no display and error LED stays on
How they document defects so they don’t go into operation
Rule: one problem — one line in the remarks log (or spreadsheet) and at least two photos. The line includes: date/time, place (class/warehouse), delivery position, model, serial number, how it manifests and who found it.
Photos: first — overall view with a sticker or box showing the serial; second — close-up of the defect or screen/indicator during power-on. If missing parts, photograph the box and what’s missing.
After recording, the faulty unit is moved to "QUARANTINE" and not repaired on site. Acceptance of the rest continues so the whole process is not stopped.
At the end the responsible person compiles the remarks into a short report and hands it to the assigned person (e.g. IT manager or contract manager) to formalize a non-conformity report and start replacement or replenishment.
Next steps after SAT: commissioning without surprises
After SAT, keep checked equipment separate from items with issues. One unrecorded detail easily becomes an incident in production.
Separate flows: items passed without remarks go to installation or a "ready to install" storage. Items with defects or disputes go to quarantine until resolved. Physically separate quarantine: a separate area or shelf prevents boxes from accidentally being taken to installers.
Treat storage before commissioning as part of acceptance. Keep boxes and seals, do not mix kits between devices. If installation is planned later, mark the package with status and responsible person. Keep conditions simple: dry, dust-free, no sharp temperature swings and restricted access.
How to close remarks
A remark is closed not by promise but by a confirmed action: replacement, repair, completion, correct firmware or configuration.
A short practical flow helps:
- supplier or integrator confirms the solution (what will be changed/fixed and timing)
- you receive the device or parts tied to the serial number
- perform a targeted recheck of the problematic point only
- record the result: "resolved" or "repeat"
Before commissioning it’s useful to have a status snapshot for the batch: how many units ready, how many in quarantine, which serials, who is responsible for closing open points and by what date.
How an integrator can help
An integrator often takes responsibility for planning commissioning, the overall schedule and a consolidated SAT report. It’s convenient when everyone uses the same checklist format and one list of remarks rather than separate tables from the warehouse, IT and security.
If you procure and deploy PCs, all-in-ones and servers, agree the SAT format with the manufacturer and integrator in advance. For example, in projects with equipment from GSE.kz (GSE.kz) you can usually agree templates, acceptance criteria, escalation procedures and 24/7 support to speed up closing remarks and avoid blocking deployment.
FAQ
What is SAT acceptance and why is it needed if there is an invoice?
SAT is a short on-site acceptance that confirms the delivered items match the order and that the equipment appears and behaves as operational at basic power-on. It is used to catch obvious problems before installation and configuration, when a small issue can cause downtime and disputes over responsibility.
How long does the box-to-workstation SAT take and what does it necessarily include?
Typically a box-to-workstation SAT takes 10–15 minutes per unit and includes checking the packaging, matching markings and serial numbers to the documents, a visual inspection of the case, verifying completeness, and a short power-on including a BIOS/UEFI check. The goal is not exhaustive testing but to filter out obvious defects and discrepancies before deployment.
How to prepare for SAT before opening boxes?
Do not start with unpacking: first prepare the documents, the reference specification, contacts of responsible persons and a place with good light and a flat surface. Appoint one person who will make decisions and record findings so the process doesn’t become chaotic.
What documents should be on hand for SAT acceptance?
At minimum have the delivery note/UPD and the contract specification to verify items, models and completeness. Also useful are warranty terms and RMA/return rules so you don’t miss notification deadlines for discrepancies.
Why inspect the packaging and seals first and only then unpack?
Photograph the box and seals before opening, especially if there are dents, moisture marks, tape reapplications or punctures. If you open the box without this record, it becomes harder to prove the damage occurred before acceptance.
What is the difference between a defect and a non-conformity, and what should be recorded as an issue?
A defect is a problem with the condition or functionality of a specific unit (for example, it won’t power on or has a cracked case). A non-conformity is a discrepancy with the delivery documents or specification (for example, a different model, wrong serial number or lower disk capacity), even if the device powers on.
What to do if the device powers on but BIOS/UEFI shows warnings or unusual symptoms?
If BIOS/UEFI shows warnings, there are repeated reboots, abnormal noises or smells, stop and record the issue rather than putting the unit into service. These symptoms often become downtime after installation and are easier to resolve at acceptance.
How to document a defect so the supplier cannot dispute it?
Record the serial number from the label, the model and the position in the delivery document, then take photos: overall view, close-up of the defect, label/serial and packaging (if damaged). Describe facts without speculating about causes, e.g. “dent on right side of chassis, 3 cm, scratch nearby” or “power applied, indicator does not light, fans do not start.”
What should be done with equipment if SAT finds a defect or missing items?
Do not move a problematic unit further down the chain or start installation — place it in a quarantine area with its full packaging and kit. Agree on status: replacement, completion or diagnostics. Close the issue only after the actual fix is confirmed with a targeted recheck.
What are the most common SAT acceptance mistakes and how to avoid them?
The most common mistakes are: not photographing packaging and serials, mixing components from different boxes, and starting installation before issues are closed. These are avoided with simple rules: one box — one dedicated area, record condition before opening, and log status for each unit on site.