Refitting a Computer Lab During the Break: A Plan
Refitting a computer lab needs a precise plan: delivery, OS image, cabling, peripheral checks and an on-time launch by September 1.
Why labs end up unready
Deadlines rarely fail because of one big mistake. Usually it’s a chain of small delays. One day is spent agreeing the equipment list, two more on clarifying sockets and network, then it turns out some seats lack cables, adapters or mounts. In the end the refit stalls not because of the physical installation but because people, tasks and dates aren’t aligned.
From the outside it looks like everything can be done in parallel: deliver equipment, assemble furniture, prepare the OS image, sign acceptance documents and test peripherals. In practice, without a shared plan that only creates conflicts. If PCs are already delivered but the seating plan is still changing, equipment sits in boxes. If the OS image isn’t ready, towers are in place but the room can’t be used. If the network wasn’t checked beforehand, installation is postponed to the worst possible moment.
Most time is lost at four points:
- deliveries arrive in parts and installation can’t be finished in one visit;
- there’s no final inventory per seat: PC, monitor, keyboard, mouse, headset;
- user accounts, drivers, printers and network access are forgotten;
- acceptance is rushed and issues are found right before the first lesson.
Another frequent cause: small but important details are remembered too late. Is the power cable long enough for each outlet? Do the monitors match the mounts? Who brings extension leads? Who checks headphone sound? Does the teacher’s projector and PC work? Separately these look small, but together they easily consume several days.
It’s especially hard when several people are responsible for deadlines but nobody keeps the overall picture. The facilities manager waits for delivery, the sysadmin prepares the OS image, the contractor plans mounting, administration approves documents. Everyone is busy but tasks diverge. You need one person who keeps a simple plan: what’s ready, what blocks the next step and what must be completed by a specific date.
When the supplier and integrator run the project end-to-end, delays are usually fewer. At GSE.kz this is easier to organize because the company manufactures equipment in Kazakhstan and provides system integration and service support. But even then the school still needs one person who quickly confirms decisions.
What to record before work starts
The main cause of delays isn’t assembly or setup. The class is usually late because important decisions weren’t agreed in advance. Start by recording the project boundaries: how many seats, who approves what and which dates are fixed.
Begin with the exact number of workstations. Don’t use an approximate figure—get a final count: student seats, teacher seat and, if needed, a separate PC for an administrator or a spare. This affects purchasing, placement, cable lengths, number of network ports and even power load.
Next clarify the equipment list. A class rarely needs only PCs and monitors. Often headsets or headphones, webcams, a printer or MFP for the teacher, a projector or interactive panel, surge protectors, UPS units, spare cables and basic peripherals are required. If this list isn’t closed immediately, the computers may arrive on time but launch will be delayed by one missing item.
Define who approves software and access. This could be the deputy head, the IT teacher, the school IT specialist or a district administrator. Decide in advance which educational programs must be on every machine, which sites and services should be accessible, whether students can install files, if USB restrictions are needed and which accounts will be used. Without that, even a good OS image for the computer lab will need to be redone later.
Then fix the critical dates. Usually there are five: delivery, unloading, furniture installation, equipment installation and final testing. If at least one date is floating, the whole schedule loses meaning. Also note who is responsible for the room, access to the classroom, electrical supply and network on the day of installation.
One more important point: designate the person who accepts the result. This should be a specific individual, not an abstract administration. They check that all workstations power on, required programs open, peripherals work and any issues are recorded immediately.
It’s convenient to gather all this in one short 1–2 page document. If a contractor like GSE.kz is handling delivery and integration, it’s important in that document to divide responsibilities: what is delivered, what is mounted, who configures the network and who signs off the final check.
A step-by-step plan for the break
If you need to be ready by the first day of school, plan the refit by dates, not by readiness. The easiest approach is to split the break into short stages and include 1–2 buffer days for failures, missing items or replacement of faulty equipment.
First check the room, not the computers. Before accepting equipment, ensure the classroom has enough outlets, the network is brought to the needed locations, breakers can handle the load and furniture and the seating plan are agreed. If this is done later, equipment will sit in boxes while tables are moved and power sources found.
Then follow a simple schedule.
- In the first days of the break — inspect the room, electrical supply and network, confirm the seating plan.
- Next — accept the equipment by quantity and completeness, check boxes, serial numbers and external condition.
- After acceptance — label every workstation and its equipment.
- Then — deploy the OS image, install required programs and set basic settings.
- Finally — leave a window for fixes, re-checks and replacing faulty devices.
Labeling seems minor, but it saves hours. When each seat has a number, it’s easier to connect equipment, find faults and quickly see which monitor, network or audio is not working. Label both ends of cables when possible.
Deploy the OS image after the equipment is placed at seats. Otherwise you can mix up machines, reconfigure names and hunt for which computer is which. Usually one reference machine is enough to check all programs and settings, then replicate that configuration on the rest.
Don’t use the last days of the break for heavy installation — keep them for fixes. This is when small but important problems surface: a missing adapter, a monitor not detecting signal, a couple of machines losing network, or a printer not recognized. If the vendor handles equipment and support together, coordinating fixes and replacements is simpler, but you still need time buffers. Without them, even a small fault shifts the whole launch.
How to build and test the OS image
A good OS image saves not hours but days. If one reference machine is correctly configured, you can bring the whole lab to a uniform state: identical software, rights and security settings. For a lab refit this is a key stage.
What the reference image should include
Agree a short, exact list: operating system, educational programs, browser, office suite, printing tools, antivirus or built-in protection and all required drivers. Don’t add unnecessary applications “just in case.” The cleaner the image, the fewer crashes and questions for the teacher.
If the class uses identical devices, building the image is easier. When the school receives a batch of identical PCs or all-in-ones, drivers and settings don’t vary machine to machine. This is convenient for classes with uniform hardware, especially if the configuration is known in advance.
Set up user accounts immediately. Teachers usually need full access to settings and software installation, while students should have a standard profile without system-level rights. Disable unnecessary notifications, autorun of third-party apps and anything that distracts during lessons.
Then check updates. Install critical OS updates, make sure protection is active and run a quick scan. If you skip this, some machines may start updating during the first lesson.
How to validate the image before mass deployment
Do not roll the image out to the whole class at once. Start by deploying it to 2–3 machines and test common scenarios: teacher and student logins, launching educational programs, printing, audio, webcam and network, inserting a flash drive and accessing shared folders. Also observe boot and restart times.
Ask a teacher to run through a typical lesson on a test PC. This quickly finds small issues an admin might miss: wrong keyboard language, inconvenient shortcuts, a missing codec or access restrictions to a needed folder.
Finally, prepare a quick recovery method: a saved clean image, a bootable USB stick and a short step-by-step guide. If a machine loses its settings, it should be restored to working order in 15–20 minutes, not taken apart for half a day.
How to make a clear cabling diagram
A cabling diagram isn’t decorative. It lets you start the class quickly, troubleshoot and maintain it later. If one seat fails during a lesson, the teacher or technician should immediately know which computer it is, where its socket is and which switch port it uses.
Start with simple numbering of workstations. The same number must appear everywhere: on the desk, on the tower or all-in-one, on the monitor and in your spreadsheet. Use a clear format like WS-01, WS-02, WS-03. That avoids situations where attendance lists, desk labels and cable markings all disagree.
Label each cable on both ends: network cable, monitor power, system power, printer and speakers if present. A label on only one end is almost useless: the switch’s end shows a number, but under the desk it’s unclear where the cable goes. Use short readable tags like WS-07 LAN and WS-07 PWR.
How to avoid mixing power and network
Route power and network separately. Don’t put everything into one tight bundle under the desk. Mixed cables complicate fault-finding, increase the chance of pulling the wrong lead and make cleaning harder. If cable trays are available, use one for network and another for power. If only one tray exists, separate the cables inside it and group them with ties.
Before final routing check simple things: cable length without tension, reach to the outlet and switch port without moving furniture, unobstructed passages and spare length for replacing a monitor or tower. Each seat should allow power and network to be disconnected separately without dismantling the entire row.
Cables shouldn’t be taut, but long coils under desks aren’t good either. Excess length quickly becomes a tangle. For all-in-ones the scheme is usually simpler because there are fewer separate leads, but the rule remains: each cable must be clear at a glance.
Finish with a short maintenance diagram: a single sheet or file showing seat number, device name, outlet number, switch port number and notes about peripherals. This helps later when replacing one device, checking the network or moving a student to another seat.
How to test monitors, audio and other peripherals
If you skip this stage, the first lesson often starts with troubleshooting a dead cable, a quiet headset or a stuck key. Test peripherals in the same sequence at every seat rather than randomly.
Start with monitors. At each seat check there’s an image after power-on, the correct input is selected and the resolution matches the screen. Open light and dark backgrounds to spot dead pixels, strong backlight, bands or flicker. Also check tilt and brightness settings.
Then test input devices. For keyboards do a quick typing check; for mice move the cursor, click both buttons and scroll the wheel. If many identical sets are used, swap a suspect device with a known-good one to see whether the issue is with the peripheral or the PC port.
At each seat check five things:
- monitor: image, resolution, no flicker;
- keyboard: main keys, Shift, Enter, Backspace;
- mouse: movement, buttons, scroll wheel;
- headphones and microphone: playback and recording in both channels;
- printer, if present: a test print and correct paper feed.
Don’t rely on the system sound icon alone. Plug in headphones, play a short audio file and make sure audio is present in both channels without distortion. Then record a short voice sample and listen back. This reveals common issues: sound exists but the wrong microphone is selected or it’s too quiet.
If there’s a printer in the room, do at least one test print from the teacher’s PC and, if needed, from a student’s station. Check not only physical output but response time, print queue and driver errors.
Record all issues immediately: seat number, device, symptom and what has been checked. A simple table like “seat 12 — right headphone channel not working” saves time for the school admin, contractor and supplier.
Mistakes that derail the launch
Most refit projects fail not because of complex equipment but because small details weren’t fixed in advance: one missing adapter, an unlabeled cable or an extra hour of manual OS installation can become a lost day.
The most common error is ordering equipment by a general list instead of an exact inventory. If the document doesn’t specify monitor models, cable lengths, connector types, number of outlets, keyboards, mice and patch cords, mismatches almost always appear on site. Desks are in place but some workstations can’t be completed.
Manual OS installation on each PC causes problems too. When a technician installs the image individually on every machine, the risk of different settings, missed drivers and varying program sets increases. One PC prints, another doesn’t see the network, a third asks for updates right before class.
Lack of simple labeling causes delays. If cables, power bricks, switch ports and seats aren’t labeled, any repair takes too long. After cleaning or moving furniture it’s unclear which cable goes to which PC and troubleshooting becomes guesswork.
Testing on the last day of the break is almost always a bad idea. A monitor may have a dead pixel, a speaker may hum, a webcam may not be recognized, or a printer may need a different driver. When these small faults accumulate, the room may be formally ready but not usable for lessons.
Another underestimated issue is the lack of a small spare stock. Two spare mice, one keyboard, a few video cables, network leads, adapters and extension cords often save the day. Without spares even an inexpensive part can halt the launch.
If you need a quick guide, check five things in advance: a precise inventory per seat, a single prepared image and driver list, labeled cables and power bricks, peripherals tested a few days before start and a small stock of spares. When only a final check remains before the first lesson, the launch usually goes smoothly.
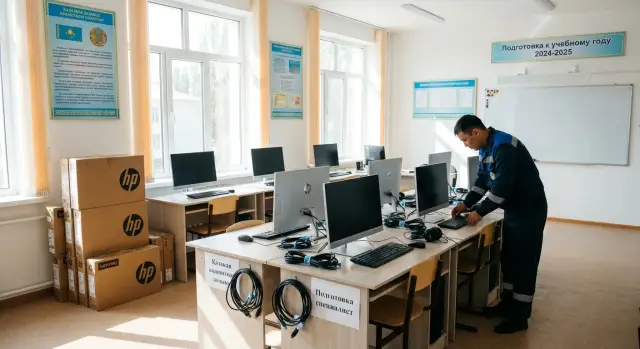
Example: preparing a 24-seat class
For a 24-student-seat class plan by days. Even with good delivery, most time is spent on acceptance, labeling and final checks rather than on installing the PCs themselves.
Assign seat numbers 1–24 and a separate teacher’s desk if present. Then boxes, monitors, keyboards, mice, power cables and patch cords can be tied to specific seats and confusion after unpacking is greatly reduced.
Sample schedule for the break
On day one do acceptance: count devices, check completeness, inspect cases and screens, and apply labels to towers, monitors and peripherals. Missing or damaged items become obvious immediately.
Days two and three: place equipment at seats and build the cabling scheme. Position devices, route power and network, label cables on both ends. Check that cable lengths are sufficient without tension and access to outlets and switch ports stays convenient.
Day four: deploy the OS image and verify basic settings. Ensure machines are named according to the scheme, can access the network, log into the required environment and launch mandatory programs.
Day five: test peripherals. At each seat check monitor, keyboard, mouse, audio, headsets, webcam and USB ports if they’re used in lessons. Then walk all 24 seats with a short checklist.
The final walk-through can be reduced to five questions:
- does the PC power on at the first press;
- does it see the network and required resources;
- does the monitor work with the correct resolution;
- is all peripheral hardware detected;
- is the seat ready for a student without technician help.
If the refit follows this scenario, on the first school day the class is not still being assembled but simply opened and lessons begin. That’s the main sign of proper preparation.
Short checklist for the day before the first school day
The day before start you don’t need to re-test everything from scratch. Walk a short route and make sure no small issue will break the first lesson.
Start with the simplest: power on each workstation using the normal power button, without temporary workarounds. If even one PC doesn’t boot reliably, that’s not a minor issue but a task for immediate fix.
At each seat check a few items. The PC, monitor and peripherals should power on without on-screen errors or cable re-seating. The network should work reliably: access to local folders, the printer and the internet must open without delays. Test audio, video and USB with real examples: open a short clip, insert a flash drive, play audio. There should be no loose temporary extension cords under desks that can be tripped over. Finally, the seat number should match the sticker, the diagram and the equipment list.
Also view the room from a teacher’s perspective, not the installer’s. Sit at 2–3 different seats and check sight lines, ease of USB access, loose connectors and whether cables interfere with chairs or students’ legs.
A simple rule: if a problem can be noticed in 30 seconds, a student will notice it during the first lesson. It’s better now to open a presentation, play a short video, insert a flash drive and check audio than to interrupt a class later.
The last step is a short issue list: what’s wrong, at which seat, who fixes it and by what time. Example: seat 12 — no sound in headphones — technician fixes by 18:00. With such a list the launch is calmer.
Next steps without rushing
After installation and checks, do a few more simple things. They don’t take long but significantly reduce first-day risks.
Set a specific final acceptance date and time. Not “end of the break” but a concrete appointment when responsible people walk the room against a prepared list: workstations, network, logins, printing, audio, projector, mice, keyboards and spare devices. This shows what is really ready and what needs finishing.
Prepare a short teacher’s memo. One page in simple language is enough: how to power the room, who to contact for problems, where logins are stored, how to check internet, audio and printing before a lesson. If something goes wrong, the teacher won’t waste time guessing.
Agree who and how will fix issues in the first days of operation. Define not only the performer but the workflow: who receives school requests, which problems are fixed the same day, what can be solved remotely and what requires an on-site visit, and who replaces peripherals or power bricks. This is especially useful in the first week when small faults usually appear.
If the school prefers a single contractor for PCs, all-in-ones, integration and support, discuss that option in advance. It reduces the number of handoffs between suppliers and saves time at responsibility boundaries. For such projects consider GSE.kz: the company manufactures computers, all-in-ones and servers in Kazakhstan, provides system integration and technical support.
The earlier roles are distributed, the smoother the launch. A good outcome is simple: on the first school day the teacher enters, turns on the equipment and starts the lesson immediately.
FAQ
What’s the right place to start when refitting a computer lab?
It’s better to start with the classroom, not the purchase. First fix the number of seats, the seating plan, power outlets, the network, the list of devices and who is responsible for approvals. If this isn’t agreed in advance, the equipment can arrive on time but the class still won’t be ready to use.
Are reserve days needed during the break?
Yes—almost always. Even with a good plan, leave 1–2 days for late deliveries, replacement of faulty devices or minor fixes. Without this buffer, a small problem can easily delay the whole launch.
Who should be responsible for the whole project on the school side?
You need one specific person inside the school. They confirm decisions, track task status and quickly remove blockers. When many people are responsible but there’s no single owner of the process, deadlines usually slip.
What must be fixed before work begins?
At minimum: the final number of seats, the exact equipment list, the list of programs, user rights, delivery and installation dates, and the person who accepts the result. It’s convenient to collect all this in a short 1–2 page document so everyone works from the same plan.
When is the best time to deploy the OS image to the computers?
After the equipment is placed at its seats. That way you won’t mix machines, device names or seat assignments. First test the master image on 2–3 machines, then roll it out to the whole class.
What should a good OS image for the class include?
Only the necessary items: OS, educational software, browser, office suite, drivers, printing support and basic protection. Avoid extra programs. The cleaner and simpler the image, the fewer issues and questions the teacher will have on day one.
Do cables and workstations need to be labeled?
Yes—definitely. The same number should appear on the desk, the computer, the monitor and on the cables at both ends. This kind of labeling saves time during installation, checks and future maintenance.
Which small details most often cause the launch to fail?
Commonly forgotten items are power cable lengths, adapters, user accounts, drivers, network access and spare peripherals. Testing on the last day is another frequent mistake. Deadlines are usually missed not because of one major fault, but because several small issues accumulate.
Should I budget for spare peripherals and cables in advance?
Keep a small spare stock: a few mice, one or two keyboards, video cables, network cables, adapters and extension cords. This inexpensive reserve often saves the day when something doesn’t work right after installation.
What should I check the day before the first school day?
Check that every workstation powers on, the network and login work, sound and USB ports operate, and labeling matches the plan. Walk the room from a teacher’s perspective, not an installer’s. If you need a single contractor for hardware, integration and support, that usually simplifies the launch. For such tasks consider GSE.kz, since the company manufactures equipment in Kazakhstan, provides integration and technical support.