Power and Redundancy in the Rack: A/B Schemes and Phase Control
Rack power and redundancy: practical A/B schemes, choosing PDUs, load distribution, phase control and quick checks to reduce the risk of outages.
Why racks shut down unexpectedly
A sudden rack outage almost always looks the same: some equipment powers off, some stays on, then a cascade of reboots begins. If databases, virtualization, or file services are running at that moment, the result is not only downtime but also a risk of data corruption.
Often the cause is not a single “bad” server but the whole power chain. One tripped breaker, an overloaded phase, a weak or improperly selected PDU, swapped A and B lines, or a poor contact in a plug or terminal — any of these can take down multiple devices. So treat rack power and redundancy as a system, not just a set of outlets.
Warning signs usually appear beforehand: breakers trip periodically (especially at peaks), a cable or PDU feels hot, UPS or PDU logs report overloads, or one phase carries noticeably more current than others. A common reason for "sudden" failures is small ad-hoc changes in the rack that alter connections without notice.
Many issues can be fixed without rebuilding the whole server room. For example, in a small rack most “important” devices are often plugged into a single PDU because it’s convenient, while the other PDU is nearly unused. That may be fine until the next upgrade or seasonal peak.
Quick and safe steps:
- Label power runs and outlets, and spread critical devices across different inputs (A/B).
- Check ratings of breakers, plugs and cables; remove adapters and questionable extension cords.
- Measure current on each line and phase, then redistribute load.
- Verify UPS settings and trip thresholds; perform a short test by disconnecting one input.
- Clean up the wiring diagram and enforce a rule: any change only by checklist.
What rack power consists of, in plain terms
Think of power as a chain where a failure in any link often results in the same outcome: some equipment loses power. It’s important to see the whole picture, not just "plug it in — it works."
A typical chain: the building feed into the server room (from the electrical panel or main breaker), circuit breakers, UPS (if present) and its outputs, cable or bus to the rack and the rack PDU. Then come server PSUs, storage, switches and other devices.
Confusion often starts with terminology:
- “Line” — a dedicated feed/circuit from the panel to the rack or to the UPS.
- “Outlet group” in a PDU — a set of outlets on a shared breaker, measurement channel, or control group.
- “Individual outlet” — a specific PDU socket where a single power cord is plugged in.
If a line fails, the whole rack can go down. If a group trips, part of the rack loses power. A bad contact on one outlet can bring down a single device and look like a mysterious failure.
Another key point is how many PSUs a device has. A server with one PSU always depends on a single chain. A dual-PSU server should have its PSUs on different lines (A and B). Then losing one line won’t power off the server, but load on the remaining side will increase.
At the start, capture four facts: total power capacity and actual load, type of supply (single-phase or three-phase), allowed load per line/UPS/PDU, and the boundary of responsibility (panel, UPS, PDU, outlets). Without this it’s hard to find the weak link.
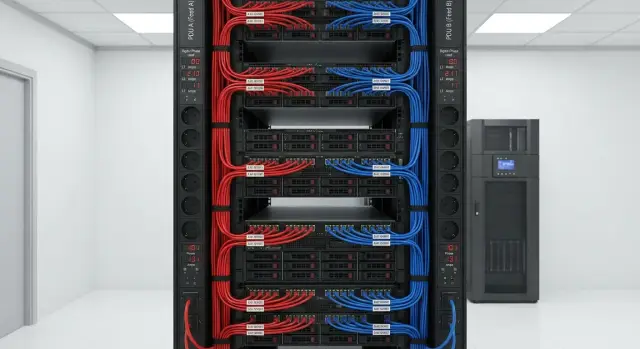
A/B redundancy: how it works and where it fails
An A/B rack scheme provides two independent power paths to equipment. The idea is simple: if path A is lost due to failure, maintenance or a tripped breaker, path B stays up and critical devices keep running.
Ideally independence begins as early as possible: different breakers in the panel, different outlet groups, different UPS units, and on large sites even separate feeds. Small server rooms often implement a simpler option: two breakers and two PDUs in the rack (PDU-A and PDU-B).
If a server has two PSUs, the basic rule is one cord to A and one to B. But that works only if the paths have no common point of failure.
A/B often “breaks” because of small details:
- both PDUs are fed from the same UPS or the same breaker (no real redundancy);
- one path uses an extension or temporary outlet that can be accidentally unplugged;
- B’s plug was temporarily inserted into A and left that way after work;
- A and B converge in a power strip or a single inlet;
- two PSUs are fed from one cable through a Y-splitter.
It’s trickier when some equipment has only one PSU (some network gear or entry-level storage). Better to mark risk levels up front. Minimum: keep single-PSU devices on one chosen path (often A), have a spare unit or PSU, and a plan to move them to B during maintenance. If downtime is unacceptable, an external automatic transfer switch (ATS) or replacing devices with dual-PSU models helps.
How to choose a PDU and not regret it
A rack PDU is not just an extension cord. It determines whether you can properly separate A/B, avoid overheating and quickly see what tripped.
Choose PDU by use case. A basic PDU is fine when you only need reliable outlets. A metered PDU lets you see current and power at least for the input so you’re not guessing where the overload is. PDUs with switching let you remotely reboot a hung PSU or power devices on a schedule. A managed PDU with remote access and per-outlet monitoring pays off when racks are distributed and you need diagnostics without travel.
Form factor: horizontal (1U/2U) is convenient in small racks for quick access to outlets. Vertical (0U) is often better for dense racks: it doesn’t consume U space, cables are tidier, and you usually get more outlets.
Before buying check specs that actually affect failures: rated current and power (with margin for peaks and growth), input plug type and single-/three-phase compatibility, number and type of outlets for your PSUs, and clear overload indication.
Think about operation: clear outlet numbering, sensible groups (to separate critical from non-critical), and visible A/B labels. A good habit is to mark PDUs and cables with the same tags so nobody accidentally plugs both PSUs into the same feed during a swap.
Load distribution: simple logic instead of guesswork
Distributing load means not putting all consumers on one power line or one PDU group. Even when breakers and UPS seem to have margin, the problem often hides at the cord or outlet level. A single tripped breaker can take down half the rack.
For A/B schemes the goal is that if one side fails the other won’t exceed its limit. Practically that’s often close to 50/50, but perfect symmetry is rare: some devices have a single PSU, one side may have a smaller UPS, or one side may need to hold longer on batteries.
Account for peaks, not just averages. Servers draw more at startup, during updates, backups, or high CPU/GPU load. Keep headroom — otherwise rack power becomes a lottery.
Don’t forget hidden consumers: network switches, routers, firewalls, storage shelves, KVMs, console devices, chargers, fans, sensors and converters. Separately they are small, but together they take meaningful power.
Simple example: servers are balanced A/B, but storage and a switch are plugged into one PDU out of habit. Disk activity spikes overload that side and trips protection. If you can distribute storage across two feeds (if supported) or move the switch to the other PDU, the rack survives peaks more gracefully.
Phase control and balancing in practice
On a three-phase feed a rack can trip because one phase is overloaded even if total power looks OK. Breakers and cables protect a specific phase, not the rack average. A typical case: two phases have margin, the third is overloaded, heats up and trips a breaker or the UPS protection.
You can usually tell if you have single-phase or three-phase by the main breaker/cable labeling and the PDU: three-phase PDUs often show currents separately for L1/L2/L3 and have matching labels.
Balancing means placing large consumers across different phases. If you have an A/B scheme, balance inside A and separately inside B — they are two independent mini-systems for load.
A short process before changes:
- find the top 3–5 heavy consumers (servers, storage, GPU nodes);
- check which phases they are on;
- move plugs so large consumers are on different phases;
- measure after each step rather than relying on feel.
Keep a simple table: device, A or B, phase (L1/L2/L3 or “1φ”), measured power (W) or current (A) at typical load, and measurement date. This discipline quickly reveals imbalances and helps plan additions safely.
Measurements and monitoring: what to check regularly
Unexpected outages nearly always have precursors: rising current on a line, phase imbalance, hot contacts, frequent breaker trips. Seeing these signals early gives time to redistribute load or remove non‑essential devices before failure.
Minimum parameters for regular checks (ideally via metered PDUs, partly possible manually): current and power for each input (A and B) at the PDU level; currents per phase (L1/L2/L3) and imbalance; load by outlet groups or key consumers; voltage and frequency (if shown by PDU/UPS); temperature in the rack and around PDUs/cable entries.
Set thresholds at two levels so you have time to react: warning at about 70–80% of rated current and critical at 90–95%. For phases: if one phase stays noticeably higher for a long time, schedule moving some load.
If no centralized monitoring exists, adopt a manual check routine: after any rack change (added server, moved PDU, changed power) and then regularly — weekly for the first 1–2 months, then monthly. Quick current clamp measurements and comparison to PDU readings often reveal issues before they become incidents.
An event log saves hours of troubleshooting. Record date, changes made, A/B and phase currents, triggered thresholds and outcome. Organizations with 24/7 needs usually formalize these procedures with responsible contacts and support agreements (for example with an integrator like GSE.kz).
Step-by-step: bring a rack into order in 1–2 days
If you follow a plan, rack power and redundancy can be sorted over a weekend or two workdays. Work from facts: what’s in the rack, where it’s fed from and what the real load is.
Day 1: inventory and measurements
Make a list: every device, how many PSUs it has (one or two) and where it’s currently plugged in. Racks commonly mix dual-PSU servers, single-PSU network gear, KVM, storage shelves and small PSUs — the small ones often push a line to its limit.
Then check each A and B feed not by words but by tracing the chain: PDU → breaker → UPS (if present) → incoming feed. Often A and B end up on the same UPS or breaker and redundancy exists only on paper.
Finish day one with measurements: record current per line and phase (if 3φ). Note typical and peak values during a workday, not just the instant reading.
Day 2: redistribution, labeling and test
Now redistribute connections. Put dual-PSU devices on separate PDUs and lines. Spread single-PSU consumers so one side isn’t overloaded and phases are balanced.
- Move plugs so A and B are independent not only inside the rack but up to the breaker/UPS.
- Balance phases, avoid one phase at the limit while two phases are light.
- Label cables: A or B, PDU number, outlet number.
- Configure current thresholds and alerts on PDUs/UPS.
- Do a planned test: cut one line and confirm the rack remains operational.
After the test produce a simple rack diagram and change rules: who adds equipment, how to check phases and where to plug A/B. If the rack is built for a project (e.g., servers and integration), agree the approach with the supplier and service so you don’t fix outages during business hours.
Common mistakes and traps
Most unexpected outages stem not from “bad servers” but from accumulated small decisions.
The sneakiest trap is pseudo A/B. Servers have two PSUs and cords go into different PDUs, but both PDUs are fed from the same breaker or UPS. During a failure it looks like redundancy, but everything goes down.
Another common issue is extensions, multi-taps and temporary wiring inside the rack. They overheat, make poor contacts and are easy to knock during work. If a plug or outlet gets hot, don’t ignore it — it’s a warning.
Inrush currents and short peaks are another source of surprises. When many devices boot at once (maintenance window), load can spike above rated values and a breaker or UPS trips even though steady-state calculations said it should be fine.
Other typical situations: critical and non-critical devices share a single line without prioritization; A and B got swapped after maintenance; one phase overloaded while the other two are nearly idle; the rack lacks clear labels (which PDU is on which feed and breaker).
If you work with an integrator, ask not only for a wiring diagram but also for neat labeling and a short A/B verification certificate. In GSE.kz projects these items are often included in acceptance because they save hours of downtime later.
Quick checklist before powering up and after changes
Before powering the rack and after any change (added server, replaced PDU, moved power) run this short control. It takes 10–15 minutes but often prevents accidental outages.
Check A and B independence not only at rack outlets but back to the source. Practical minimum — different PDUs, different breakers, different UPS outputs. If A and B converge on one breaker or UPS, that’s not redundancy.
Then check load. Each feed should have headroom, not run at the limit. Inrush currents, updates, task peaks and UPS battery degradation increase effective draw.
For three-phase power, evaluate phase balance separately. Even with acceptable total power, a single overloaded phase can trip protection. Compare phase currents at the input or on PDUs and aim for even loading.
A sign of order is clear labeling. It should be obvious which is A and which is B: on the cable, on the PDU and on the outlet (for example, “A-PDU1-12”). This speeds work and reduces errors during replacements.
Finally — response discipline. Set alert thresholds (current, power, temperature, loss of an input), assign an owner for notifications, and define actions. Without this, monitoring becomes charts rather than protection against downtime.
Example: a small office rack
Typical setup: one rack in an office, two PDUs, eight servers, one storage array and some network gear (switches, router, small UPS for management). Power came from the panel through a breaker and everything looked fine on paper. In practice the breaker occasionally tripped during peak hours (month-end, backups, updates) and recovery took 10–20 minutes.
The check revealed two issues. First, most PSUs were plugged into a single PDU for convenience. Second, the rack was fed mostly on one phase and peak current approached the limit, though average consumption seemed safe.
Fixes began with a clear A/B scheme: each dual-PSU server had one cable to PDU A and the other to PDU B. Storage and key network gear were also distributed where supported; single-PSU devices stayed on A but with headroom. Then clamp measurements were taken per line and per phase at the panel to see the real picture, not just nameplate watts. Monitoring thresholds were set: warnings at a chosen percent of rated current and a separate limit for short peaks.
As a result, if one feed or PDU fails, services do not drop immediately. They keep running while the admin has time to swap a cable, replace a PDU module or troubleshoot a breaker. Rack power and redundancy stop being a lottery.
After the work keep three artifacts:
- a single-line power diagram showing A/B and linked breakers;
- a load table by line and phase (what is connected where and peak currents);
- brief rules for adding new equipment (where to plug, what to measure, which thresholds to update).
Next steps: lock results and scale the approach
Start by documenting the current state: photograph the rack, label power cables, note which devices are on A and B, list PDUs and which breakers feed them. Tedious, but these notes save hours during incidents and maintenance.
Make a simple power map: for each server and network device note PSU count (one or two), measured load under typical conditions (at least from PDU readings) and the phase. For upgrades tie the hardware change to power: dual-PSU devices with known consumption make A/B predictable.
Bring in an integrator if you have three-phase power, many critical services or recurring incidents. A common pattern: after adding a couple of servers one phase gets overloaded and racks trip on peaks even though total capacity seemed adequate.
To scale the approach across racks:
- adopt a template diagram: where line A and line B are, how PDUs and breakers are labeled;
- agree change rules: any new device is assigned a spot in the diagram and its consumption is measured;
- review phase balance after any notable load change;
- plan to replace single-PSU critical devices with dual-PSU models where possible;
- assign a power owner who keeps the map, measurements and wiring discipline.
When upgrading a rack for servers and storage, sometimes a turnkey approach is easiest: select compatible hardware and build in a proper A/B scheme, phase balance and monitoring from the start. An integrator like GSE.kz can help: from rack servers (including S200 Series) to designing and supporting infrastructure 24/7 across the country.
FAQ
Why can a rack shut down “suddenly” even though it worked fine before?
Most often the problem is in the power chain, not a single server: overloaded line/phase, weak PDU, tripped group breaker, or a poor contact in a plug or terminal. Practical steps: first check UPS/PDU logs for overload, carefully feel plugs/connectors for heat, then measure current on each line and phase to find where the exceedance or imbalance is.
How to quickly find out if A/B is only on paper and not in practice?
A quick test is to look for a single point of failure. - Check which breakers feed PDU-A and PDU-B: if they are on the same breaker, that's not redundancy. - Verify both PDUs are not fed from the same UPS output. - Make sure there are no temporary extensions: power strips, multi-taps, or Y-splitters that join A and B. If A and B are independent up to the breaker/UPS, the scheme is much closer to true redundancy.
What parameters should be monitored to avoid discovering outages after the fact?
Minimum — current and power per input (A and B) on the PDU/UPS level. If power is three-phase, add currents for L1/L2/L3 and watch for imbalance. It’s also useful to monitor: - voltage (if available on UPS/PDU); - temperature in the rack and at cable/PDU entry points; - events: overloads, input loss, frequent switches to battery. Main rule: measure after any change in the rack, not only on a schedule.
How to choose a PDU to avoid later problems with overheating and overload?
Choose by purpose, but basic criteria are the same: - rated current and power with margin for peaks and growth; - compatibility with your power (single-phase/three-phase, plug type); - enough outlets of the correct type for your PSUs; - clear overload indication and, preferably, current/power measurement. For remote racks or when you need diagnostics without visiting the site, pick a managed/measurable PDU — it shows quickly where the overload is and what tripped.
Why can a breaker trip on a three-phase feed even if total watts look OK?
Because protection trips per phase and cable, not by the rack’s average consumption. Practical steps: - measure L1/L2/L3 currents at the input or on a 3-phase PDU; - identify the 3–5 largest consumers and spread them across phases; - after moving plugs, re-measure currents and record results. Balance phases separately for line A and line B if you have independent A/B feeds.
What headroom should be considered normal for a line/UPS/PDU?
A practical guideline is not to run a line/breaker/UPS flat out. Common practice is to keep steady load around 70–80% of the rated current, with short peaks below 90–95%. That leaves room for: - inrush currents at simultaneous starts; - seasonal load peaks; - UPS battery degradation and configuration changes. If thresholds are regularly reached — redistribute load or add a feed/UPS rather than hoping it will hold.
How to correctly connect dual-PSU servers in the rack?
Ideally plug one PSU into A and the other into B, and ensure the remaining side won't be overloaded when one side fails. Check two things: - that A and B are truly independent up to the breaker/UPS; - that the remaining side can handle the load, especially during peaks. After redistribution, do a short test: disconnect one input and confirm servers and key services keep running.
What to do with single-PSU equipment if redundancy is required?
First, honestly assess the risk: a single-PSU device always depends on one chain. Practical options: - keep these devices on one chosen side (e.g., A) but leave headroom on that side; - have a spare PSU or spare device and a plan to switch to B during work; - for critical nodes use an external automatic transfer switch (ATS) or replace devices with models that have dual PSUs. Important: avoid placing single-PSU critical devices together in an already loaded outlet group.
What labeling should be used so A and B are not mixed up after maintenance?
Labeling reduces mistakes after maintenance and speeds up incident troubleshooting. Minimum set: - each cable: A or B; - PDU: clear PDU-A / PDU-B marking; - outlets: number (and group/phase if needed); - a simple table mapping cable ↔ outlet ↔ device. Good practice — make any change by checklist and immediately update the load and connection table.
How to safely test that a rack will survive the loss of one power feed?
Perform a short controlled test during a maintenance window. - Notify users/on-call staff and record current A/B loads. - Disconnect one input (A or B) at the level you want to test (PDU/line/breaker). - Confirm critical devices stay on and the remaining side does not exceed limits. - Restore power and check there are no temporary connections left. Repeat the test after notable changes (added server, replaced UPS, moved PDUs).