Protecting Ports and Cables in Computer Labs Without Extra Cost
Protect ports and cables in computer labs: fastenings, strain relief, connector choice and cable routing to reduce failures.
Why ports and cables wear out quickly in computer labs
At home one person plugs a cable a few times a week and usually does it carefully. In a computer lab the same port is handled by dozens of students in a day, and cables constantly move with chairs, feet and bags. So failures usually start not because of “bad hardware” but from normal wear.
The main reason is mechanical. Cables are pulled, bumped with knees, pinched by chair legs, and twisted during cleaning. Even if a connector looks intact, contacts loosen inside, and the conductor near the plug begins to break.
The second reason is user habits. In a rush people pull by the cable instead of the connector body. USBs are forced in the wrong way and pressed harder. HDMI and audio suffer the same: a small angled shift over time destroys the jack.
The third reason is a “floating” workspace. Monitor, PC and power strips are placed so the cable is taut. Any movement of the desk or monitor becomes a jerk on the port.
Most lessons are stopped by sudden failures: the image drops because an HDMI/DisplayPort has worn out, a mouse or flash drive stops working because a USB is loose, the network drops after an RJ‑45 tug, or sound crackles from a damaged mini‑jack.
The good news is that much can be fixed without replacing big devices. Often swapping a short cable is enough rather than replacing a monitor or PC. Even more often, simple prevention helps: remove tension, give the cable a spare loop and secure the wire so forces go to the fastener rather than the port.
A simple example: in a row of 12 PCs students often pull the monitor “closer.” If the HDMI runs tight to the PC, picture problems start after a couple of months. If you add 10–15 cm of slack and secure the cable under the desk, the connector stops being the weak point and failures usually drop sharply.
Typical weak spots: what breaks most often
Under heavy daily use it’s usually the accessories, not the computers themselves, that suffer. It’s useful to identify where the fault happens: in the jack, in the plug or at the point where the cable is constantly bent.
The most common case is USB and headphone jacks on the front panel. People plug by feel, at an angle, sometimes with one hand. The plug gets skewed, the jack loosens and contact drops out. Headphone cables add one more factor: they get yanked when someone stands up, swaps seats or catches them with a foot.
With video cables (HDMI and DisplayPort) the area near the plug often suffers. The cable is heavy, hangs down and acts as a lever. One sharp tug is enough to hit the connector and crack the cable at its base. This happens especially when monitors are moved, rotated or pushed toward the desk edge.
Network RJ‑45s usually fail because of a small plastic clip. It breaks when the cable is yanked or pinched by a chair leg. Short patch cords make things worse: tension appears as soon as the tower or monitor moves.
Power is at risk too, although touched less often. Damage comes from tension and abrasion: the cord runs near sharp edges, gets under a chair leg, or is pinched by a cabinet. Over time insulation is damaged and the plug starts to wobble.
Usually failures are a combination: a cable inserted at an angle under tension, a hanging cable, a bend at the plug, a short taut lead, and friction on edges. If one place has already failed, it’s almost certain to happen at neighboring seats too — a sign the problem is how connections are organized, not just careless students.
Three core principles: tension relief, bend protection, secure routing
Almost all failures come down to three things: the cable is pulled, it’s sharply bent, or it hangs and gets caught. Remove these causes and failures drop noticeably even without expensive accessories.
1) Remove tension from the connector
A port should not be the thing that a cable “hangs on.” When a student moves a mouse, slides the PC or pulls a headset, the force should go into the mounting, not the USB, HDMI or audio jack.
Practical step: leave a small loop of cable near the device (10–15 cm) and secure the cable to the desk or bracket before it reaches the port. A random tug will then stop at the fastener.
2) Protect the cable from sharp bends
The weak spot is often not the jack itself but the segment right behind it. That wire breaks from a sharp bend, especially where it jams against a wall, desk leg, or rear panel.
Keep the cable exit straight for a few centimeters and avoid pressing the wire against a sharp edge. If the cable must go down, make a smooth turn instead of a 90° kink.
3) Fix the route
A cable lying on the floor or hanging won’t last long in a classroom. It gets caught by feet, hit by chairs, and yanked during cleaning. The route should be clear and repeatable.
Minimum for one workstation: one strain relief point under the desk near the device, another fixation on the way to the main bundle, and a shared channel or tie for the group. Also provide a clear connection spot on the desk so people don’t reach to the back of the PC.
Example: if flash drives and headphones are used often, place a USB/audio extender at the desk edge and secure it. Plugging becomes simple and strain-free, and the main ports on the PC stay untouched.
Step by step: how to set up one workstation so cables don’t break
One well-organized desk is easy to scale across the class. The goal is simple: the cable should not hang on the connector, get stepped on, or be sharply bent over a tabletop edge.
Sit where a student sits and do a short “walk”: trace the path from the PC or all‑in‑one to the outlet and to each device. Note risk points: where the chair spins, where feet rest, where an edge rubs the jacket, and where the cable tightens when the monitor is moved.
Then set up the station step by step:
-
Route cables under the desk along a clear path and remove sags. Leave a small slack at the device — usually 10–15 cm is enough.
-
Make a strain relief near the port: form a soft loop and secure the cable to the desk or bracket so a tug pulls on the fastener.
-
Lay the trunk to the outlet or central hub in a tray or cable channel. The bundle should not hang down.
-
Check bend radii: there should be no sharp kinks at edges or fasteners. If a cable hits a corner, change the route or add protection.
-
Label cables and ports. Simple stickers like “PC‑07, monitor‑07” help avoid unplugging everything during a fault.
Quick test after setup: pull the cable sideways as if a student suddenly slid back in a chair. If the connector feels unloaded and nothing snags, the workstation is ready.
Fasteners and materials: what really works in a classroom
Practicality beats aesthetics in a lab. Fasteners must survive daily seat changes, cleaning and quick hardware swaps.
Where the layout changes often (reseating, replacing monitors, hooking up projectors), Velcro is convenient: it opens and closes dozens of times without damaging the jacket. Plastic ties are better for places you’re sure won’t be touched. Otherwise they get cut and retied and can compress the cable over time.
Self‑adhesive clips and bases for ties help implement the main idea — strain relief. The cable is fixed to the desk or cabinet 10–15 cm before the connector so a tug doesn’t hit the port. Adhesive elements stick better if you degrease the surface and avoid sticking them to dusty particleboard.
A cable tray or duct under desks is easier to maintain: open it, add a cable, close it. Flexible conduit helps at turns and where you need to run a bundle, but it’s harder to mount neatly.
Edges are a common pain: metal, sharp corners and holes in the tabletop. Cables wear unnoticed there, especially with frequent cleaning. Grommets, bushings and rubber pads help — any simple element that removes the sharp edge.
If a cable runs along the floor it will sooner or later be crushed or caught. In walkways use cable ramps so people can walk and roll chairs over them safely.
A practical kit for a classroom usually includes Velcro straps for changeable bundles, clips/bases for fixing near connectors, a tray or channel under desks, edge protectors and a few ramps for passageways.
Example: in a PC classroom it’s often enough to secure each video and USB cable under the desk before the connector and put the common bundle in a tray. After that accidental breaks and loose ports disappear because students pull the secured part of the cable, not the connector.
How to choose cables and connectors for heavy use
Cables in a lab most often fail near the plug and at bend points. So when choosing, think not only about “USB or HDMI” but also how the cable will lie, be pulled and be bent.
Start with length. Too long a lead becomes a hanging loop that catches feet. Too short a lead is always under tension. A suitable length has a bit of slack for movement but doesn’t droop to the floor.
Look at plug shape. If a PC sits close to the wall or the cable exits under the tabletop, a straight plug forces a sharp bend. Use angled plugs there (USB, HDMI): the cable routes to the side and breaks less at the base.
The quality near the plug is often visible by the strain relief “skirt.” The longer and softer it is, the better it absorbs tension. For classrooms avoid thin, rigid “cords” and pick cables with reinforced connectors and more flexible jackets.
What to check when buying
A few real checks that help in a lab:
- Length with no unnecessary loops and no constant tension.
- Angled plugs where the cable hits a wall, monitor stand or desk edge.
- Proper strain relief at the connector (no abrupt hard plastic transition).
- For RJ‑45: protection for the clip so it doesn’t break with frequent unplugging.
To quickly reduce failures without rework, start by replacing the most stressed leads: USB to peripherals, HDMI to monitors and network patch cords in the front rows.
How to reduce stress on the ports themselves: extenders, plugs and expendables
When students plug flash drives, chargers or HDMI cables every lesson, the computer’s built‑in port wears fastest. Repairing a PC port is almost always costlier and slower than replacing a small expendable part. The logic is simple: let students plug into a replaceable point rather than the computer.
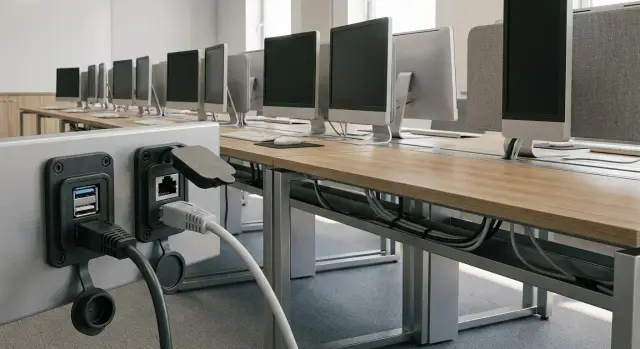
The most straightforward approach is to move frequent connection points to the desk. This can be a front USB extender, an external panel or a short adapter secured near the workstation. The PC case then stays mostly untouched and the chance of breaking the port is much lower.
External connection points: where daily plugs should go
Fixed solutions work best:
- A desk‑mounted USB hub with a bracket.
- A USB (and if needed HDMI) panel mounted on the desk edge or in a cable channel.
- A short 20–50 cm USB/HDMI extender as a replaceable insert: break it and swap it in a minute.
- For network: a tidy connection point via a short patch cord so you don’t pull the PC port.
Important: these external points also need strain relief. Fix the cable with a clip next to the connection so tugs hit the fastener.
Plugs and expendables
Ports that are rarely used (for example, rear USBs or a second HDMI) can be closed with simple dust plugs. They reduce dust and the chance someone sticks the wrong plug there.
Classroom example: a front USB on a PC broke after a student hit a flash drive with their foot. If you use a short extender instead of the chassis port, only the extender breaks. The teacher swaps it from spares and the PC stays in service without opening or soldering.
Common mistakes that lead to failures
Breakages often come from small installation errors. With daily reseating, cleaning and haste, loads quietly shift to ports, and the weak link becomes the connector on the PC or monitor.
Typical mistakes:
- Cable installed under tension with no spare loop near the port.
- Plastic ties tightened too much and cutting into the jacket.
- Cables lying on the floor without protection or labels.
- Excessively long tails hanging down and easy to catch.
- A hub or extender hanging from a single connector without mounting.
A quick local check: make sure each cable has a small slack before the port, jackets aren’t pinched by ties, nothing lies on the floor, tails don’t hang, and no hub is solely supported by a cable.
Example from practice: in a row of 12 workstations two HDMI ports failed in a quarter. Inspection showed monitors were regularly moved for cleaning and cables were taut over the desk edge. After adding slack, securing cables under the desk and fixing the hub, new failures stopped even though class usage stayed the same.
Quick 10‑minute checklist for inspecting a classroom
Do this monthly and after any desk rearrangement. Walk the room row by row and look at each workstation from top to bottom: the tabletop, edges, foot area, then the cable route to the outlet or switch.
- Cables are not on the floor and do not cross walkways.
- There is strain relief before key ports: fixation first, then the connector.
- No friction on sharp edges at bends and fasteners.
- Frequent connection points are moved to the desk or made replaceable with short extenders.
- Cables are labeled and there’s a small stock of common spare types.
If very short on time, focus on two points: the foot area (most often pulled) and the port entry to the PC/monitor (most often loosened).
Small example: in a 15‑seat room you notice three desks with HDMI cables taut to the limit. In a few minutes add a fix under the desk and give a spare loop. This reduces the chance that a sudden movement breaks the port instead of the cable.
Example for a teaching room and next steps
Imagine a 20‑seat computer lab. Students move mice, yank headsets and sometimes swap places. As a result they pull cables, bend plugs at desk edges and loosen ports. To cut failures without big costs, start with simple actions that give fast results.
What you can do in one day
Focus on basics: remove hanging tails, give slack and take load off ports.
- Secure wires under desks with clips or Velcro.
- Add strain relief: 10–15 cm loop and a fastener before the connector.
- Move frequent connections to a short extender or a mounted USB hub.
- Label cable ends (seat number and purpose).
- Agree on a simple rule: pull only by the connector body when unplugging.
What makes sense to do in a week
If the room is used every day, take one day to neatly lay the infrastructure so cables don’t get in the way.
Install cable channels along rows, cover areas where people walk, and make a clear wiring diagram (which port, which cable, which seat). Keep a small stock of spares near the room: 2–3 USB cables, 1–2 HDMI, a few RJ‑45 patch cords, some power leads and fastening supplies. This is cheaper than interrupting lessons to repair a single worn cable or waiting for a port fix.
Then adopt a short routine: visual check under desks weekly, replace worn expendables monthly. If planning a hardware refresh, pick models designed for classroom use and plan support in advance. In Kazakhstan, for such tasks organizations often consider solutions from GSE.kz — a vendor and integrator that supplies and services PCs, all‑in‑ones and servers for education and other sectors.
FAQ
Why do ports fail faster in a computer lab than at home?
In a classroom a port is handled dozens of times a day and most damage is mechanical. Cables get pulled, kicked, pinched by chairs, bent at the connector and yanked in a hurry, so contacts loosen much faster than at home.
Which connectors fail most often in a classroom?
USB ports on front panels and headphone jacks fail most often because people plug them by feel and at an angle. HDMI/DisplayPort suffer because the cable is heavy and hangs as a lever, and RJ‑45 often breaks at the plastic clip.
Why does the HDMI image sometimes drop even though everything seems connected?
Usually it’s wear at the cable base or a loose connector from repeated pulls. If the picture cuts out when you slightly move the cable, the fault is likely in the contact or a bend near the connector, not in the monitor or GPU.
What’s the simplest thing to stop USB and HDMI breakages?
Give the cable a small spare loop near the device so it isn’t under constant tension, and secure it before the connector. A sudden tug then stops at the fastener instead of the port.
How much cable slack is needed and where should it be kept?
Leave a soft spare loop of about 10–15 cm next to the port and fasten the cable to the desk or bracket before it enters the connector. The idea is that the fastener takes the load, not the port.
When should I buy cables with angled connectors?
Where a cable hits a wall, monitor stand or desk edge, a right‑angle plug reduces the sharp bend at the base. That noticeably extends service life because the weakest point is usually just behind the connector.
How can I reduce port wear if students constantly plug in flash drives and headsets?
Move frequent connection points to the desk using a fixed USB hub, panel or short extender adapter that’s easy to replace. Then students wear out the expendable adapter, not the port on the PC, and lessons aren’t interrupted by repairs.
Where should I begin inspecting the room if failures keep happening?
Start at the foot area and places where cables get caught during cleaning and chair movement. Remove cables from the floor, add route fixation under the desk and add strain relief before ports — this usually gives the fastest effect without a full rework.
What is better for the classroom: Velcro or plastic cable ties?
Velcro straps are better where the layout changes and you need to open bundles often — they don’t crush the jacket and are reusable. Plastic ties are fine for permanent points that won’t be adjusted, otherwise they’ll be cut and retightened and can damage the cable over time.
Which spare parts should be kept in the classroom to quickly restore a workstation?
Keep a small stock of common spares: USB cables for peripherals, 1–2 HDMI/DisplayPort leads, several RJ‑45 patch cords, a couple of power cables and some fastening supplies. Replacing a cheap cable is faster and cheaper than stopping a lesson to repair a port.