Portable kit for off-site citizen reception: contents and deployment
Portable kit for off-site citizen reception: equipment list, packing and labeling rules, quick on-site setup, connectivity, power and data security.
What problems does a portable kit solve on-site
An off-site reception rarely resembles work in the office. In the office there's stable internet, a familiar outlet, a nearby printer and an established order. On-site you have to bring all that with you or know in advance what you can do without.
Most often the reception “breaks” over small things that together stop the work: the laptop is out of battery, the connection drops, the printer jams, the scanner isn't recognized, and a queue forms. A portable kit is needed so such failures don't turn into a ruined reception.
It covers several practical tasks: quickly set up a workstation in an unprepared room, accept and process documents (scan, print, make copies), provide connectivity to databases and services, avoid relying on a single outlet and keep the reception pace without unnecessary pauses.
Before going out, assess the venue conditions. Ask the organizers where the table will be, how many outlets there are, how noisy it is, whether there's space for a printer, how long the reception will last and what flow to expect. If you need to serve 40 people in 2 hours in a village cultural center, a 2–3 minute delay per person quickly becomes a backlog and tension. A well-prepared kit reduces pauses and helps keep the reception smooth, even when conditions are far from ideal.
How to choose the kit contents: logic, not random items
It's better to assemble the kit not by "what's in the closet" but by "what will work reliably every time." The fewer devices and exotic connections, the fewer adapters, chargers and surprises on-site. Predictability is more important: the same connection scheme, the same cables, the same startup order.
It's convenient to think in terms of "roles." Then it's clear at once what is essential, what can be substituted and where you need a backup:
- Workstation: computer or all-in-one, monitor if needed, keyboard and mouse.
- Printing and scanning: an MFP or separate devices plus supplies.
- Connectivity: main internet and a backup channel.
- Power: extension lead and surge protector, spare power adapters, reserve for voltage drops.
- Small but critical items: tested cables, required adapters, official offline templates (if allowed by policy).
Reserve only what's critical. Usually that's internet and power. A simple example: a reception in a village cultural center with unstable Wi‑Fi and distant outlets. A second connection channel and a clear power plan solve half the problems before powering up devices.
There's an inverse rule: don't take unnecessary "just-in-case" items. They weigh down the case and complicate setup. Most often you don't need a second printer, rare cables, complex docking stations that require extra configuration, a personal router with manual settings, or unapproved removable media and external drives if they introduce a data risk.
If the configuration is chosen logically, it's easier to standardize and maintain. Organizations that buy equipment in advance benefit from fixing a single configuration based on serial PCs or all-in-ones so any field employee assembles the workstation the same way.
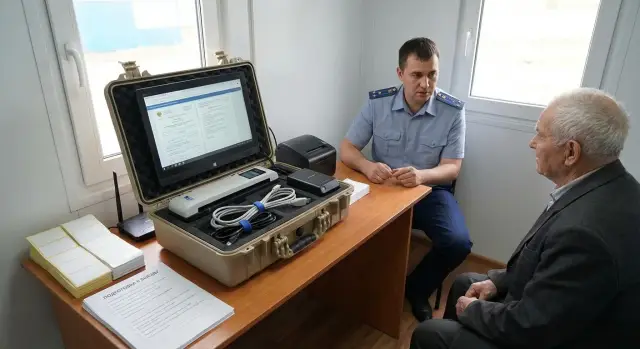
Basic computing: PC, all-in-one, input-output
The heart of the kit is the workstation. It should boot quickly, not overheat in a cramped space and withstand frequent transport. It's better to choose one model in advance and keep it consistent across kits so staff don't spend time adapting.
If space is limited (narrow table, reception in a corridor, few outlets), an all-in-one is more convenient: one chassis instead of a tower and monitor, fewer cables, faster setup. If you need more flexibility (replaceable monitor, more ports, easier repair), a compact PC with a separate monitor is suitable.
Don't chase "the most powerful" model, focus on what matters for field work:
- Screen and readability: 21–24 inches or an all-in-one of that class so forms and scans are visible without constant leaning.
- Ports: 3–4 USB, video output, wired Ethernet, headset jack or USB headset support.
- Connectivity: stable Wi‑Fi and preferably a network port for wired internet.
- Camera and sound: a webcam and headset are needed if remote consultations or calls occur.
- Reliability: a sturdy chassis and peripherals that withstand frequent plugging.
In Kazakhstan it's convenient to keep devices from one manufacturer and series so power supplies, drivers and cables are standard. For example, desktop PCs from the GSE series L200 or M200 all-in-ones.
Add drives, card readers and any “convenience” flash drives only when strictly necessary. If required, enforce the rule: only official, tracked and encrypted media.
Scanning and printing: avoid stopping because of paper
Paper often becomes a bottleneck at field receptions. If the scanner "acts up" or the printer suddenly needs consumables, work stalls and the queue grows. Plan in advance what you'll digitize and print, and choose equipment for the actual throughput.
What is scanned most often
Usually: passport (photo page and registration page), powers of attorney, applications, data processing consents, certificates and supporting documents. It's convenient when a scanner handles sheets of different weights and feeds them evenly. An automatic feeder saves time, but in the field it should not be too "delicate" about staples or creased edges.
Before departure, include paper, a few folders, printing supplies and simple maintenance tools in the kit: wipes, a soft dust brush. A stapler and spare staples help, but choose a small travel stapler.
Printing without surprises
For field work, a laser printer is usually chosen: it tolerates pauses, prints clearly and doesn't dry out. An inkjet may be lighter and cheaper but requires careful storage and regular use, otherwise banding appears.
To reduce jams and waste, keep paper in sealed packaging (moisture quickly spoils feeding), don't use curled sheets and check the tray before starting. In dusty venues people often bring documents with staples: a 30‑second inspection before feeding the stack can save 10 minutes untangling a jam.
Connectivity and internet: primary and backup options
Internet is the most common cause of field reception failure. It's better to build in two scenarios: a primary channel for work and a backup in case of signal drop or network overload.
The main option is usually the simplest: a mobile router with a SIM card. It provides Wi‑Fi for the computer and, if needed, for the printer, scanner and phone. Make sure the router can run from a battery or power bank, not only from mains.
A backup is not "just in case" — in reality you may be in the basement of a government building, a school with thick walls, or a hall crowded with people. A practical minimum: a second SIM (preferably a different operator) and a clear switching method, modem tethering on a smartphone, a short spare USB cable for power/connection and a spare network cable if wired internet is available.
A local network is not always required. If printing is USB and scanning goes directly to the PC, you can do without a mini‑network. But when several devices need shared access, keep them on the router's Wi‑Fi and store the network name and password on a card in the case.
Spend two minutes before the reception to check: open required services, send a test file and make a trial print. If pages load slowly or the connection drops, switch to the backup before queues form.
Power on-site: how to avoid relying on a single outlet
Often it's not the equipment but the electricity that fails: the outlet is far, there's only one, the contact is loose, or someone plugs in a kettle. Plan power so the kit can be deployed on any table without hunting for outlets.
A base setup that covers most situations: an extension lead, a surge protector and a few adapters for common plug types. Prefer an extension that's long enough and keep the surge protector on the table near the equipment rather than on the floor.
To avoid cable confusion and odd failures, use one power point on the table: plug everything into a single surge protector. Label cables with tags or colored tape: “PC”, “printer”, “scanner”, “internet”. This speeds setup and helps with packing.
A UPS or portable power station is justified if voltage is unstable, outages happen, it's important to save documents correctly, and printing/scanning cannot be interrupted. Also check chargers and spare batteries for critical small items: modem/router, phone for tethering, wireless mouse, token for e-signature. The working scenario: power blinks, the PC continues on UPS, the modem runs from a power bank, the reception doesn't stop.
Security and confidentiality: protecting citizens' data
The risk of leakage is higher off-site than in the office: strangers nearby, documents on the table, equipment sometimes left unattended even for a minute. So the kit should include not only hardware but also rules that are practical to follow.
First — who can see the screen and papers. Position the workstation so the monitor faces away from the queue and walkway, and don't leave folders and prints face up. In a hall a simple privacy filter and the habit of putting documents into a folder immediately after signing help a lot.
System access: minimal rights, maximum control
Create separate accounts: one for the operator and one for the administrator (only for settings). Give the operator minimal rights, no install permissions and no system settings access. Enable automatic screen lock after 1–3 minutes and require a password to log in.
Media and files: encryption and USB control
Disk data should be encrypted (full disk encryption like BitLocker or equivalent). For USB drives enforce a simple rule: either use only official service media or ban them entirely. This reduces the risk of accidental copying or introducing malware.
A quick pre‑departure check helps: the screen locks automatically, no password on a sticky note, operator rights limited, disk encrypted, USB policy applied, and prints not left on the table.
Store prints, drafts and copies in an opaque folder or sealed envelope until return to the office. Prepare a separate disposal bag for shredding and assign responsibility: who collects, where it's stored and when it's sent to the shredder.
Packing and transport requirements: case, protection, labeling
Packing is not just about getting the equipment there, it's about ensuring it arrives ready to work. First decide what matters more: maximum protection or lightness.
A hard case is justified if the kit travels often, is loaded into trunks, carried up stairs, or used at locations without careful logistics. A soft bag suits infrequent trips, short distances and when you're confident the kit won't be thrown or crushed.
Everything inside should be fixed. Foam inserts or modular dividers prevent the all-in-one screen, printer and scanner from hitting each other or suffering vibration. Small items (cables, power supplies, tokens, stamps, extension leads) are best stored in separate compartments.
Consider the environment: rain at the entrance, dusty rooms, a cold trunk in winter and heat in a car. Keep supplies and documents in a separate waterproof pouch and allow 10–15 minutes for equipment acclimatization after cold to avoid condensation.
Labeling saves time and reduces loss risk. Simple rules suffice: labels on compartments that say "what's inside" and "how to connect", matching marks on chassis and power bricks, an inventory card with serial numbers, seals or tags for critical devices and a "return zone" for small items.
This way the kit is packed back in reverse order after the reception and launches on the next visit without surprises, even if the organization uses several workstation types.
Quick on-site startup: step-by-step sequence
Most field reception failures are not caused by weak equipment but by haste and different procedures. The kit must have a fixed startup scenario so any employee can repeat it without improvisation.
On arrival spend 2–3 minutes assessing the site: where to seat the applicant, where to place equipment, whether screen glare will be a problem, how many usable outlets there are, signal strength and how to arrange the queue so people can't see screens or documents.
Startup sequence: from general to specific
Follow one consistent sequence:
- Lay out power: extension lead, surge protector/UPS, chargers. Turn on and check indicators.
- Establish connectivity: primary internet, then backup (phone hotspot or second channel).
- Start the computer and log into the operator account. Check date and time.
- Connect peripherals one by one: scanner, printer, card readers, headset.
- Do quick tests: one trial print and one test scan in the required format.
Then open required applications and verify access: logins to government systems, certificates/tokens (if used), print permissions, and templates. If login requires a code, ensure the second factor is available (phone charged, connection present).
If there's no internet: plan B
If connectivity fails, don't waste time arguing with the venue:
- Switch to the backup channel.
- If completely offline, record requests on prepared paper forms and assign a number in a journal.
- Scan documents to a local folder using a file naming rule (date, full name, document type) and temporarily store them in an encrypted container.
- Give the applicant a printed receipt of acceptance using a pre-printed template.
Pack down in the reverse order: finish the reception, save and verify copies, print summaries (if needed), log out, power off and pack using a checklist. The main rule: nothing left on the table or in device memory—especially removable drives, drafts and tokens.
Common mistakes at field receptions and how to avoid them
The most painful field problems are not "broken equipment" but small issues that eat time and frustrate the queue. With a properly assembled kit you spend minutes on setup, not half an hour searching.
A common mistake is unlabeled cables and power bricks. Everything looks the same on the table, especially when two staff are working. The fix is simple: labels on both ends of cables and a small organizer for adapters.
Another mistake is relying on a single connectivity channel. When the internet drops, the reception stops and people wait. Decide in advance the main option (wired or mobile) and keep a backup (second operator, spare router or a phone for tethering). Before departure, verify the SIM is active and the tariff allows tethering.
Printing and scanning often fail because there's no prior test. Drivers, paper or formats become apparent only when a queue waits. A short ritual helps: turn equipment on and print a test page and perform a test scan beforehand.
A separate risk is mixing up citizens' documents. When applications, copies and receipts are in one pile, it's easy to confuse them and breach confidentiality. Use a simple order: two labeled folders “in process” and “done”, a separate tray for copies and drafts, and the rule “only one set of documents on the table”.
Finally, many forget return accountability. Introduce a protocol: who took what, serial numbers, condition, and who returned it. This reduces losses and quickly shows what's missing before the next field trip.
Short checklist: 5 minutes before start and 5 minutes before departure
A standard kit makes field work predictable. This short checklist helps catch typical issues: dead battery, forgotten cable, nonworking scanner or “missing” internet.
Before leaving the office check:
- Charge: workstation, phone for tethering, power bank, batteries (if needed).
- Supplies: paper, cartridge or toner, folders/files, wipes for rollers.
- Access: login credentials, password/certificate validity, token/key.
- Quick test: trial print and one test scan.
- Packing: cables labeled, power bricks present, fragile items separated, seal or control sticker applied.
On site keep the table "clean": applicants' documents separate from drafts, screen turned away from the queue, unnecessary windows closed. If connectivity is unstable, enable the backup immediately and log incidents in a short journal: time, what happened, what actions were taken.
Before departure:
- Close sessions: log out of systems, disconnect VPN, sign out of mail and messengers.
- Remove data: save to the correct repository, clear Downloads, delete temporary files (if organizational policy requires).
- Check papers: nothing left on the table, in the printer or trays; drafts destroyed per procedure.
- Verify inventory: devices, chargers, cables, router/modem, extension lead.
- Make a short report: how many requests, what failed, what to replenish before the next trip.
The minimum that should be in every case: a workstation, scanning and printing capability, two internet options, backup power, a set of cables and supplies, plus a quick-start guide and support contacts.
Practical example: a reception in a venue without infrastructure
A reception was scheduled in a village House of Culture. There's one table in the foyer and an outlet nearby, but the power is "noisy" and sometimes cuts out. Internet alternates between 4G and 3G, and a queue is already forming: people need to submit applications, have documents scanned and immediately receive a printed copy.
Here a kit that doesn't rely on external conditions helps. Place an all-in-one on the table (fewer cables and one power brick), a compact scanner and a small laser printer nearby. Connectivity comes from a router with two SIM cards: if one network weakens, switching takes minutes. Put a UPS between the outlet and equipment to handle short power drops and protect against spikes.
Organize the flow by layout. The queue should be separate from the area where screens and documents are visible. Put the printer on the edge of the table or on a small stand so visitors don't walk behind the operator and snag cables.
Before start the team performs a quick check: connect the UPS and check its charge, verify both connectivity channels, do a test scan and print, prepare forms and supplies, enable screen lock and work under the operator account.
At the end of the day the priority is data safety and keeping track of small items. Transfer files to the approved storage, clean temporary folders, close accesses. Then power down, let the printer cool and pack by inventory so nothing is missing on the next trip.
Next steps: standardize the kit and prepare support
If field receptions are frequent, the main gain comes from a single standard. When all teams follow the same kit logic and startup steps, mistakes drop and readiness time becomes predictable.
First, fix a standard kit composition and regulation: what's mandatory, what is acceptable as a substitute, who checks before departure and who records inventory after return. Then it's convenient to separate equipment by role and store in dedicated cases: “Reception”, “Print-Scan”, “Connectivity-Power”, “Security”.
After assembling, run a trial in conditions close to real: without the usual network, without comfortable tables, and with a flow of people. Time how long it takes “to the first accepted application” and “to full readiness”, then adjust the regulation.
If you need a single supplier and integrator to help assemble a typical configuration for government bodies and large organizations, you can rely on the experience of GSE.kz (gse.kz) as a manufacturer and system integrator in Kazakhstan: serial PCs and all-in-ones, unified setup profiles and support help make field workstations identical and predictable.
FAQ
Why do you need a portable kit for off-site reception?
A portable kit prevents the reception from stopping due to small on-site issues: weak connectivity, lack of outlets, problems with printing and scanning. It lets you quickly set up a workstation and maintain a steady service pace even in an unprepared space.
How do you begin selecting kit components to avoid taking unnecessary items?
Start with the conditions: how many people and in what time frame need to be served, whether there is space and outlets, and how stable the connection is. Then assemble the kit by roles: workstation, printing/scanning, connectivity, power and the small items critical for startup. The fewer nonstandard adapters and ad-hoc connections, the more repeatable and reliable the setup.
Which is better for field work: an all-in-one or a compact PC with a monitor?
An all-in-one is more convenient where space is tight and you need to set up quickly: fewer cables and a single chassis. A compact PC with a separate monitor is better when you need more ports, easier repair or to swap parts. The important thing is to choose one type and stick to it across all kits so staff don't waste time adapting.
What computer characteristics matter most for field work?
Focus on screen readability and scanned document clarity, available ports and predictable peripheral support. For field use, several USB ports, a video output, wired Ethernet for ‘live’ internet and stable Wi‑Fi matter most. Choose enough processing power for your systems, but prioritize reliability and uniform configuration.
How to choose a scanner and avoid jams and errors?
If the throughput is noticeable, an MFP or a scanner with an automatic feeder is convenient, but only if it reliably handles different paper weights and isn't ‘picky’. Check drivers and run a test scan in the required format beforehand; otherwise the issue will appear once a queue forms. Inspect documents for staples before feeding them to avoid jams.
Which printer is best for off-site reception and why?
Laser printing is usually preferable for field work because it tolerates pauses and delivers consistent results. Keep paper sealed to avoid moisture, include consumables in the kit, and do a test page before starting to catch tray or driver issues.
How to organize internet: what should be considered the mandatory backup?
Keep two scenarios: a main channel and a backup you can switch to within a minute. The practical minimum is a second operator or the ability to share internet from a smartphone, plus a clear switching procedure. Before start, open required services, send a test file and perform a test print.
What should be included in the kit's power setup to avoid dependence on a single outlet?
At minimum: a long extension cord and a surge protector so everything draws power from one point on the table and wiring doesn't get confused. If outages or voltage drops occur, add a UPS so work can be saved properly and printing/scanning won't be interrupted. Label cables to speed setup and packing.
How to protect citizens' data during field reception without complex procedures?
Start with simple rules: position the monitor away from the queue, don't leave documents open, and enable quick screen lock. Use a user account with minimal rights for the operator and reserve admin access for configuration only. Encrypt disks and either ban USB drives or allow only registered, encrypted service drives.
What is the most reliable startup procedure on-site and what to do if there's no internet?
Follow the same sequence every time: first power, then connectivity, then the computer, and finally connect peripherals one by one. Mandatory tests: one scan and one print before starting. If there is no connection, use offline forms and a naming rule for local scans so data can be transferred correctly later.