PC Cooling Check at Acceptance: 10–15 Minute Test
PC cooling check at acceptance: a quick set of measurements taking 10–15 minutes per unit, signs of throttling and obvious assembly errors.
What we check and why it matters at acceptance
At acceptance you need to confirm not just that “fans spin,” but that the cooling keeps the system within normal limits under a short load. A quick check should answer three clear questions: do the CPU and GPU overheat, do clock speeds drop because of protection, and are there obvious assembly errors.
At idle almost any PC looks fine. Problems usually show up when temperatures rise: a poorly seated cooler, dried or excess thermal paste, clogged filter, wrong fan profile, or a pinched cable. A short load run is often more revealing than watching the “desktop” for a long time.
First, check simple things: CPU (and GPU, if present) temperatures at idle and under load, fan speeds and their response to heating, frequency stability, noise (whine, crackling, vibration, a cable catching the blade), and system behavior under load (freezes, reboots, errors).
This is especially important for a batch. One “bad” unit often indicates a systemic cause: a bad thermal paste batch, repeated assembly error, incorrect cable routing, different fan revisions, or damage during transport. Catching an issue at acceptance can save weeks of returns and downtime, which is critical for schools, clinics and offices with no time for long diagnostics.
Common problems are recurring: the cooler is tilted or under-tightened, thermal paste applied in a blob or with gaps, a fan plugged into the wrong header or spinning irregularly, a cable in the impeller, protective film left on the cooler base, or airflow blocked by a filter or panel.
What you can realistically catch in 10–15 minutes per PC: overheating under short load, early throttling, fan malfunctions, and most visible assembly errors detectable by noise and temperature graphs. Rare faults that appear only after an hour (for example, heat leaking from a micro-gap or instability at extreme load) require long tests and are usually handled as a separate sample-based check.
Preparing the testing area and a simple protocol form
To get fair results, all units need identical conditions. Otherwise you’re comparing room temperature and case placement, not build quality.
Choose a place where you can keep roughly the same air temperature for a few hours. Avoid direct sunlight and placing PCs near radiators or space heaters. Normal ventilation or an open door is usually fine, but airflow should not be blowing directly into a case.
Place the system so it has proper air intake and exhaust. Don’t press the case against a wall or push it into a niche. Keep a consistent distance to the wall for all tested machines, otherwise one unit will have poor exhaust and another will have better airflow and the numbers will “drift.”
A minimal, simple kit:
- a room thermometer (or a sensor on a rack) to log conditions
- a USB drive or network location with prepared utilities and a stress test
- a stopwatch (a phone is fine) to keep load intervals equal
- optionally — a noise meter app on a smartphone to quickly spot an obviously howling fan
Next, use a short protocol form. It enforces discipline and makes it easy to compare devices, which is important for sampling.
A convenient protocol can be a table (paper or file) with these fields:
- date, location, room air temperature
- PC model, serial number, configuration (CPU, GPU, RAM)
- case placement (on desk or floor), distance to wall, presence of dust on filters
- results: idle and load temperatures, fan RPMs, presence of throttling
- subjective notes: unusual noises, vibrations, abrupt RPM jumps
- assembly comments: cables blocking airflow, loose heatsink, missing seals, a wobbling fan
A practical tip: make a “reference” unit for the batch. Test 1–2 devices first, record normal temperature and RPM ranges, and use that as a baseline to quickly spot outliers needing deeper checks.
Minimal measurements: what to record numerically
So the check doesn’t become “by ear” or “by eye,” decide in advance which numbers you’ll collect from each unit. Then results are easy to compare and problem machines stand out quickly.
Start with the conditions. Two identical PCs can show different temperatures just because the room is warmer or there’s a draft. Record room temperature and also the temperature where the case actually draws air.
Minimum set that gives maximum value in 10–15 minutes:
- air temperature: near the workstation and at the case intake (front or bottom), in °C
- CPU and GPU temperatures: at idle (after 3–5 minutes) and under load, in °C
- fan speeds: CPU fan and case fans (RPM); PSU fan only if a sensor is available
- CPU/GPU frequencies: average and minimum under load (MHz/GHz) with a note if there were drops
- power draw: brief sensor readings if available (CPU package power, GPU power, total power), in watts
Log these in a short format: model and serial number, date, room temperature, then two blocks — idle and load. Example: if room is 24°C but intake is 29°C, it’s already clear the case is starved for fresh air (perhaps too close to a wall or in a tight niche).
Look at the pair “temperature + frequency.” If temperature rises under load and CPU frequency drops significantly, that’s a direct sign of throttling or incorrect cooling setup. Even without complex tests these records help quickly weed out problem units and send them back to assembly for rework.
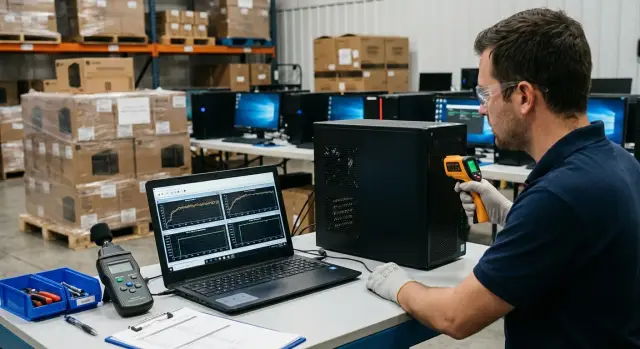
Step-by-step 10–15 minute test for one PC
This express approach fits acceptance testing when you need to quickly filter problematic units and verify consistent batch behavior.
-
Let the PC idle for 2–3 minutes. Record baseline values: CPU (and GPU) temperature, fan RPMs and perceived noise.
-
Run a short CPU load for 5–7 minutes. Watch temperature and frequency behavior. A healthy system usually reaches a plateau. It’s suspicious if frequency begins dropping noticeably after 1–2 minutes while temperature keeps rising or fluctuating.
-
If there’s a discrete GPU, add 3–5 minutes of GPU load. Check whether the card hits thermal or power limits and whether there are sharp frequency drops.
-
Stop the load and observe for 1–2 minutes how the system cools down. Temperatures should fall steadily and fans should gradually slow. If cooldown is slow or fan behavior is erratic, investigate assembly and settings.
Alarm signals in such a test:
- sudden temperature jumps of tens of degrees in seconds without clear cause
- unstable RPMs: a fan wildly speeds up then nearly stops
- early drops in CPU or GPU frequency under load that don’t settle
- high heat at low load (often felt as very hot exhaust)
- after stopping the test, temperature falls slowly or in jumps
Practical example: when accepting a batch of office PCs for a classroom, compare 2–3 units in sequence with the same procedure. If one is noticeably hotter and louder at the same conditions, it’s usually not a quirk but an incorrectly mounted cooler, bad thermal paste, or blocked airflow.
How to spot throttling without complex diagnostics
Throttling is when the CPU or GPU reduces clock speed to avoid overheating or to fit within power limits. At acceptance this matters: a PC may look fine at idle but will slow and become unstable under load. For a quick check watch temperature, clock speed and fan response together.
Quick signs by numbers and behavior:
A common scenario: temperature spikes in the first minutes, fans go to high RPM, but temperature doesn’t stabilize. Then clock speeds begin to fall and performance drops while the load remains constant.
Watch for signs visible within 10–15 minutes:
- temperature climbs rapidly and doesn’t settle on a plateau (fans spin up but no stabilization)
- CPU or GPU clock noticeably drops under sustained load (a persistent drop, not a single spike)
- fan RPM barely changes while temperature rises (possible fan curve issue, sensor problem, BIOS setting or wrong connector)
- stutters: brief slowdowns, FPS drops, UI hangs without obvious cause
- airflow imbalance: hot exhaust with weak intake or cool exhaust with very hot case interior (issues with filters, fan direction or airflow)
How to confirm throttling in a couple of minutes:
- Run a CPU (or GPU) load and observe for 3–5 minutes.
- Record peak temperature and clock at the start and after 3 minutes.
- Check if fan speeds rise with temperature.
- Note if performance drops (e.g., a clear clock speed decrease or stutters).
Short example: on one PC CPU temp jumps to high values within a minute, the fan becomes noticeably louder, but after 2–3 minutes the CPU clock starts behaving like a saw (up and down) and the system stutters. This is a typical sign of overheating or a poorly seated cooler, even if idle looked fine.
If throttling repeats across multiple units of the same configuration, that points to a systemic issue: BIOS settings, repeated assembly mistake or limited case airflow.
Assembly signs you can spot immediately
Many cooling issues are visible before running tests. If one PC is poorly assembled, it often repeats across others. A quick visual inspection saves time.
Five things to check in 2 minutes
Open the side panel, shine a light and look at the CPU area and case fans.
- Cooler is tilted or not tightened properly: one corner sits higher than another or fasteners are uneven. If the heatsink moves slightly when nudged, that’s a bad sign.
- Thermal paste applied incorrectly: too much squeezed out or almost no coverage. It’s bad if paste has spilled onto components around the socket.
- Protective film on the cooler base: rare but critical. If you see a film, label or glossy finish “like new” on the cooler base, stop acceptance for that unit and disassemble.
- CPU fan plugged into the wrong header or spinning suspiciously slowly: the cable should be in CPU_FAN. If it’s in SYS_FAN or a pump header, the board may not control RPMs correctly.
- Poor airflow through the case: cables block fan intakes, touch the blades, or fans are oriented wrong so hot air recirculates.
Quick example of a worrying find: everything looks neat but the front case fan barely spins and the CPU-fan cable is routed to an edge header. Check the connection — such small mistakes often cause overheating in 5–10 minutes under load.
If you find any of these signs, note them in the protocol and don’t waste time on long tests until the assembly is fixed.
How to test a batch: sampling and comparing results
For a batch it’s not only absolute temperatures that matter but also the spread between identical PCs. Ideally 3–5 random units give similar temperature, RPM and behavior under load. If one stands out, it’s usually an assembly issue or a single defective part and easier to catch now than after deployment.
Start with a small sample, but choose it to cover different groups. For a large shipment follow a simple logic:
- pick PCs from different boxes (start, middle, end of the pallet)
- include different assembly dates or batch stickers if present
- if shipment arrived in several consignments or shifts — check one from each
- take one unit from the edge (these often suffer more in transport)
- if there are two similar configurations — test both
Compare results only under identical conditions: same room, same load duration, same power source. Normal variation among identical PCs is small: temperatures and RPMs may differ a bit but shouldn’t fall into different “behavior classes” (for example, one holds clocks steady while another quickly drops).
Alarm signs when comparing: one PC runs noticeably hotter at the same RPMs, fans run higher continuously without reason, time to reach peak temperature differs greatly, or throttling appears on one unit but not on others.
If one unit is an outlier, don’t decide based on a single sample. Test 2–3 more from the same group (same box, pallet or assembly date). If the problem repeats, it’s likely systemic. If not, it’s probably a single defect.
To separate a model issue from an assembly issue, log the serial number, exact configuration (CPU, GPU, case and cooler type, number of fans) and BIOS version if visible. Then you can see whether a single serial is bad or an entire configuration drifts.
Common acceptance mistakes and how to avoid them
Cooling is often judged “by eye” and by a single quick start. That’s insufficient: some defects show only after warming up and under short load.
Mistake 1: a single run with no warm-up
If you just open the desktop, glance at temperatures and shut down, you’ve only confirmed that sensors work. Let the system idle 3–5 minutes, then load it 3–5 minutes, and only then compare numbers. This reveals weak cooler contact, dried paste or a misbehaving fan.
Mistake 2: testing in poor conditions
A PC in a niche, under a desk or flush with a wall will have blocked vents and poor results even if it’s otherwise fine. Do acceptance in the same place with normal intake air and no boxes or packaging nearby.
To reduce spread follow simple rules:
- same case position for all units
- fixed room temperature (record it)
- identical idle and load durations
- side panel closed if units are supplied closed
Mistake 3: comparing results from different conditions
If you measure at 19°C one day and 26°C the next, you can’t conclude the batch got worse. Compare only measurements from identical conditions or always record room temperature alongside results.
Mistake 4: trusting auto fan profiles without checking response
Auto may be tuned too quietly and fans will spin up late. Check that RPMs noticeably rise with temperature and fall after the load. If the response is delayed or RPMs “saw,” review BIOS settings and fan connections.
Mistake 5: ignoring noise and vibration
Humming, rattling and vibration often mean imbalanced blades, a cable touching the fan, a bad bearing or a loosely mounted case fan. Temperatures may look normal but that noise can lead to failure in weeks. Such a unit should be replaced or sent for diagnostics.
If you accept equipment for a government body or school, agree in advance who will provide quick replacements. Vendors with local support (for example, GSE.kz) usually handle these cases faster than makeshift on-site repairs during acceptance.
Quick acceptance checklist
This checklist helps make testing consistent for all units and avoid missing small but important details. It fits desktop PCs, all-in-ones and workstations when you have 10–15 minutes per machine.
Required fields in the protocol
First, log the context. Without it temperatures and RPMs often lose meaning, especially when comparing batches.
- room air temperature (e.g., 23°C) and where the PC stands (on desk, in rack, by wall)
- model and configuration (CPU, GPU if present, RAM), plus serial or inventory number
- idle and short-load temperatures and how quickly they rise (within 1–2 minutes)
- fan RPMs and CPU/GPU clock stability under load
- short noise note: normal or suspicious (whine, rattle, abrupt jumps)
After numbers do a quick visual check without disassembly. Verify airflow direction (usually rear or up) and that warm air is not just recirculating inside the case.
Quick visual signs of sloppy cooling assembly
Sometimes a problem is visible even if temperatures are currently within acceptable bounds. Small things: cable touching a blade, a bundle blocking a front fan, a tilted heatsink. Check basic things: fans spin, nothing vibrates, and there’s no odd burning smell. When accepting identical PCs compare 2–3 units — a large spread often indicates inconsistent cooler mounting or paste application.
Decision per unit
Make a clear final mark so the batch doesn’t get stuck in discussion:
- Accept: metrics match other units, clocks hold, no throttling.
- Rework: suspicious noise, odd airflow, fan not working, cables blocking.
- Extended test: CPU/GPU throttling, temperatures rising quickly, or results significantly different from batch norms.
This format makes checks reproducible: one inspector tests 5 units, another tests 5 units, and conclusions are comparable.
Example acceptance flow and next steps
Imagine a delivery of 50 office PCs for several rooms. You don’t have time to run full stress tests on every unit, so sample 10%: 5 units from different boxes (start, middle, end of pallet) and an extra unit if noise or labeling seems suspicious.
For each PC fill one short line in the protocol so you can compare later. Keep conditions identical: same outlet, similar room temperature, same load and test duration.
A record might look like:
- serial number, date, room temperature
- CPU: peak temp and throttling (yes/no)
- GPU (if present): peak temp and throttling (yes/no)
- fan RPM at peak (CPU and case)
- notes: noise, vibration, smell, errors
A healthy group usually shows tight numbers: peak temperatures differ little (for example, within 5–10°C), fan RPMs are similar, and there’s no throttling. Noise increases predictably under load and subsides quickly after the test.
A problematic unit stands out. For example, four PCs are similar and one is much hotter, with the fan at max and signs of throttling. That alone is reason not to accept that unit and to mark it suspicious.
If a problem repeats (e.g., 2 of 5 in the sample) act firmly and don’t try to force acceptance. A reasonable sequence is:
- pause acceptance of this batch or at least this model until the cause is found
- isolate suspicious PCs and log their test results
- ask the supplier to rework (secure cooler, reapply thermal paste, correct fan direction, fix cables)
- schedule an extended check on a larger share (for example, 20%)
To reduce disputes, agree criteria in advance: acceptable room temperature range, load duration, maximum temperature without throttling, expected fan RPMs and what counts as a defect (e.g., throttling under stock settings or a large spread across the group). Attach this to the contract or acceptance report.
If procurement includes deployment and support, agree acceptance protocols and service response times upfront. With vendors that offer integration and local support, such as GSE.kz, these rules can be set before shipment so acceptance issues are resolved faster and don’t hold up deployment.
FAQ
Why run a load test at acceptance if everything looks fine at idle?
In 10–15 minutes you confirm three things: the system does not overheat under a short load, clock speeds do not drop due to protective throttling, and there are no obvious assembly mistakes. This quickly weeds out problematic units while the batch is still at acceptance rather than later in operation.
How do I make test conditions consistent so the numbers are trustworthy?
Keep the same conditions for all units: the same room, no direct sun or heaters nearby, the same position for the case and the same distance to the wall. Record room temperature and, if possible, the temperature at the case air intake in the protocol — otherwise comparisons between units won’t be fair.
Which numbers should I actually record in the protocol?
At minimum — room temperature, CPU (and GPU if present) temperatures at idle and under load, fan speeds, CPU/GPU clock speeds under load and notes about any drops. Also record configuration and serial number so you can trace issues across the batch.
What is the simplest 10–15 minute test scenario for one PC?
Start with 2–3 minutes idle to log base temperatures and fan RPMs. Then 5–7 minutes CPU load, then 3–5 minutes GPU load if present, and finally 1–2 minutes watching cooldown and fan behavior. The goal is not absolute maximums but whether the system reaches a stable plateau without frequency drops.
How can I tell if throttling is happening without complex diagnostics?
Watch the combination of temperature and clock speed. If temperature rises, fans are loud, and CPU/GPU clocks fall and don’t recover under steady load, that’s throttling. Another sign is a ‘sawtooth’ clock behavior under constant load accompanied by stutters.
What assembly mistakes most often cause overheating and can be caught quickly?
Typical causes you can catch quickly: uneven or loose cooler mounting, poor thermal paste application, CPU fan plugged into the wrong header, cable caught in an impeller, wrong direction of case fans, or blocked intake by a filter/panel. These show up as unstable RPMs, strange noises, or temperatures spiking in the first minutes of load.
What can I spot in a 2-minute visual inspection before testing?
Open the side panel and look at the CPU area and case fans. Check that the cooler is not tilted or loose, the radiator doesn’t wobble, the CPU fan is plugged into the CPU_FAN header, cables don’t obstruct airflow or touch the impeller. If you see a clear issue, mark it in the protocol and send the unit for rework instead of wasting time on extended tests.
How should I test a batch: sampling or every PC?
Don’t assess only absolute temperatures — check the spread between identical PCs tested in the same conditions. If one unit is noticeably hotter and louder at the same RPMs or shows throttling while the others don’t, test 2–3 more units from the same group (same box, pallet, assembly date) to determine if it’s a batch problem or a single defect.
What signs are considered alarming and what should I do if they appear?
Warning signs include fans not responding to temperature increases, RPMs oscillating, sudden temperature jumps, freezes, restarts, or repeated throttling. Mark such PCs as “extended test” or “rework.” At acceptance it’s more important to catch repeatable causes across the group than to spend a long time diagnosing one unit.
How to define clear criteria for accepting or rejecting based on cooling?
Use a clear pass/hold/retest scheme: “Accept / Rework / Extended test” with a short reason and numbers (temperature, clock, RPM). Agree criteria in advance: load duration, acceptable room temperature range, maximum temperatures without throttling, expected fan RPMs, and what counts as a defect (for example, throttling under stock settings or a large spread across the group). If delivery includes support, agree acceptance protocols and replacement procedures ahead of time with the supplier — manufacturers with local support like GSE.kz usually resolve these issues faster than ad-hoc repairs during acceptance.