Organizing Video Wall Operator Workstations: Plan and Practice
How to organize operator workstations for a video wall: separate zones, choose connection interfaces, and plan redundancy and maintenance without stopping shifts.
Where the problem starts: visibility, speed and responsibility
An operations room with a video wall doesn’t start with furniture or display choice. First answer a simple question: what must the operator notice in time, and what happens if they don’t.
In any shift there are two information streams. The first must always be in view: key cameras, alarms, system statuses, a map and the overall situation. The second appears as needed: archive footage, sensor details, messages with field teams, tickets. When these streams are mixed, the operator spends seconds finding the right window and can miss events.
Layout mistakes often add to the problem. If workstations are placed “where they fit,” people block each other’s view, get glare, and can’t hear colleagues. If connections are assembled with “temporary” cables, replacing a monitor becomes a quest and easily ends in downtime.
It’s important to distinguish room types. A security post typically monitors fixed cameras and access control. A dispatch room maintains contact with field teams and manages processes. A situational center compiles information from different systems and makes group decisions, so it requires higher levels of collaboration and role distribution.
Before buying equipment make several decisions, otherwise it’s easy to overspend and still end up with an inconvenient ops room:
- which screens are personal and which are shared on the video wall
- who switches sources and who can change layouts
- which scenarios are time‑critical (10 seconds, 1 minute, 5 minutes)
- how maintenance will be performed without stopping the shift (redundancy, hot swap)
Example: in a 24/7 monitoring center one operator watches alarm cameras, another handles communications and logs. If both have the same tasks and no assigned responsibilities, they either duplicate each other or assume “that’s not my job.” So projects almost always hinge on responsibility first, then on equipment.
Gathering requirements: people, scenarios, sources and constraints
A working scheme starts with clear requirements. If you don’t collect them up front, small details surface later and break the shift: someone can’t hear alarms, the image lags, or access to the rack is blocked by desks.
First record people and work rhythm. How many operators sit at consoles at the same time, who is the shift lead, is there an on‑duty engineer, and which tasks run in parallel. Look at the peak, not the average: what happens during an incident when everyone switches between sources and uses comms.
Then describe display scenarios. Which data must be on the video wall constantly (for example, a general map and an events list) and which appear on request (a specific camera, SCADA window, document or email). That makes it easier to determine how many windows are needed and where they should live: on the shared wall or on personal monitors.
What to clarify before drawing the scheme
Walk through this short list of questions:
- which sources will be connected and how many (cameras, SCADA, maps, office apps, guest laptops)
- which windows must be continuously visible, and how many windows are needed at peak on the wall and at an operator station
- what is critical for quality (resolution, legibility of small text, color, is audio required)
- what latency is acceptable for video and control, especially for alarms
- what room constraints exist (window light, reflections, noise, service access routes)
Discuss reliability separately. If shifts are 24/7, decide in advance what can be serviced without stopping the shift: replacing a power supply, switching to a backup PC, accessing switching. In integration projects this is often stated simply: scheduled work must not leave the operator without key screens and at least one control path.
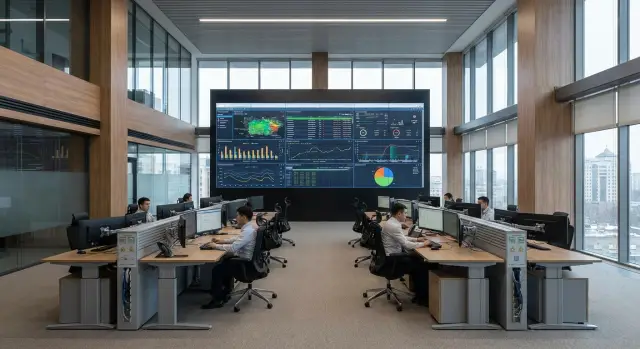
Dividing work zones in the room
Layout depends less on furniture and more on how people view the wall and move in the room. If you don’t plan this, even expensive equipment won’t help: operators will twist in chairs, block each other’s view and hinder maintenance.
The video wall zone should have a clear approach corridor. Leave space so you can reach the wall without squeezing between desks and racks. Viewing angles matter more than aesthetics: the operator should see critical elements without turning their torso, not just the center.
Operator desks usually work better in a curved arrangement facing the wall. Each station should have space for two monitors, keyboard, mouse, notebook, documents and a headset so items don’t sit on keys or get lost between shifts.
The shift lead needs a view of both the wall and the room. A good position is slightly behind the operator line or to the side: this allows quick access to any station and communication tools without walking between chairs.
A service area for the engineer should be separate: racks, switching, spare modules and tools should be accessible while the shift runs. A separate service aisle to the racks rather than a route through the operator line is a key element if you plan maintenance without stopping shifts.
Before installation, check movement routes: how the operator approaches the workstation, how the shift lead walks the posts, how the engineer reaches the racks and wall, and where consumables will be stored (boxes, spare cables, a trolley).
Ergonomics and operator working conditions
Ergonomics affects errors more than it seems. Operators read small text, rapidly shift attention between screens and do this for hours. Failures are often due not to inattention but to posture, glare and fatigue.
Distances, heights and seating
For a desktop monitor aim for 50–70 cm from the eyes so text is readable without constantly tilting the head. The video wall usually sits further away, 2–4 m. If fine details must be read on it, plan for large fonts and clear color schemes.
Position the screen so the top edge is roughly at eye level or slightly below. The keyboard and mouse should allow elbows close to the body and avoid dangling wrists. Desks should have room for documents and a headset while the edge doesn’t press on forearms.
Lighting, noise and air
Check lighting both day and night. Use even soft lighting without glare from windows or ceiling fixtures. Simple test: seat a person and adjust lighting brightness — reflections on screens will show immediately.
Noise also causes fatigue. If there is an equipment room or racks with active cooling nearby, separate them and control noise at operator seats. Monitor temperature and humidity: in overly dry rooms eyes fatigue faster.
For 24/7 shifts adopt a micro‑break rule: every 45–60 minutes take 1–2 minutes to look into the distance and change posture. In one monitoring center this noticeably reduced headache complaints within a week without physical changes.
Connection interfaces: what to choose and how not to get lost
Confusion starts with a simple question: what exactly are you connecting to the video wall. There are usually three groups: operator PCs (workstations), a server or visualization controller (which composes windows on the wall), and external video sources (cameras, recorders, TV feeds, guest laptops). Label each line by role from the start: “operator workstation”, “wall content”, “camera input”. This saves hours during commissioning and repair.
Short logic for choosing
DisplayPort is usually more convenient for PCs and workstations: fewer surprises with resolution and refresh rates, especially when a desk has 2–3 monitors plus output to the wall. HDMI suits guest connections and simple sources but is more likely to cause issues with cables, run length and mode “loss.” SDI makes sense for professional video and predictability on long runs. USB‑C is convenient as a universal connector, but in an operations room it’s risky: the same port can be video, data and power, leading to incompatible cables and docks.
Quick guidance:
- Operator PCs and professional graphics: DisplayPort
- Guest devices and simple sources: HDMI
- Professional video and long runs: SDI
- USB‑C: only with standardized docks and verified cables
Don’t rely on “just a long cable.” For 15–30 meters and beyond plan fiber or extenders with a clear budget for resolution.
USB is needed not only for keyboard and mouse but also control panels, readers and sometimes touch displays. Plan it as a separate layer: where hubs will sit, how to swap a device without stopping the shift and what to do if USB drops out.
Audio and intercom should be separate channels: headsets, desk mics, intercom systems. When audio travels with HDMI it’s harder to reserve and diagnose.
Switching and control: matrix, controller, KVM
Switching answers who sees which source on the wall and who can control it. Mistakes here hit reaction time, so separate image output and device control from the start.
A video wall controller is required when layouts, scaling, presets and quick scenarios matter (for example, “fire”, “perimeter”, “night shift”). It takes many inputs and composes a clear image on the wall.
A matrix switcher is useful when there are many sources and routing must be flexible: the same signal can go to the wall, a supervisor monitor and a recorder without reconfiguring the whole scheme.
KVM solves another task: controlling hardware without running to the rack. An operator works with multiple PCs or servers from one keyboard and mouse, switching by button or hotkey. This is especially important in 24/7 operations when some equipment sits in a server room or locked cabinet.
Define rights in advance and document them: operators switch sources and call presets, shift leads change layouts and priorities, engineers access network, matrix and controller settings.
Unified labeling helps both shifts and service teams. Three simple rules are enough: one naming format for sources and outputs, cable labels on both ends, and a nearby table mapping “source — port — assignment.”
Redundancy should be targeted where failures stop a shift: dual power inputs with UPS, redundancy for critical network segments and a bypass method to output a basic “duty” picture to the wall.
Step‑by‑step design plan for an operations room with a video wall
A working project relies on documentation: who does what, where equipment stands and what to do on failure. Then the system won’t turn into a set of quick fixes after launch.
-
Draw a room plan with real dimensions: video wall, desks, aisles, doors, access zones to racks and service areas. Check that equipment access doesn’t block evacuation routes.
-
Describe content scenarios: what stays on the wall, what appears on alarm, what remains on operator monitors. Set priority rules (for example, “alarm always on top”) and who can change layouts.
-
Choose signal architecture and mark failure points: where the controller or matrix is located, where KVM is, which lines and power blocks are critical.
-
Select compute and power: workstations, servers, racks, UPS and cooling. If local supply and service matter, projects sometimes prefer locally produced hardware. For example, GSE.kz offers lines of PCs, all‑in‑ones and servers (L200, M200, S200) used in 24/7 infrastructures.
-
Make a cabling plan: routes, lengths, connector types, spare lines and labeling. Before handover run an acceptance checklist: the picture is present, control works, scenario switching functions, and recovery after reboot is verified.
-
Train the shift on short actions: how to restore standard mode, what to do when one source fails, when to escalate and what information to report.
Maintenance without stopping the shift: plan it in advance
If the operations room runs 24/7, design maintenance as carefully as the video wall itself. Then a small failure won’t become an emergency outage.
Separate equipment that can be hot‑swapped from that which requires downtime. Usually you can replace cables, peripherals and a single operator monitor without interrupting the shift. In server hardware hot‑swap components can be replaced if supported. Replacing a video wall controller, reconfiguring matrices or working on main power usually requires an agreed maintenance window.
Define procedures in advance: who makes decisions, where the acceptable risk line is, how changes are logged, which tests are mandatory after work and how to quickly revert to the previous configuration.
Power deserves special attention. Minimum: UPS on key nodes, separation across different circuits and clear labeling. It’s better when critical components have dual power inputs on different lines so shutdown of one circuit doesn’t kill the whole path.
Keep spares on site. A box with commonly used cables, power bricks, a mouse and keyboard often rescues a shift faster than calling a field crew.
Finally, monitoring. Beyond remote checks (temperature, power status, port errors), provide short operator checks: “are all key windows present”, “can sources be controlled”, “no alarm indicators on switches.”
Typical mistakes and traps
The costliest problems rarely look like "hardware failure." More often they are accumulated small issues: unlabeled cables, random adapters, no access to racks, and nobody knowing who decides during an incident.
First mistake — a cable zoo. When desks and racks contain cables of different lengths and types without tags and a standard routing rule, moving a workstation becomes a quest. In a real shift this means extra minutes finding a signal and the risk of unplugging a neighbor.
Second mistake — mixing office and critical chains so a single failure becomes a single point of failure. Example: one switch serves both office PCs and video wall control. If the office network updates or stalls, everything drops even though the problem started in the office segment.
Third trap — relying on adapters. Unstable contact in an adapter (especially with daily vibration and cleaning) causes a black screen that is hard to catch. Prefer choosing one or two connection standards and lock them as policy.
Often maintenance is overlooked: no service aisle to racks or to the video wall and any replacement turns into a shift‑stopping operation. Check four things: physical access to switching, spare ports and power for temporary connections, a clear labeled diagram, and a fast way to move an operator to a hot seat.
Finally, lack of procedures. In a 24/7 monitoring center during an outage the question is not who is guilty but who within 2 minutes decides: switch to backup, call the on‑duty engineer, and log the incident.
Short checklist before launch
Before the first shift verify not only “the picture is there” but that the shift can work comfortably and engineers can maintain the system.
- The room plan matches reality: zones marked, aisles clear, safe access to the video wall, racks and service points.
- For each connection it’s clear which interface is used (HDMI/DP/SDI, USB, network), where adapters exist and why they are needed.
- Redundancy is planned: power (dual lines or UPS), critical nodes (controller/matrix/KVM) and a clear failover procedure.
Then check what typically causes issues in the first weeks:
- cables labeled on both ends, port inventory available
- a maintenance procedure for work without stopping the shift: what can be done during operations, what requires a maintenance window, who approves changes
- tested failure scenarios: disconnecting a source, losing network or power at a switching node, operator actions per the instructions
If you rely on local suppliers and expect 24/7 service, add support contacts and a spare parts list to the procedures.
Example scenario: a 24/7 monitoring shift
Inputs: 6 operators and 1 shift lead, a 3x2 video wall for the overall picture. Continuous monitoring means the main risk is losing control even for a few minutes during switching or repair.
Work zones are arranged to avoid interference and keep the lead’s sightline to the wall and the crew. A common layout uses two rows: a front row of three operators closer to the wall and a back row of three. The shift lead sits to the side at an angle with quick access to comms and the event log. An engineer station is separate with a laptop, a test monitor and a cabinet of consumables.
Operators use their workstations and switching is centralized in one location (a rack or cabinet). Desks carry only necessary cables: power, network and 1–2 user interfaces. A centralized controller and KVM let operators route sources to the wall without manual re‑plugging.
Redundancy is implemented in practical details: UPS for the wall, controller and network core; duplication of critical lines; a kit of spare cables; a spare KVM extender or free matrix port.
Hot maintenance works like this: the engineer first moves critical sources to a backup path, the operator confirms the wall image, then the faulty node is removed and swapped. Monitoring continues; some outputs temporarily move to a neighbor input or backup source.
Next steps: from scheme to an operational shift
Collect inputs in one short document: room plan with dimensions, operator roles, source list, availability requirements (e.g., 24/7) and constraints on noise, light and security. This document becomes the basis for procurement, installation and acceptance.
Then audit existing infrastructure. Problems often hide not in the wall itself but in details: a single unmanaged switch, mixed cables, power on one breaker, one PC servicing two critical sources.
Practical order of actions:
- record current connections and mark single points of failure (power, network, cables, devices)
- agree the specification: operator workstations, servers (if needed), switching, KVM/control, UPS
- approve the installation plan and maintenance windows to avoid stopping the shift
- run failure and recovery tests against the checklist
- train the shift: who to call, what to switch, how to log incidents
Final step — acceptance in near‑operational mode: 1–2 monitored shifts with notes recorded. If you need turnkey supply and integration, it’s often convenient to engage a single team for workstations, server room, switching and procedural support. In Kazakhstan such projects are, for example, carried out by GSE.kz as a manufacturer and systems integrator.
FAQ
Where should you properly start a video wall operations room project to avoid choosing the wrong equipment?
Start from responsibilities and response times. Define what the operator must notice in time and what happens if they miss it, then split information into two flows: what must always be visible and what opens on request.
What is best to show continuously on the video wall, and what should remain on operator monitors?
Keep the "big picture" on the video wall: key cameras, alarms, system statuses, a map and general situation so it’s visible without searching. Details like archives, correspondence, requests and sensor readouts are usually better on personal monitors and only pushed to the wall when needed.
How do you gather requirements if normal days are calm but incidents turn chaotic?
Describe not the average day, but the peak during an incident: how many people are active, who is the shift lead, which tasks run in parallel and what happens when everyone starts switching sources and talking on comms. That makes it easier to determine how many windows are really needed and where they should be.
How can you tell the room layout is done correctly and won’t hinder shift work?
Start by fixing real dimensions and movement routes: how the operator approaches the station, how the shift lead moves between posts, how the engineer accesses the racks and the video wall. If there is no service passage or access to switching, maintenance will inevitably interfere with shifts and cause downtime.
What basic distances and screen heights are normal for an operator?
For a desktop monitor, aim for 50–70 cm from the eyes and position the screen so the top edge is at or slightly below eye level. The video wall is usually 2–4 m away, so don’t plan fine text there: use large fonts and clear contrast schemes.
How do light and noise affect operator errors and what to do about them?
Test lighting day and night from the operator’s seat: glare and reflections are immediately visible and quickly cause fatigue. If there are racks with active cooling nearby, separate the noise from workstations and monitor temperature and humidity, because overly dry air increases eye strain.
What should you choose for connections: DisplayPort, HDMI, SDI or USB‑C?
For workstations and multi‑monitor setups, DisplayPort is generally more stable. HDMI is convenient for guest devices but can be problematic on long runs; SDI is suitable for professional video and predictable long‑distance links; USB‑C should be used only with standardized docks and verified cables.
When do you need a video wall controller, a matrix, and when KVM?
A video wall controller is needed when layouts, presets and fast output scenarios (e.g., alarms) matter. A matrix switch is useful to flexibly route the same source to multiple consumers without changing the whole scheme. KVM addresses control of several PCs or servers from one station when the equipment is located in racks.
How not to get lost in cables and why are adapters a common source of problems?
Adopt a consistent naming format for sources and outputs, label cables on both ends and keep a port‑to‑destination table near the rack so repairs aren't guesswork. Minimize adapters: unstable contacts in adapters often cause “black screens” that are hard to diagnose.
How to design maintenance without stopping the shift and what to keep in reserve on site?
Decide in advance what can be changed without stopping the shift and what needs a scheduled window, and document the procedures including post‑change tests and rollback. For 24/7 operations have UPS on critical nodes, clear power labeling and a small on‑site stock of spare parts; many choose hardware with serviceability and availability in mind, for example GSE.kz lines L200, M200 and S200.