Office PC Repairability: How to Check Before Purchase
Practical signs that reveal an office PC’s repairability before purchase: access to RAM and SSD, standard mounts, and replaceable PSU and fans.
Why check repairability before buying
Office PCs usually fail not in dramatic ways but because of small issues that should be fixed quickly. Most often it’s the power supply, fans, SSDs, and sometimes RAM modules (or the need to add them). Front-panel connectors, the power button and cables also wear out. If access to these parts is inconvenient or uses non-standard components, even a simple repair can take days.
"Fixing quickly" is almost always more important than saving 5–10% on the purchase. One employee being offline for half a day can cost more than the price difference between models—especially if the PC is at reception, in accounting, or in a room where people constantly work with documents. When repairs drag on you pay twice: in lost time and in rushed purchases of “some compatible” parts.
Repairability also affects spare parts stocking. If your fleet uses identical, standard mounts and connectors, inventory needs are minimal: a couple of PSUs, several SSDs, a set of fans. If every chassis uses its own mounts and “special” connectors, stock requirements grow and the chance of not having the right part increases.
Before choosing a model, synchronize procurement with IT and answer a few questions in advance. What failures are most common and what do you want to be able to replace on-site in 15–30 minutes? Who will repair: in-house IT, a contractor, or warranty service, and how many days does a repair cycle realistically take? Which parts must be standard (PSU, fans, drive mounts, access to RAM/SSD)? Do you need fleet standardization and what spares will you keep? And separately: what are the warranty limitations—can the chassis be opened and consumables replaced without losing support?
What to ask the supplier before comparing models
It’s easy to compare office PCs by price and CPU. It’s harder to know how serviceable they will be once you start replacing SSDs, memory or fans. So collect a short package of materials from the supplier before choosing a model.
Ask not for marketing brochures but for items that show the construction without guessing:
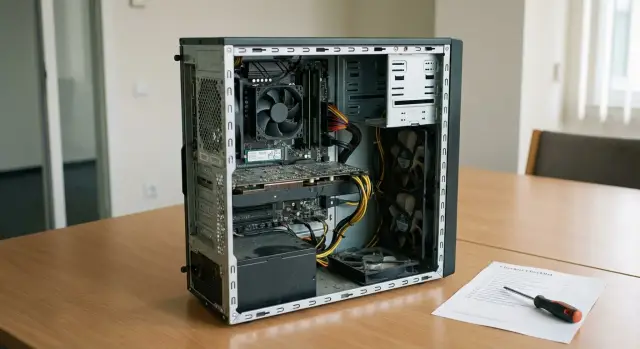
- close-up photos of the internal layout (with the side panel off) showing drive mounts, access to RAM slots and cable routing;
- photo of the PSU nameplate (model, wattage, input specs and connectors);
- a written warranty rule: whether the chassis can be opened for cleaning and replacing consumables by your IT staff, and what counts as intervention;
- a list of consumables and sizes: fans (size and connector), filters (if any), CMOS battery (usually CR2032).
If possible, arrange to inspect a sample unit briefly (10–15 minutes is enough). Open the chassis, check for warranty seals that void support, and confirm whether you can reach the SSD and memory without removing half the parts.
A small procurement example: two similar configurations differed only in that one had the SSD under a decorative panel with non-standard clips. Replacing that drive took three times longer and often broke the clips.
If you buy for government, education or business, include these requests in emails and specifications. Then “serviceability” stops being a verbal promise.
Chassis and internal access: a quick first test
Start with a simple test: how fast can you open the chassis and put it back. Office PC repairability often fails on small details: a difficult cover, flimsy clips, or the need to remove extra parts for a single operation.
The most convenient option for a fleet is a side panel on regular screws (preferably with knurled heads so you can undo by hand) or a clear clip that opens without force. If the cover uses rare screws, hidden clips or requires careful plastic prying, expect more service time and a higher risk of breaking mounts.
Watch out for seals and "one-time" elements. One warranty sticker on a single screw is acceptable. It’s a problem if the chassis is designed so that the first opening breaks a fastener, cracks a decorative panel or tears a plastic clip. In use this becomes a constant issue: to replace an SSD you must “break the chassis integrity.”
A quick on-site test: the cover should come off in 30–60 seconds without special tools; main parts (RAM, SSD/HDD, PSU, fans) should be visible immediately; they should be reachable by hand without removing the front panel or unplugging half the cables; the case should close without misalignment or gaps.
Also check dust management. Filters are good, but the key question is whether they remove without tools. If a filter can be pulled out from the front or bottom in one motion, cleaning takes minutes instead of becoming a “mini repair.”
Access to RAM and SSD: how to tell if upgrades will be simple
Upgrades are usually needed not on the purchase day, but a year in: more memory for new software, or a second drive for databases or archives. So judge repairability by how quickly and without surprise you can reach RAM and drives.
For RAM, it starts with the number of slots and access. A good sign is two or four slots with clips you can reach by hand without removing the CPU cooler or plastic shrouds. A bad sign is a module blocked by a bulky duct or clips hidden under a decorative cover—this adds 10–20 minutes and raises the risk of breaking fasteners.
For a 2.5" SSD, it’s not just whether there’s space but how it’s mounted. The easiest are trays or a separate cage with screw mounts. If the drive is held by two screws into thin metal or a non-standard plastic frame, replacement becomes a quest and vibration or connector misalignment can cause intermittent errors.
Check M.2 separately. Sometimes the slot exists but is blocked by a graphics card, a riser, or a cover that only comes off after partial disassembly. For a fleet, that means extra downtime: installing an SSD may require removing other cards and re-routing cables.
Internal photos usually reveal the essentials: whether RAM clips are accessible, whether there are proper 2.5" mounting points (screws or trays), whether the M.2 is unobstructed, if a screwdriver can reach screws, whether board connectors are labeled, and whether cables block access.
A simple guideline: if an employee needs to add 16 GB RAM and a second SSD, a "good" chassis allows this in one short maintenance window. In a "disposable" layout you’ll spend time disassembling half the case and be afraid of breaking plastic.
Power supply: standardization, connectors, ease of replacement
The PSU often determines whether a repair is quick or becomes a hunt for rare parts. A good sign is a standard PSU that can be replaced in 10–15 minutes without tearing the chassis apart.
Form factor and mounting
First confirm the form factor. The most convenient for a fleet is a standard ATX PSU: easier to source, easier to keep in stock, and usually matches mounts. SFX is also standard but less common and may require an adapter plate. The biggest problem is a proprietary PSU (size, mounting or cable length) that fits only a specific chassis.
Look at how the PSU is secured. If it’s held by the standard four rear screws and slides out without removing the motherboard, that’s a good sign of a serviceable system unit.
Connectors and "rare" variants
Check that power is delivered through standard connectors: a 24‑pin motherboard connector and a 4/8‑pin CPU connector. If the supplier mentions a “proprietary cable” or shows an unusual multi‑pin board connector instead of a 24‑pin, future PSU replacement may only be possible with the original part.
For a quick spec check, make sure:
- the PSU form factor is listed as ATX (or SFX without exotic adaptations);
- the 24‑pin ATX and 4/8‑pin CPU connectors are explicitly present;
- the PSU can be removed without full chassis disassembly;
- there are at least 1–2 SATA power connectors for drives;
- the wattage has a modest reserve for future SSD/HDD additions and expansion cards.
A power margin is important not for speed but for reliability. A typical scenario: the department adds another SSD and a simple I/O card, the old PSU was near its limit and began to make noise or trip. It’s easier to include some headroom now than to replace PSUs across a fleet later.
Fans and cooling: what matters for quick replacement
If cooling is awkward, even a minor failure causes long downtime. For serviceability, fans should be standard, available and connect without surprises.
Size and mounts
Look for common fan sizes: 92 mm or 120 mm. That makes replacements easy to source. Mounting should be standard: four screws or common clips. It’s a problem if a fan is on a non-standard frame, glued in, held by one‑time clips, or integrated with a plastic duct that can’t be bought separately.
Connectors and access
Check how fans plug into the board. 4‑pin (PWM) gives nicer control, 3‑pin is acceptable. The critical point is that a free matching header should be accessible on the board and that no “proprietary” connectors are used.
The practical test: can you replace a fan without removing the motherboard? In a normal case you unscrew the fan, unplug it and install a new one in 10 minutes. In a bad design you must remove other modules, thread cables through tight openings, or even take the motherboard out.
For quick servicing check whether dust filters remove without tools, whether grills and heatsinks can be cleaned without disassembly, and whether cables block screws or connectors.
Motherboard, slots and fastenings: signs of a sensible design
People often look only at RAM and SSD when judging repairability. But the board, slots and small mechanics determine whether you can replace a part in 10 minutes or spend an hour on strange mounts.
Start with the front panel. In a sensible design USB and audio use standard connectors (USB 2.0/3.x, HD Audio) and run as a separate cable. If the front panel is a removable module on screws it can be swapped when a connector fails instead of replacing the whole chassis.
PCIe slots should be physically accessible and rear slot covers should be removable and reusable. One‑time breakaway slot covers make life harder: after installing an expansion card you can’t reassemble cleanly, the chassis rattles and draws more dust.
Look at general build quality: drive cages or SSD mounts should be removable, screws should thread into metal or proper inserts rather than soft plastic. If threads strip after the first swap, fleet maintenance becomes expensive.
From photos or inspection check a few things:
- PCIe covers fastened with screws, not breakaway tabs;
- proper motherboard standoffs, not screws driven "anywhere";
- removable drive brackets and standard fastenings;
- cables routed so they don’t block replacements;
- no glue, potting or "filled" connectors that prevent disassembly.
A simple example: someone broke the front USB on a flash drive. In a normal chassis you replace the front panel module or cable. In a "disposable" design you often disassemble half the case, and sometimes it’s easier to write off the unit.
A step-by-step repairability check before procurement
The best way is to inspect a real sample (demo or test unit). If there’s no sample, ask for photos of the internals and a short disassembly video. The goal is to estimate how long a typical repair takes and whether rare parts are needed.
A 10–15 minute checklist you can run:
-
Chassis and access. How the side panel is removed: screws, clips, seals. It’s good if everything opens without "dances" or risking broken plastic tabs.
-
RAM and SSD. Are memory slots visible and accessible, are there free slots and are the clips easy to press? For SSDs check the mounting: screws or trays, and whether you must remove blocks or cables to reach the drive.
-
Power supply. Is the form factor standard (often ATX) and are power connectors conventional? Important: can the PSU be pulled out without removing the motherboard. Also assess cable routing: tight cables make replacement painful.
-
Fans and cooling. Fan size (80/92/120 mm), connector type (typically 3‑pin or 4‑pin) and access to screws. If a fan is behind a shroud, confirm the shroud can be removed quickly and isn’t held by fragile clips.
-
Fastenings and cables. Are screws standard, are there cable ties or anchor points, and do cables block drives and PSU removal. A neat build usually means the product was made "for real life."
Mini scenario: imagine in a year the accounting department needs to replace an SSD and one fan. If this takes 20–30 minutes without rare parts, the model’s repairability is acceptable.
Common traps and signs of a "disposable" PC
Repairability often fails not on complex breakdowns but on small construction details. New hardware hides this. After a year or two any swap can become long and costly.
The most common red flag is non‑standard parts that can’t be quickly sourced. If a PSU looks ordinary but has a non‑standard size, mount or connector, replacement is hard: no market equivalent exists and the original may take weeks to arrive.
Signs of a "disposable" design to filter out:
- fragile plastic clips on the chassis that break on first opening;
- breakaway PCIe covers that can’t be reinstalled neatly;
- RAM or SSD only accessible after removing the motherboard;
- fans of non‑standard thickness or with rare connectors;
- hidden screws and mounts requiring a special screwdriver.
A practical test: ask the technician to show removing the side panel and accessing RAM, SSD and a fan in 5–10 minutes. If they need special tools, clips break, or cables obstruct, real life will be the same.
Short checklist to compare models
To compare models quickly and fairly, keep a short set of checks. It helps spot repairability issues and avoid buying a chassis that’s easier to write off than to fix.
Ask the supplier for photos of the internals (with the side panel off), a photo of the PSU label and close-ups of drive and fan mounts. If you get only polished renders, be wary.
Check these five items:
- The chassis opens without complex clips or rare screws.
- RAM and SSD replacement takes minutes without removing the motherboard.
- The PSU is standard (e.g., ATX) with conventional connectors: 24‑pin, CPU 4/8‑pin, SATA.
- Fans are common sizes (80/92/120 mm) with standard 3/4‑pin connectors.
- Fastenings are reusable: trays, rails and covers fit back, threads don’t strip.
Also note dust servicing: can filters be removed and grills cleaned without full disassembly. The same simple guideline applies: if replacing a fan and adding an SSD in a year requires removing half the components, the model loses even if specs look good.
A practical example: one fleet and typical failures
Imagine a department of 50 office PCs running 8–9 hours a day. After 12–18 months two things usually fail most often: fans (noise, stop, overheating) and SSDs (write errors, sudden slowdowns, blue screens). Here you’ll see repairability in practice: some machines are fixed in 15 minutes, others turn into a quest.
If the chassis is awkward (many small screws, stiff clips, no easy drive access), replacing an SSD or a fan can take 40–60 minutes. Add time to find the right part, disassembly/reassembly and testing, and one incident can cost half a day.
To estimate downtime cost, a simple formula suffices: employee time without a PC + technician time. If out of 50 PCs three need repair in a month and each causes two hours of downtime (waiting + work), that’s six hours of lost department time plus IT load.
In the procurement spec it’s useful to fix 2–3 requirements that sharply reduce such losses:
- access to SSD and RAM without full chassis disassembly;
- standard sizes and mounts (no rare frames or adapters);
- standard ATX power supply and clear power connectors.
Also plan a small stock for the chosen model: 2–3 SSDs, 3–5 fans and 1 PSU for a fleet of 50 PCs. That’s cheaper than leaving people without work and waiting for deliveries, especially when failures come in waves.
Next steps: how to lock requirements into procurement
To prevent repairability from remaining a wish, make it verifiable in the requirements. Then a supplier can’t swap a convenient‑to‑service chassis for a similar‑looking but complex internal design.
How to write requirements in the spec
Avoid vague wording; list points you can check on a sample or from documents:
- quick internal access: cover on screws or a clip, no glue or one‑time clips;
- standard drive mounts (2.5/3.5) and reusable fastenings;
- standard ATX PSU (or another clearly specified standard) with typical connectors;
- ability to replace fans without full chassis disassembly;
- documentation: disassembly guide and list of compatible consumables.
Before signing, ask the supplier to demonstrate on a sample: open the chassis, remove an SSD, move a memory module, pull the PSU and replace a fan. If the demo requires special tools, breaks clips or is blocked by cables, production units will behave the same.
Then agree the service approach: who replaces parts and in how many hours, and which spares you hold. Usually a small kit suffices: 1–2 PSUs for common models, a set of identical fans, a few SSDs and memory modules for main configurations, plus a couple of power and SATA cables (if used).
If local manufacturing and Kazakhstan‑based support matter, clarify with GSE.kz what materials and manuals they provide for a given model and how support is organized: they produce computers and servers in Kazakhstan and offer 24/7 technical support with a service network across the country. This is useful when repairability needs to be maintained throughout the fleet’s lifecycle.