Mini server room in a school: common oversights in design
Mini server room in a school: common things missed when setting up the room — power and UPS, ventilation, access, security and capacity for 2–3 years of growth.
Commonly forgotten things when setting up a mini server room
A mini server room in a school is not about a “nice rack”. It's a place where equipment runs 24/7 and the environment must be controllable: power outages, heat, dust, wet cleaning and accidental human actions.
The main difference between a mini server room and a “cabinet in an office” is environmental and access control. In an ordinary office someone may open a window in winter, block ventilation with boxes, or accidentally unplug a plug during cleaning. The result is the same: the network goes down, the electronic gradebook fails, appointment booking or lab systems stop working.
Small details that create big risks are often underestimated: summer overheating due to poor ventilation, overloaded power circuits, a weak or mis-sized UPS, “everyone has some access” and unsecured cables. On launch day everything looks fine: load is still low, the room is cool, drives and PSUs are new.
But hidden problems show up after 3–6 months. A second server or video recorder is added, heaters in adjacent rooms are used more often, grills clog with dust, UPS batteries lose capacity, and connectors loosen because of constant rearrangements.
To make a reliable mini server room usually more than one IT person is needed. Typically at least four roles are required: IT (load, network, redundancy), facilities (electricity, ventilation, maintenance and cleaning), security (access control, keys, log) and leadership (priorities, rules, responsibilities). When these roles are agreed on in advance, the mini server room stops being a “risk point” and becomes a calm part of the infrastructure.
First, define the institution’s tasks and constraints
Mini server rooms in schools are often built “on the spot”: whatever was bought and whatever fit. Later it turns out there’s not enough power, noise disturbs classes, and half the services fail during an outage. Start simply: which systems must run every day and what happens if they stop.
Schools and clinics host different loads: shared files and printing, 1C or MIS, video surveillance, telephony, domain controllers, Wi‑Fi, sometimes an electronic gradebook or local learning services. Each service has a different cost of downtime. Cameras can survive 10 minutes without recording; a clinic’s registration system or MIS often cannot wait an hour.
It helps to record a few things up front:
- which services are critical and which are secondary
- how many concurrent users and when peak hours occur
- acceptable downtime: minutes, an hour, a working day
- building constraints: electrical capacity, space, noise
A simple rule of thumb: in schools there’s a morning peak for Wi‑Fi and the gradebook, load drops during the day, and evening work focuses on backups and updates. Clinics peak during reception hours and any MIS failure immediately stops work in the offices.
Also check the building’s “physics”. Older buildings often have weak wiring and few spare outlets. The only suitable room might be next to a classroom or treatment room where noise and heat become problems. Record these constraints honestly at the start to avoid redoing power, ventilation and placement later.
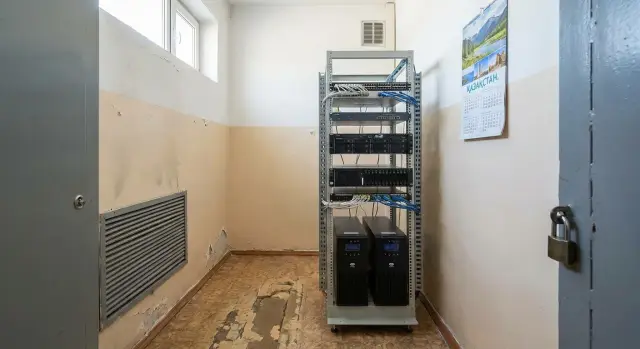
Room and placement: location solves half the problems
People usually take “whatever is free” for a mini server room. This almost always causes problems in the first season: heat, noise, hard servicing, and after a year nowhere to put a second UPS or switch.
Immediately mark places where equipment will perform poorly. A room next to radiators and heating risers quickly dries and overheats air. A storeroom with chemicals and paint is dangerous due to fumes and dust. Pass-through areas (by reception, in corridors) increase the risk of accidental shutdowns and “extra hands”.
Area is less important than access. Leave space to open a rack door, slide a server out, remove a cover, replace drives and not press your back against the wall. It’s convenient to be able to service the rack from both front and rear and to have cables not pulled tight.
A short paper plan often saves rework. Mark where the cabinet or rack will stand and how the door opens, where the UPS will be (it’s heavy and battery access is needed), where the switch and patch panels will be, how cable entries will be arranged (top or bottom), and where outlets and grounding are so you don’t use extension cords.
Noise affects placement. In a clinic avoid placing the rack near consultation rooms; in a school avoid near the library or classrooms during exams. Practical detail: if the rack is flush against the wall, any hardware replacement may require removing some cables, and “five minutes” easily becomes an hour of downtime.
Power and UPS: not just to survive an outage
Power is not “we’ll install a UPS and that’s it”. Problems often start when the server, switch and router share a circuit with a teacher’s kettle or a corridor air conditioner.
A dedicated circuit with its own breaker and clear labeling reduces the risk of accidental disconnection and makes it easy to identify what lost power. A good practice is to separate rack power from “everything else”.
Choose a UPS by two parameters: load (watts) and required autonomy time. If the goal is to ride through short dips and shut down cleanly, 10–15 minutes often suffices. If you must keep registration or communications for longer, provision more—but autonomy increases cost and battery size.
Plan for maintenance. A UPS with bypass (or an external bypass) allows battery or UPS replacement without fully powering down the server room. Without a bypass, “planned battery replacement” often becomes downtime.
Have an electrician check grounding and surge protection. This is especially important in schools and clinics due to old panels and frequent load switching.
Avoid chains of extension cords. A practical minimal setup that works:
- a dedicated circuit and breaker for the server cabinet
- a quality PDU mounted in the rack instead of household multi-sockets
- separate power feeds for critical devices (server, network, storage)
- labels on plugs and outlets to avoid unplugging the “wrong thing”
- space reserved for a second UPS or battery module in the future
If an integrator is doing the project, agree up front which devices must be on UPS and which can be left unprotected.
Ventilation and temperature: how to avoid summer overheating
Overheating is usually caused by air, not “weak servers”. A corridor AC rarely helps: the door is closed, cold air doesn’t get in and hot air doesn’t escape. The room becomes a thermos, especially in July and August.
To understand airflow, look at supply and exhaust. If a room only has a gap under the door and no exhaust, heat will build up. A simple test: after 10–15 minutes the room feels stuffy and temperature rises even with the door open. Another sign is a “hot corner” near the rack: air stands there.
Thermal load grows unnoticed. Today you have one server, a switch and a UPS; next year a second server, another switch and a video node appear. UPS units also generate heat even when “idle”.
Signs of overheating easy to miss:
- servers spin fans faster and louder than usual
- sudden reboots or hangs
- performance drops under load (CPU throttling)
- the rack is hot to the touch, especially at the top
A minimal effective control: a temperature sensor (preferably with logging) at equipment level and a short change log. Add a server, close a grill, change flow direction — compare temperatures a week later. This helps find the cause and fix it before the first heat wave.
Cabling and network: order beats aesthetics
Cables in mini server rooms are often installed “as it happens” because it’s faster. Later any failure becomes a quest: what goes where, what can be pulled, and what must stay.
Rule one — do not mix power and low-voltage lines. If bundled together you get interference, hard-to-find faults and the risk of pulling power along with the network. Route them in separate trays or at least on different sides of the rack.
Plan spare length and ports. Taut cables are hard to service. Without slack you will soon run out of ports when a new office, camera or Wi‑Fi point is added.
A practical minimum that pays off at the first hardware replacement:
- label both ends of each cable (port number and destination)
- use a patch panel for building lines instead of plugging them directly into the switch
- install simple cable organizers front and rear of the rack
- secure power cords separately
- leave several spare switch ports and 1–2 spare patch cords
Place the switch so it can be reached without “taking the wall apart” and without blocking ventilation. In clinics this is critical: downtime affects the reception desk and workstations.
Documentation can be simple but must exist: a rack diagram (what is where), a port table “port — room/device — notes” and a list of spare cables. Then a new staff member can understand connections without guessing.
Access and physical security: without excessive bureaucracy
The goal is simple: only those who really need to enter the mini server room in a school or clinic should do so, and entries should be visible in a log rather than rumors.
Define 2–4 roles (for example, IT specialist, responsible administrator, maintenance contractor) and set rules: who may enter alone, who needs an escort, who can open the rack. Often a short regulation and an entry log are enough: date, who entered, why, when they left. In schools a practical approach works: one key set held by the responsible person and a sealed backup key.
A reliable lock and key tracking matter more than complex access cards. And a rule often violated: don’t store boxes, mops, stationery or cleaning supplies in the server room “temporarily”. Foreign items create dust, block airflow and increase leak risk.
Protect from water by planning. If pipes run overhead or there is a wet area nearby, consider relocating or at least installing a leak sensor and forbidding wet cleaning inside. A real scenario: a cleaner spills water at the threshold and it flows under the door. A raised threshold or seal helps, and equipment should not sit directly on the floor.
Fire precautions must be basic but mandatory: a smoke detector, a clear power cut diagram, a suitable fire extinguisher and unobstructed ventilation grilles. Do not close ventilation for “silence” — overheating is worse than noise.
Video and sensors are useful when risk is higher: frequent personnel changes, shared corridor access, expensive servers or night duty. Small institutions often find a camera at the entrance and a door-open sensor sufficient.
Spare capacity for 2–3 years: what to build in now
Expansion almost always happens faster than expected. Schools grow storage needs (gradebooks, teaching materials), camera counts and archive retention, and backup requirements. Clinics add workstations and more medical data. So the mini server room should have clear spare capacity, not run at the limit from day one.
Plan for bottlenecks:
- power: UPS and breakers with headroom, plus 1–2 spare outlets in the rack
- cooling: ability to boost ventilation without major repairs (space for a second fan or AC, access for cleaning)
- rack: free U space and enough depth so a new server fits and the door closes
- network: spare switch ports, IP address headroom and space for new cable entries
- storage: ability to add disks or a shelf without replacing the entire server
Example: you install 16 cameras with 14 days retention, then next year they require 30 days. If there’s no disk space and no spare power or cooling, “adding a couple of disks” turns into buying a new server and emergency work.
Also sketch an update plan. In 12–18 months you often buy disks, replace UPS batteries and expand the network. In 3–5 years the server is usually replaced or tasks are migrated to a newer node.
If you buy servers and workstations from a local vendor and integrator like GSE.kz, ask up front for a clear 2–3 year expansion scheme: what can be added without downtime and what will require a maintenance window.
Step-by-step plan: how to build a mini server room without rework
To avoid endless fixes, follow steps and record decisions in writing. Then electricians, facilities and IT speak the same language.
First, identify what you are protecting from downtime and overheating:
- list services (gradebook, 1C, video surveillance, telephony, Wi‑Fi) and mark acceptable downtime for each
- choose a room and agree access: who can enter, where the key is stored, how to reach the room quickly at night or on weekends
- calculate power: total wattage, growth margin, dedicated circuit, grounding; select a UPS for both watts and runtime
Next, handle details usually remembered after the first heat wave or outage:
- plan ventilation and temperature control: where hot air will go, how to reduce dust, where sensors are and who watches alerts
- assemble the rack, route and label cables immediately; panel and outlet labels save hours
- run safe tests: briefly cut mains power to verify UPS behavior and proper shutdown; to simulate heat, increase load and check temperature with the door closed
If you provision equipment with margin, reserve rack space and power so you don’t move the whole room a year later.
Typical mistakes and traps in schools and clinics
Even a carefully assembled mini server room can fail due to small oversights. In clinics this is especially visible: reception depends on network, telephony and the internet gateway.
Common story: a UPS exists but only the server is connected. During an outage the server stays up but the switch and router die. As a result the electronic gradebook, MIS and printers “disappear” even though the hardware didn’t fail.
Errors that often cause incidents and stress:
- partial UPS protection: forgetting the switch, router, access point, media converter, PBX or telephony gateway
- the room becomes a storeroom: boxes and furniture block access to the rack, outlets and power buttons
- air recirculates: no fresh supply, grills blocked, fans pushing into a hot wall, temperature rising hourly in summer
- ad hoc cabling: no labels or diagrams, someone pulls the wrong patch cord and takes down half the building
- everyone knows one password: access accounts are not logged, and after an incident you cannot trace changes
Another trap is lack of spare capacity. Today one server and a small switch; next year another server, backup appliance or storage arrives and there is no space, no outlets and no ports.
A practical tip: check not “how it works now” but “what happens during a power cut, heat wave or emergency repair on a Friday evening”.
Quick checklist before launch and acceptance
Before handover walk through a short list and record results: photo of the panel, sensor readings, UPS runtime. This saves nerves when something starts “falling over” a month later and details are forgotten.
On-site checks (suitable for school or clinic):
- power: dedicated circuit, labeled breakers and outlets, grounding present, no extension cord chains
- UPS: provides expected runtime under real load and powers not only the server but key network points (switch, router, storage); run a 5–10 minute cut test
- temperature and airflow: temperature measurement in the room, supply and exhaust working, grills not blocked; check the “summer, door closed” scenario
- access and security: clear access rules, assigned responsible persons, keys tracked, no unauthorized access
- cabling and documentation: cables labeled, rack and port diagram available so a new person can understand connections quickly
Also note 2–3 year reserves: free rack space, power margin in the panel and UPS, and at least 20–30% spare switch capacity. If everything is tight today, any expansion becomes rework.
Example of a real mini server room
Scenario: a mini server room for a school of 800 students or a clinic where reception runs all day and the MIS must be always available. Usually a small room near the IT office or a utility space, but with a proper lock, ventilation and clear access for responsible staff.
In year one the basic setup covers daily needs and reduces outage risk:
- one server for domain, files and key services (clinic: MIS)
- network cabinet or rack, switch and router
- a place for local backups (NAS or disk array)
- a UPS with some margin in power and runtime for clean shutdown
- a simple monitoring system (temperature, power, alerts)
What prevents a rework in a year is not complexity but margin: leave 30–40% free rack space, plan power headroom (separate circuit, breakers, outlets) and design summer cooling with spare capacity for a second server and extra disks.
In year two small but essential additions often appear: more corridor and door cameras, a second server for redundancy or new services, expanded disk space for archives and video. If power, cooling and rack space were planned, these additions happen dust-free and without rework.
After the first summer and winter check:
- peak temperature with door closed and under load
- UPS operation (actual runtime and battery condition)
- dust in filters and on grilles
- noise and vibration (often a sign of ventilation issues)
- incident log: what failed and on which days
If equipment procurement must meet local content rules, it makes sense to choose servers and workstations from a domestic manufacturer with local support (for example, GSE.kz) so maintenance doesn’t become a separate project.
Next steps: turning a plan into a working room
When you know where the mini server room will be, convert ideas into clear tasks, responsibilities and purchases. Then the server room won’t be a “no-go noisy cabinet” everyone is afraid to touch.
Start with a short list: what currently hurts (network drops, slow database, no backups) and what services will appear in the next 2–3 years. Example: gradebook, video surveillance, local databases, class Wi‑Fi, local backups.
Then gather everyone who affects the outcome. It’s better to agree once than look for blame later when breakers trip or a rack blocks a corridor.
- fix goals and constraints: which services are required, maintenance windows (holidays, nights), and what cannot be turned off even for a minute
- assign responsibilities and boundaries: IT (logic and equipment), electrician (power and breakers), security/facilities (access and keys), cabling contractor (entry, patch panels, labeling)
- prepare a procurement plan by blocks: rack, UPS with clear runtime, ventilation or AC if needed, cabling supplies (outlets, trays, labels)
- verify equipment against room conditions: electrical capacity, noise level, where hot air goes, space for a second UPS or server
- describe acceptance: what to check (temperature under load, UPS switchover, cable order, critical services), who signs off and who maintains afterwards
If you need a complete solution built to the institution’s needs, in Kazakhstan this is often easier with a systems integrator. For example, GSE.kz can supply S200 Series servers, help with integration and provide support so the mini server room works every day, not only on launch day.
FAQ
Where should I start the mini server room project to avoid rework later?
Start with a list of services and acceptable downtime. For most schools the critical systems are network, Wi‑Fi and the electronic gradebook; for clinics — the MIS and the reception desk. These requirements define power, UPS, cooling and access needs, not the other way around.
Is it necessary to have a separate power line for the mini server room?
A dedicated line with its own breaker and clear labeling reduces the risk of accidental shutdowns and overloads. The most common problem is when the rack shares a circuit with “household” loads like kettles, heaters or air conditioners, causing trips or voltage drops.
How to choose the right UPS for a mini server room?
Choose a UPS based on the actual load in watts and the required autonomy time. If the goal is to survive short outages and perform an orderly shutdown, 10–15 minutes is often enough. Importantly, the UPS should power not only servers but also critical network gear (router/gateway, switch).
Why is a UPS bypass useful and when is it required?
If you cannot service the UPS without cutting power to the whole rack, any battery replacement becomes downtime. A UPS with a bypass (internal or external) allows servicing the UPS while keeping the rack powered.
Why does a mini server room overheat in summer even if the building seems cool?
Overheating usually happens because there is no proper airflow, not because the servers are weak. The room becomes a thermos: the door is closed, hot air has no escape. At minimum, provide a clear path for hot air and install a temperature sensor to monitor trends rather than guessing.
How to organize cabling so an outage doesn't become a puzzle?
Keep power and low-voltage cables separate and always label both ends of every cable. Without labels and a patch panel, any incident becomes a guessing game and a single pulled patch cord can take down a whole floor.
What devices besides the server should be connected to the UPS?
People often forget smaller but critical devices: the switch, router, media converters, PBX/gateway, and sometimes access points that serve key areas. If these are not on the UPS, the server can stay on but services will be inaccessible because the network is down.
How to manage access to the mini server room without excessive bureaucracy?
Limit access to the people who really need it and set simple rules: who can enter, for what reason, and for how long. Often a reliable lock, key control and a simple entry log are more effective than complex pass systems.
What 2–3 year growth margin should I provision from the start?
Plan for bottlenecks: power (UPS and breakers with margin, plus 1–2 spare outlets in the rack), cooling (space to add a fan or AC unit and access for cleaning), rack space (free U slots and enough depth), network (spare switch ports and cabling entries) and storage (ability to add disks or shelves without replacing everything). If everything is packed tightly from day one, any addition becomes emergency work.
What should be checked before launching and accepting a mini server room?
Before acceptance, test power and UPS under real load, including a short network power cut of 5–10 minutes, and record the result. Measure temperature with the door closed and ensure vents aren’t blocked. Also confirm that cables are labeled and there’s a simple rack-and-ports diagram so maintenance does not depend on one person.