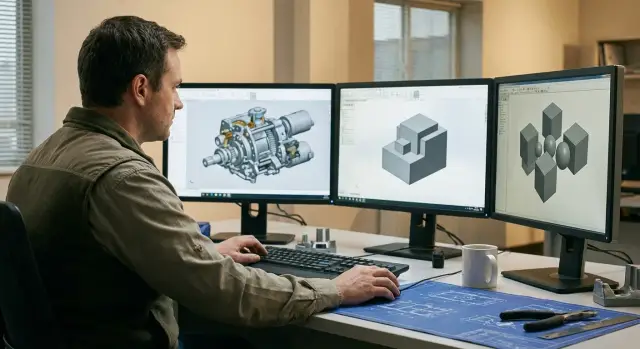
Large assemblies in Inventor: LOD, simplification, proxies and libraries
Practical tips to speed up large assemblies in Inventor: LOD, simplification, proxies, working with libraries, checks and common mistakes.
Why large assemblies start to slow down
When it comes to large assemblies in Inventor, people often blame “too many parts.” In practice, it’s not the file count itself but that Inventor constantly recalculates complex geometry, inter-component dependencies and updates that cascade.
It’s important to note that slowdowns look different. Sometimes the assembly takes a long time to open but then rotates fine. Other times it opens quickly but any part move triggers a rebuild that lasts minutes. Saving can be slow due to link recalculations, and drawings can update painfully slowly because of heavy views.
A common reason is excessive detail where it isn’t needed for the current task. For layout work you need overall dimensions, mounting points and interfaces. Threads, chamfers and tiny holes don’t help at that stage but burden recalculation.
Signs of overloaded geometry and unnecessary dependencies include: a rebuild triggered by a simple action (rotate, replace a component, suppress), long "Updating" on open even with no changes, stuttering during rotation on adequate hardware, or dozens of other parts turning red and rebuilding after replacing one component.
To make improvements noticeable and measurable, first record a baseline. Three numbers are enough: time to open to ready state, rebuild time after a typical change (for example, suppress a subassembly and restore it), and save time after an edit.
Then follow a simple principle: show and recalculate exactly what you need for the task. If the goal is layout and interference checks, prepare light representations. If the goal is issuing manufacturing documentation, decide ahead which elements must be “real” and where simplification is acceptable.
Define the goal and level of detail before optimizing
Optimization of a large assembly almost always starts not with Inventor settings, but with the question: why are you opening this assembly now? If the goal is unclear, you risk speeding up the wrong things and removing something important.
Make a short list of real scenarios: layout (dimensions and relative positions), drawing release, collision and clearance checks, sometimes visualization for approvals. Each scenario has its accuracy threshold: layout doesn’t need threads and chamfers, but for fits and drawings they can be critical.
Agree on task “levels” in advance: subassembly (local edits), product (interfaces), line or area (general dimensions and maintenance), project (federated model for other disciplines). Each level allows a different set of parts and accuracy.
To make the team act consistently, establish rules for folder structure and naming. That saves more time than it seems: simplifications, LOD and replacements are applied faster when it’s clear what is a module, what belongs to the library and what is a project-specific part.
Minimum agreements:
- where module boundaries lie and who “owns” them;
- what belongs in the library (fasteners, standard items) and how it’s marked;
- what can be hidden or replaced without approval;
- what must not be simplified (datum surfaces, mating holes, mounting faces);
- how representations and states are named so they can be found quickly.
Example: for collision checks inside an electrical cabinet you care about enclosures, doors, cable ducts and service areas—not panel logos and small chamfers. But mounting holes and support surfaces must remain accurate, otherwise you’ll get a fast but incorrect result.
LOD in practice: how to set up multiple lightweight representations
LOD (Level of Detail) in Autodesk Inventor solves a simple problem: the same assembly but different sets of included parts for specific work. This is especially noticeable in large projects where fasteners and small details add cost to every rotation and rebuild.
Start with a naming and content standard for LODs. Usually three states are sufficient: for layout, for interference and clearance checks, and for release.
How to assemble LOD sets without surprises
Build LODs by the rule “the earlier it’s used, the lighter it should be.” For layout, keep large envelope parts and important interfaces and turn off small items. For collision checks include only what affects collisions, clearances and fits. For release keep the full set that must appear in drawings and the BOM.
Disable what is expensive to calculate and brings little value for the current task: small fasteners, threads, chamfers, repeating parts, decorative covers. If a subassembly contains many identical components, it’s usually better to exclude them at the subassembly level rather than toggling each one.
A rule that almost always helps: one LOD — one purpose. Trying to make a single view that serves "layout + accurate BOM" usually becomes a heavy compromise that is inconvenient for everyone.
Check the impact on drawings and BOMs
A drawing in Inventor can reference a specific LOD. Before handing off a model, open key drawing sheets and ensure the correct representation is selected and the BOM retains required items.
Typical workflow: create a "Layout" LOD without fasteners and fine details. The model becomes light and you can adjust routes and clearances. Before release switch to the "Release" LOD, wait for one rebuild, and get correct views and complete parts lists.
Proxies: when to replace heavy components
A proxy is a lightweight substitute for a part or subassembly. It looks similar, occupies the same place in the assembly, but recalculates much faster. In daily work geometry for layout and envelope is usually enough; not every chamfer, thread or internal profile is needed.
Proxies are especially useful where there are many duplicates or very long items: cable routes and harnesses, standard cabinets and modules, repeated supports, and legacy components imported from other projects that bring extra dependencies. For example, in a rack with dozens of identical brackets you can keep one real bracket for control and replace the rest with proxies.
What to convert to a proxy
A typical proxy candidate contains many small features (perforations, grilles, threads), appears dozens of times, its exact shape is only needed at drawing or final inspection stage, or it’s an imported part that is expensive to rebuild.
Parts that define datums, critical clearances and fits should remain real at least in one representation. A good compromise: proxy for everyday work, original for verification.
How to avoid chaos in files
Agree on storage and naming up front. Usually a separate folder or library like "_Proxy", a consistent suffix (e.g., _PRX) and a property flag in the part metadata is enough to indicate simplification.
Switching should be fast and not require manual repair. Keep identical constraints and reference geometry (the same planes, axes, points) and identical names for base features. Before passing an assembly on, test a few nodes: check that mates didn’t break, envelope dimensions and key holes match, and views update correctly.
Model simplification: what to remove and what to keep
Simplification works best where a part is "pretty" but unnecessary for assembly work: enclosures with hundreds of holes, castings with many fillets, parts with small cutouts and decorative features. The goal is to keep what affects layout, fits and collision checks, and turn the rest into light geometry.
What to usually remove
You generally benefit from removing small features that don’t change intent but heavily load rebuilds and graphics: chamfers and small fillets along edges, threads and knurls (if not used for clearance checks), embossing and logos, repetitive small holes and perforations, and complex internal cavities not needed for layout.
At the same time keep mounting faces, datum planes, axes, hole centers and envelope dimensions. A handy approach is to make a light version that preserves outer contour and all fastening locations while turning off the cosmetic details.
Simplify by subassembly and avoid mixing versions
Don’t simplify the top-level assembly all at once. Start with the heaviest subassemblies (gearbox, rack, enclosure module) and create lightweight variants for them. This way you see the effect faster and reduce the risk of breaking the project.
To ensure a simplified geometry doesn’t accidentally go to production, keep simple rules: separate working and simplified versions by name or property, use dedicated representations and verify which one is active before release. Link drawings and BOMs to the full version. Before sending to manufacturing do a quick check that the full model opens without substitutions.
Step-by-step plan to speed up a large assembly
Speed improvements are best done bottom-up: handle heavy parts and subassemblies first, then the overall assembly. Otherwise you treat the symptom, not the cause, and rebuild time returns.
1) Record a baseline
Open the assembly under the same conditions (same computer, same file, no extra programs) and note times: open time, rebuild time after a typical change, and optionally file size. That’s enough to judge whether changes help.
2) Focus on 3–5 main culprits
Pick a few components that cause the most trouble. Usually these are parts with many features, arrays, imports, complex geometry or many dependencies.
Workflow:
- Find the 3–5 heaviest components or subassemblies.
- Create lightweight variants for them (simplify geometry, remove fine details).
- Build LODs for tasks: layout, checks, release.
- Replace heavy nodes with proxies where safe.
- Clean dependencies: remove unnecessary adaptivity, redundant links and cyclic references.
After each step remeasure and compare to the baseline. If there’s improvement, record a team rule: what to always simplify, where to use LOD, and where proxies are forbidden.
Common mistakes that increase rebuild time
Even with LOD and simplifications, rebuild time can keep growing. Often the issue isn’t “heavy geometry” but how links are organized inside the model.
The first problem is excess dependencies between subassemblies. When parts in one subassembly reference geometry in another (external sketches, common planes or face grabs), Inventor must recalculate the whole chain. You change one hole and half the product rebuilds.
The second trap is adaptivity left on “just in case.” It helps during layout but later causes cascades of rebuilds on any update. Often adaptivity remains turned on in dozens of components though only a couple actually needed it.
The third reason is lack of rules for library components. Someone edits a library bolt inside a project, someone copies it into a subassembly folder, someone else replaces it with a “similar” part. After a few iterations links break and the BOM behaves unpredictably.
Signs you fell into these pitfalls: many parts rebuild when you changed one; mates or positions break after replacing a component; the project contains files like "part_v12_final2" and several clones; adaptivity is enabled on parts that haven’t changed shape for a long time.
A practical example: a protective cover was made adaptive and tied to holes on an adjacent frame. Later the frame changed, Inventor rebuilt the cover, then fasteners, then neighboring nodes—and rebuild time jumped from seconds to minutes. Fixing this often means locking geometry, removing external references and leaving adaptivity only where it’s truly needed.
Libraries and standard components without unnecessary weight
In large assemblies the slowdown often comes not from complex mechanics but from details: hundreds of standard parts, purchased items and fasteners treated as unique files in the project. A well-organized library makes standard components fast, predictable and easy to find.
Divide the library by meaning: standard items (fasteners, washers, bearings), purchased assemblies (motors, sensors, gearboxes), corporate standard parts (brackets, covers). This helps control model quality and avoid mixing changeable items with those that must remain stable.
Consistent naming and properties save as much time as LOD. If standard components have consistent parameters filled (name, standard, material, supplier, mass), search and BOMs work without constant manual edits.
Another important point is versioning. Don’t quietly edit a library file if it’s already used in dozens of assemblies. It’s better to issue a new revision and keep old versions for existing projects.
Also “weigh” the library. A common mistake is storing detailed models with threads, small chamfers and logos. Such a component used in many places quickly inflates rebuild time. For typical use keep a lightweight default and detailed versions only when needed.
Quick checklist before handing an assembly off
Spend 10 minutes checking the model before handing it to manufacturing or colleagues. It’s cheaper than catching freezes and endless rebuilds on others’ machines.
Test the assembly on a typical workstation (not the most powerful PC). Then ensure: the assembly opens and rotates without minute-long pauses; there are at least two LODs (a light working one and a separate release one); the heaviest nodes are replaced with proxies or simplified versions; inter-node dependencies and adaptivity are minimized; the component library has no duplicates and no excessive detail.
If you don’t know where the heavy spots are, run a simple test: suppress the largest subassemblies one by one and watch how open and rebuild times change. Usually 2–3 culprits are found quickly.
Real-life example: speeding up an assembly without a full redesign
Imagine an assembly of about 15,000 components. It still opens tolerably, but any change in one node (replace a bracket, move a hole, edit a profile length) triggers a long rebuild and you wait minutes each time.
Analysis shows the heaviness comes from a few subassemblies: runs with many segments, standard modules with many small chamfers and holes, and fasteners that multiplied into different versions from different folders.
Minimal changes that don’t break the product structure are introduced: create simplified variants for heavy subassemblies (remove chamfers, threads, small holes that don’t affect envelope or interfaces); create proxies for runs and repeating modules so the main assembly has light geometry; set up two LODs—"Layout" and "Release"; and consolidate the fastener library to a single set without duplicates.
As a result the assembly becomes predictable: local edits stop triggering a full-model rebuild, switching between tasks becomes noticeably faster, opening and saving improve, and there are fewer accidental errors from duplicates. Team work smooths out and interactions become more predictable.
Next steps: lock rules and check hardware
To prevent regression, formalize rules as a short guideline: which LODs to use (and how to name them), when to use proxies instead of heavy parts, and which components come from the library. Fewer exceptions mean more stable performance.
Run a pilot on the most problematic assembly and compare numbers before and after: open time, rebuild time after a typical change, file size, frequency of freezes and how smoothly the view rotates.
Also check whether your hardware is the bottleneck for CAD load. Common hardware limits are insufficient RAM, a slow disk, low single-core CPU performance (many rebuild operations depend on single-thread speed), and for shared folders—network and storage throughput.
If you need a plan to update workstations and infrastructure (designer workstations, storage servers and services), it’s often useful to involve a system integrator. For example, GSE.kz (gse.kz) as a manufacturer and integrator in Kazakhstan can help assemble a solution for your tasks and procurement requirements.
FAQ
Why is the assembly slow even if there aren't that many parts?
Usually it’s not the number of files, but that Inventor keeps recalculating complex geometry and dependency chains. Threads that slow things down include threads (fasteners), chamfers, perforations, imported bodies and inter-assembly links that force Inventor to rebuild large portions on any change.
How to quickly and honestly measure whether it got faster?
Record three numbers as a baseline: time to open until fully ready, time to rebuild after one typical action (for example, suppress a subassembly and restore it), and time to save after a small edit. Repeat measurements under the same conditions to see what helped.
Where to start optimizing a large assembly so you don't "speed up the wrong thing"?
Start with the goal: layout, collision checks, drawing release, or visualization. For layout keep overall dimensions, mounting points and interfaces and remove small cosmetic details; for release keep the full contents. Mixing goals in one representation usually creates a heavy, inconvenient compromise.
How many LODs are actually needed and how to avoid turning them into chaos?
Create a few LODs for different tasks and name them consistently across projects so the team doesn't get confused. Typically three is enough: a lightweight one for layout, a medium one for interference and clearance checks, and a full one for release. Before handing off, ensure drawings and BOMs reference the correct LOD.
What is usually safe to disable in a layout LOD?
Turn off what barely affects the current task but is costly to compute: small fasteners, threads, chamfers, repeated elements and decorative parts. Prefer disabling components at the subassembly level rather than one-by-one to avoid manual cleanup.
When is it better to use proxies and when not?
Proxies are suitable for heavy or repeated components where you only need envelope and mounting locations, not exact shape. Typical candidates: cable routes, long profiles, cabinets and modules, and imported parts with heavy geometry used many times. Keep critical mating and datum features as originals at least in one representation.
How to replace a component with a proxy without breaking mates?
Give proxies the same reference geometry and attachment points as the original so mates don't break. Keep clear naming or a property flag and store simplified files separately so a proxy isn’t accidentally sent to manufacturing.
What to remove when simplifying models and what must be kept?
Remove details that don't affect dimensions, fastening or clearance checks: chamfers, small fillets, threads, embossing, logos, fine perforations and secondary internal cavities. Keep the overall contour, datum planes, axes and hole centers—otherwise you’ll speed up the model at the cost of mating errors.
Why does rebuild time grow even after LODs and simplifications?
The usual culprits are inter-assembly references and adaptivity left "just in case". When one subassembly references geometry of another, a single change can trigger a cascade. Adaptivity multiplied across many parts also magnifies rebuilds. Limit external links, lock geometry where possible and keep adaptivity only where it’s genuinely needed.
How to organize fasteners and purchased parts library so it doesn't slow down the project?
A library should be a single source of standard components; otherwise duplicates and “similar-but-different” files appear and break predictability. Keep standard parts lightweight by default and detailed versions only when needed. Manage versions carefully—issue a new revision instead of silently changing a file already used in many assemblies.