Equipping schools for remote learning: the basic kit
Equipping schools for remote learning: which PCs, cameras, headsets and network settings are needed so lessons run without interruptions.
Where lesson failures start and how to avoid them
Remote lesson failures almost never begin with complex equipment — they start with small things: sound drops out, the camera gives a dark image, the Wi‑Fi fluctuates, or the teacher's laptop dies mid‑explanation. So equipping schools for remote learning should logically start with a basic check: can the teacher be heard, is the board (or presentation) visible, and does the connection hold for at least 40–45 minutes without interruptions.
Three things are most often forgotten: a decent microphone (the laptop’s built‑in one rarely helps), stable Wi‑Fi in the classroom itself (not just “it works in the corridor”), and power (extension lead, working sockets, chargers, spare cables). Another common pain point is a tangle of adapters: one small adapter breaks and the lesson simply cannot start.
Critical failures are those that stop students from understanding the material: audio cutting out, the picture freezing for 10–20 seconds, or the teacher repeatedly reconnecting. Tolerable issues are when the image isn’t perfectly sharp but the face and materials are readable, or the camera angle is not ideal while the sound is clear.
You can check a good result in 10 minutes before the week starts:
- the teacher is heard without bubbling or echo even when stepping 1–2 meters away;
- the teacher’s face and materials are legible in normal lighting;
- a video call stays connected for at least 45 minutes without reconnects;
- there is spare power: charger connected, cables not taut.
A simple example: class 7B lost connection every third lesson. The Wi‑Fi point was placed behind a concrete column and the teacher used 2.4 GHz. Moving the access point to an open spot and switching to 5 GHz solved the issue without buying new computers.
Use scenarios: from a single classroom to the whole school
Planning is easier when you choose a scenario first. Problems often arise not because of “weak equipment,” but because the school tries to solve different situations with one setup.
Typical cases:
- lesson from the classroom: the teacher at the board, some students online;
- lesson from a separate room: a quiet room for stable connections and recordings;
- mixed days: the teacher is in class today, at home tomorrow, schedule unchanged;
- event streaming: staff meetings, competitions, open lessons.
Next, clarify responsibilities. In a small school one person often covers several tasks; in a large one you need a clear “who does what.” A typical scheme includes the teacher (conducts lessons), students (connect and submit work), an administrator (network, access, equipment) and a methodologist (lesson rules, material formats).
Third, consider how many lessons run simultaneously at peak times. If 2–3 classes connect at once, internet and Wi‑Fi requirements are modest. If 15–20 classrooms plus remote teachers connect, the bottleneck will be the network and device management, not cameras.
Platforms also set limits. Video lessons need an outgoing internet channel, decent audio and a camera. For the electronic diary and tests, reliable access and responsiveness matter more. Good practice is to choose 1–2 main tools and one backup.
Example: the school pilots one classroom, records problems (echo, weak Wi‑Fi by a window, overload at 10:00) and then scales using the same rules. When purchasing, it’s convenient to plan a unified device fleet from the start — easier to support and update centrally.
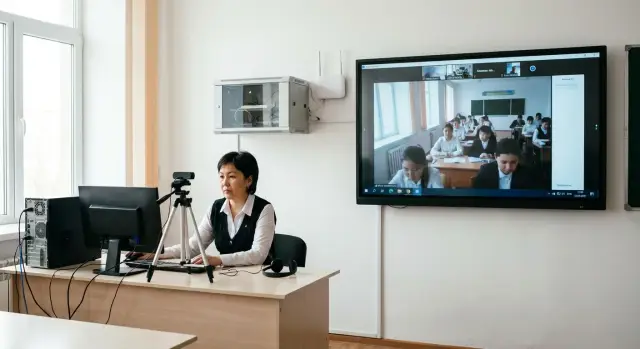
Minimum classroom kit: so teachers can be seen and heard
Many lesson failures are caused by simple things: bad audio, a dark face in frame, or a lagging computer. If you plan to equip schools for remote learning, start with a working minimum in every classroom where a teacher leads lessons.
The teacher’s computer can be a desktop or laptop, but it must handle video calls and presentations smoothly, boot quickly and not freeze when a camera is connected. It’s practical to have a separate webcam and several USB ports: fewer mid‑lesson swaps and less chance that something will unplug in a rush.
A webcam is more about honest 1080p than “megapixel numbers.” Look for true 1080p, a wide angle (to include the teacher at the board), a secure mount (monitor or tripod) and an autofocus that doesn’t drift when the teacher moves.
For audio, the choice is simple: a headset works if the teacher stays at the computer and there is ambient noise. If the teacher often stands and writes on the board, a desktop microphone placed closer to them is more convenient.
Lighting solves half the image quality problems. Often a simple lamp aimed at the face and placing a window to the side (not behind) is enough.
For reliability, include a small reserve: a spare headset (the most common failure), a spare webcam on the floor or for a neighboring classroom, an extension lead and spare power cable, and a simple mount so a camera won’t fall.
Example: in the computer lab the camera sits on a tripod by the first desk, a lamp sits beside the monitor, and a spare headset is kept in a labeled box. This saves 5–10 minutes in nearly every problematic lesson.
Teacher workspace outside the classroom: what really matters
If lessons are taught from an IT room or method room, the essentials are silence, stable lighting and a place where people don't walk behind the teacher. This reduces noise, keeps lesson pace and distracts students less.
A basic kit for such a place is simpler than it seems. For equipping schools for remote learning, collect identical sets so teachers don’t search for adapters and cables a minute before the call.
Minimum that covers most needs: a computer or laptop that doesn’t freeze (prefer some memory headroom), a good webcam and a headset (or separate microphone), a simple lamp, a reliable extension lead and chargers.
A second monitor really helps when you need to see students and show materials at the same time. Typical setup: presentation or diary on the main screen, video call and chat on the second. If the teacher mainly holds short consultations without sharing material, a second monitor can wait.
For math, physics, chemistry and primary grades, a graphics tablet (to write formulas) or a document camera (to show a textbook or experiment) is useful. History and literature teachers often need just a screen and camera.
To keep kits from scattering, provide simple storage and issuing: labeled boxes or slots, an issuance log and spare cables. Keep 1–2 backup kits for failures, and buy PCs and monitors from the same series to avoid driver and port surprises.
Student devices: minimum requirements and trade‑offs
For stable remote lessons, uniformity and predictability matter more than raw power. Schools usually use three models: school PCs, students’ personal devices (BYOD), and a mixed approach. Mixed is often most realistic: the school covers critical groups (graduating classes, students without devices), others use personal devices.
If the school issues devices, stick to a simple package: laptop or desktop, webcam (if not built‑in), headset and charger. Specs usually suffice: a modern dual‑core CPU, 8 GB RAM, SSD from 128 GB and an 11–12 inch screen or larger. Don’t forget updates, user accounts and checking camera and microphone before issuing. For desktops, identical models simplify driver and repair work.
Headsets for students solve many failures. Without them, echo, noise and “I can’t be heard” begin in a shared room. Simple wired headsets with a microphone and a small reserve of consumables (ear pads) are usually best.
When equipment is limited, organizational compromises help: a timetable with slots for online classes, dedicated rooms with ready workstations, on‑site connection points for students without home internet, and prioritized device loans.
Also consider accessibility: large fonts, clear desktop shortcuts (“Lesson,” “Support”), simple login without extra passwords and a backup communication channel for short announcements.
On‑site network: internet and Wi‑Fi so connections don't drop
Even with a good laptop, lessons fail because of the network. When equipping schools for remote learning, check not only contract speed but stability.
Assess the internet channel by three things: real speed during peak hours, latency (ping) and packet loss. In lesson terms you’ll feel this as garbled audio, frozen video, or delayed student responses. Moderate bandwidth is often enough, but spikes and packet loss break connections more than “not enough megabits.”
Wi‑Fi usually becomes the bottleneck because of congestion and poor access point placement. One access point per floor and “it should reach” won’t work: the signal may exist but the quality won't. Plan coverage for the number of concurrent connections (classrooms, corridors, staffroom) and place points near actual work areas, not just where there is a socket.
A wired connection for the teacher’s workstation is often justified. If the teacher streams, uses an interactive panel or shares video, a cable gives predictability: fewer interferences, fewer random disconnections and simpler troubleshooting.
Simple checks before the week starts:
- run 10–15 minute video calls from several classrooms simultaneously;
- check that audio doesn’t break up and video doesn’t freeze during motion;
- measure ping and packet loss during peak hours, not in the morning;
- check Wi‑Fi load: how many devices are actually on the network in each classroom;
- mark problematic areas and move or add access points.
A separate network for staff and a guest network for students often reduces load: teacher devices get priority and access to needed resources, while guest Wi‑Fi interferes less with lessons.
If the network is built turnkey, involve a system integrator who can plan Wi‑Fi for the expected load and perform on‑site measurements. In Kazakhstan, projects like this for schools are done by GSE.kz.
Power and reliability: small things that make the difference
Even with good internet, a lesson can fail because someone bumped a plug, a system unit overheated, or a laptop charger died. When planning equipment for remote learning, power and everyday reliability are as fundamental as camera and sound.
Start with clear power rules. An extension lead “from the nearest shop” is often not designed for continuous load; overheating and poor contacts cause random reboots.
Quick measures that usually help:
- use surge protectors with a switch rather than cheap multi‑plugs;
- separate power circuits: computer and monitor on one, chargers and projectors on another;
- secure extension leads and plugs (ties, clips, Velcro) so they aren’t pulled out during breaks;
- label cables and power bricks so they aren’t carried between rooms;
- keep 1–2 spare chargers and power bricks for popular models.
A UPS is not needed everywhere, but in key locations it saves lessons and data. Typical scenario: the lights blink, the router restarts, the teacher reconnects and the class loses 5–7 minutes.
Prioritize UPS for network equipment (router, switch, access point), teacher PCs in rooms with frequent online lessons, the server room or comms cabinet (if present), and PCs holding important materials.
Don’t forget temperature and dust. When vents clog, equipment gets noisy, slows down and freezes. Simple rule: don’t place system units next to radiators or in closed cabinets, and do a quick cleaning each quarter in the busiest rooms.
Step‑by‑step launch: from zero to the first stable lessons
If you act “per classroom,” lessons often fail for different small reasons: echo in one room, the camera pointing at a window in another, Wi‑Fi only reaching the door in a third. It’s easier to make one clear standard room and then replicate it.
Five‑step plan:
-
List classrooms and conditions: where the teacher’s desk is, how many students, whether there's a projector, where the sockets are. Choose 1–2 reference rooms (for example a standard classroom and the IT room).
-
Test internet and Wi‑Fi not at the distribution board but where the lesson happens: at the teacher’s desk and at the first and last desks. A common finding: signal is fine by the door but drops at the board.
-
Assemble the kit and set it up: camera at eye level, front lighting, microphone near the teacher, speakers not pointed at the mic. The goal is simple: students see the face and hear the voice without background noise.
-
Run a 10–15 minute test call with a short scenario: greeting, explaining a topic at the board, a class question, showing a presentation, and a 20‑second silent pause (echo and noise are immediately obvious).
-
Fix the settings: which devices are default, volume levels, camera position, where to plug cables. Then run a short training for teachers in the reference room so everyone follows the same routine.
Example: with 20 classrooms, you can perfect 1–2 reference rooms in the first week and then copy the kit and settings. If you buy equipment and support from an integrator, ask for a configuration template and a test scenario — it speeds up the rollout.
Settings and security without unnecessary complexity
Most time is eaten not by cameras and microphones but by small glitches: a lost password, a surprise update or “someone installed something.” If you’re equipping schools for remote learning, agree on simple rules that keep lessons stable.
Start with an inventory. Every laptop, PC, webcam and router should have an inventory number and a sticker with the room. Make it clear who issues devices, where spares are stored and how to report problems. Even a simple table “device — room — responsible person — check date” helps.
Keep user accounts simple: give teachers a working account, not a temporary one that expires. Store passwords with a responsible person in a sealed envelope or a secure vault, not in a messenger.
Minimal settings that give maximum effect:
- block program installation without an admin password;
- enable only required startup apps;
- disable pop‑up notifications during screen sharing;
- schedule updates for evenings or weekends;
- use a separate “guest” profile for substitutes and checks.
Apply updates on a schedule: every 1–2 weeks, but not on the morning of lessons. For critical devices (teacher PCs, access points) keep a maintenance window and run a quick check after updates.
Privacy is often compromised by accident. Agree on simple bans: don’t show registers or lists with phone numbers in camera view, don’t open documents with personal data on screen, close extra tabs before sharing, and don’t speak passwords or codes aloud.
Common mistakes when equipping and how to avoid them
The most painful lesson failures come from small mistakes. These repeat across schools, especially when equipping is done “from a checklist” without testing in a real classroom.
A common scenario: a high‑end camera is installed and the image is great, but the audio is muffled with echo. Students ask the teacher to repeat, the lesson derails into fixing sound. In a noisy room, a good microphone or a simple headset matters more than extra megapixels.
What is easier to prevent:
- expensive camera but no decent microphone: buy a headset or separate mic and test in real noise;
- one access point per floor: network drops during peak use, plan coverage for classrooms and corridors;
- no spare cables and adapters: a missing HDMI, broken USB or lost charger can stop a lesson;
- heterogeneous equipment without a standard: different chargers and settings — choose 1–2 standard kits and make a short cheat sheet;
- no quick headset exchange process: designate a responsible person and keep a small reserve.
Practical example: with three different laptop models and two types of display connectors, a teacher searches for the right adapter each time. Standardized workstations with spare cables almost eliminate these pauses.
Quick checklist before the school week
Before Monday, do a short check in each classroom where online lessons are planned. It takes 10–15 minutes and catches the small things that most often cause remote learning setups to fail.
Five points to go through:
- Video: camera at eye level, background tidy, face not in shadow. If a window causes glare, rotate the desk or add a lamp.
- Audio: speak for 20–30 seconds and listen to a recording. If there's echo, move speakers away, use a headset or bring the mic closer to the mouth.
- Connection: make a test call from the teacher's seat. If drops repeat, the cause is usually overloaded Wi‑Fi or weak signal.
- Power and cables: plugs are not loose, the surge protector switch works, cables aren't taut. Key equipment should be on a UPS where possible.
- Backup: a spare headset nearby and a simple plan B for one lesson (another room or connection via a phone).
A small example: if the image is fine but students complain about bubbling sound, replacing the microphone or switching to a headset often fixes it. If lessons drop at the same time each day, check for heavy background tasks or updates occurring then.
Example: how a school assembled a working minimum in 2–4 weeks
A school with 800 students and 25 classrooms faced a typical problem: up to 8 simultaneous remote lessons in the schedule and failures caused by small issues. The goal was not to equip everything at once but to quickly assemble a stable minimum.
In the first 1–2 weeks the school allocated 10 teacher kits and 2 spares. The kit was simple: a PC or all‑in‑one, webcam, headset, a second screen if possible and a preconfigured set of programs. Spare kits were kept in the staffroom so a lesson could continue by swapping equipment in 5–10 minutes.
At the same time they strengthened the network. Access points were placed on each floor to cover corridors and classrooms, and teacher workstations were wired where possible. This immediately removed intermittent disconnections.
Support was organized simply: a responsible person on shift, a single contact number for requests and a simple incident log (when, room, what happened, how it was resolved). A few clear metrics were enough for control: complaints per day, disconnections per lesson, time to start and how often a spare kit was needed.
In 2–4 weeks the school achieved a predictable system: less panic, more repeatability and clear next steps for improvement.
Next steps: how to lock in results and avoid backsliding
To make equipping schools for remote learning sustainable, use a simple consolidation plan. Start with inventory: list classrooms and mark where online lessons occur most often (languages, IT, exam prep). Prioritize those rooms and bring others online in turn.
Approve one standard kit. When every room has a different set, small mismatches turn into failures: wrong cable, no charger, different settings.
Set school‑level rules: what is in the kit and how it looks, where equipment is stored and who issues it, what counts as a fault and when to report it, and what spare parts are kept on site.
Before scaling, run a pilot in 1–2 classrooms during real lessons: one high‑load and one typical. After a week collect short feedback from the teacher and fine‑tune sound, lighting, access point placement and the PC configuration template.
Plan support. If lessons run daily, “come by in the afternoon” doesn’t work. Minimum — a clear channel for requests and a response rule: what is solved by phone immediately and what requires a visit. Backup devices let you replace equipment in 5 minutes rather than cancel a lesson.
If you need a local supplier and integrator in Kazakhstan, it is sometimes easier to rely on locally produced PCs, all‑in‑one systems and servers, plus implementation and service support. For example, GSE.kz as a manufacturer and system integrator works with educational organizations and can help standardize fleets and networks so classrooms are assembled to a single standard.
FAQ
Where is the best place to start equipping so lessons don't fail?
Start by checking three things in a real classroom: sound, image and connection stability for 45 minutes. Most lesson failures are caused by the microphone, weak Wi‑Fi at the board, or power—not by a “slow” computer.
What is more important for a remote lesson: camera or microphone?
A laptop’s built‑in microphone often picks up echo and classroom noise, so students hear garbled or missing words. The simplest solution is a headset if the teacher works at a PC; if the teacher moves to the board, a separate microphone placed closer to them is more convenient.
Which webcam is suitable for a classroom lesson?
Aim for a true 1080p camera with a wide field of view, a solid mount and autofocus that doesn’t “float.” It’s more important that the teacher is visible at the board and that the frame handles movement well than chasing extra megapixels.
How can I quickly improve the image if the teacher is hard to see?
Place a light source in front of the teacher and avoid a window behind them, which causes the camera to darken the face. Often a desk lamp and a small change in desk orientation noticeably improve the image without buying new equipment.
Why does video call performance lag even when the internet is fast?
Check not the contract speed, but latency and packet loss during peak lesson times. If calls drop in specific spots, the issue is usually access point placement or congestion; moving the point and switching to 5 GHz often helps faster than replacing computers.
Should the teacher's PC be wired if Wi‑Fi is available?
For broadcasts and frequent online lessons, a wired connection is more predictable and easier to diagnose. Keep Wi‑Fi for mobility, but if possible assign the teacher's main workstation to a wired connection.
Which spare items really save lessons without costing much?
Keep a small spare stock: an extra headset, one additional power cable, a quality extension lead with a surge filter and one spare camera per floor or classroom pair. These allow you to replace a minor item in 5–10 minutes instead of canceling a lesson.
What should be at a teacher's workstation outside the classroom?
If lessons run from different locations, prepare identical kits and store them in labeled boxes so teachers don't hunt for adapters last minute. In a quiet room, silence, steady lighting and a clear connection scheme matter more than complex gear.
What are the minimum requirements for student devices and school PCs?
For video calls and learning platforms, a modern dual‑core CPU, 8 GB of RAM and an SSD are usually enough, plus a camera and headset. The key is uniformity and predictability: a standardized fleet reduces driver, charger and repair issues.
What simple test and settings prevent problems on Monday?
Run a short test before the week starts: a 10–15 minute call from the classroom to check sound, movement in the frame and content sharing. Then lock default settings and simple rules so updates, notifications and random programs don't break lessons.