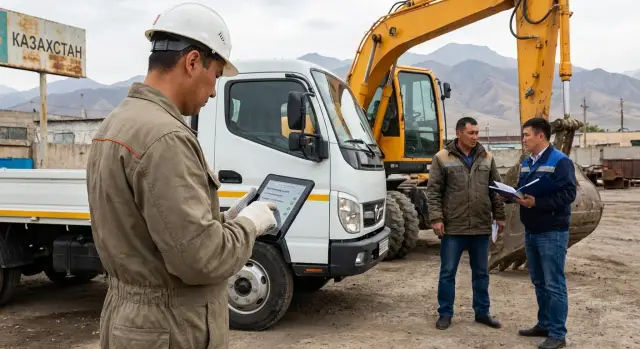
Electronic Inspection Log: Checks, Mileage and Photos
An electronic inspection log helps record checks, link them to mileage and operating hours, store photos, and assign roles in the process.
Why you need an electronic inspection log
Paper logs are inconvenient not because they're paper, but because they poorly protect the process. Pages get lost, entries are hard to verify, and backdating is nearly impossible to prove. As a result, a log exists, but there’s no confidence the inspection actually took place.
A missed pre-departure check quickly turns into risk: line refusal, shift downtime, an accident, injury, fines and investigations. Often the problem isn’t rare major failures but small issues that should have been noticed in advance: tire pressure, a leak, non-working lights, worn belts, play in joints, missing fire extinguisher.
An electronic inspection log makes the record clear and verifiable: who inspected, when, which vehicle, with what result and with what photos. This reduces disputes between operations and maintenance because there is a single source of truth.
A separate benefit is tying inspections not only to the date but also to mileage or operating hours. The date alone says little about load: one vehicle may do 50 km in a week, another 1,500 km; equipment can be idle but accumulate operating hours on warm-up or in-place work. Linking to mileage and hours helps spot wear on time and plan maintenance based on actual use.
Different roles expect different things from the log. Managers want discipline and downtime statistics; safety needs confirmation of pre-trip and pre-shift checks; operations need equipment readiness and a quick fault history.
What to track: assets and inspection types
To avoid confusion, first agree what exactly is the unit of record. Not the entire fleet, but concrete units you can decide on: release to the line or send to repair.
Most often records are kept per vehicle (cars, trucks, buses), heavy equipment (loaders, excavators, cranes), trailers and semi-trailers. If attachments affect safety and downtime, include them (buckets, brushes, hydraulic breakers). Some fleets separately track key components that are moved between machines (battery packs, generators, tires, modular attachments).
Next, define inspection types. Drivers need a quick pre-trip check, mechanics need confirmation of serviceability, dispatchers need a ready/not-ready status and a clear reason.
Usually three modes are distinguished: pre-departure (or pre-shift) inspection, post-shift inspection (to record new defects), and periodic calendar-based inspections. Also mark scheduled maintenance and unscheduled checks—for example after a driver complaint, an accident, towing, overheating or abnormal noise.
Finally, choose the record unit so history is easy to search. A practical minimum for a vehicle inspection log: vehicle (or unit), date and time, driver, shift. For heavy equipment add mileage or operating hours so identical checks are not lost across shifts.
What data to record in each entry
One record should answer a simple question: which equipment was checked, where and when, with what readings and what outcome. The clearer the structure, the easier it is later to find the root cause, prove the inspection, and link notes to repairs.
Start with identifiers. For road vehicles, license plate and VIN are usually enough; for heavy equipment, serial and inventory numbers are often more important. If the fleet has identical models, an inventory number prevents confusion—especially when equipment works on different sites.
Record mileage and operating hours. It’s important not only to store the value but also the source: entered manually, captured by a photo of the instrument cluster, or fed from telematics. This helps resolve disputes when readings suddenly drop or spike. For heavy equipment set a rule for recording hours (for example, from the panel counter before the shift) so everyone does it the same way.
Don’t skip operational context: date and time, location, shift, route or site (quarry 3, construction site A, city route). These fields quickly show where the equipment was working if the same defects repeat.
Keep final condition in clear statuses:
- serviceable
- with remarks (departure allowed)
- departure prohibited
- sent to repair
Add a short comment to the status: what is wrong and what was decided now (fixed on site, handed to mechanic, awaiting spare parts). This format is clear to mechanic, driver and dispatcher without extra explanations.
Minimal inspection checklist for vehicles and heavy equipment
The minimum is needed so the electronic log doesn’t become a long questionnaire, yet catches dangerous defects before departure. A good base for a daily pre-trip or pre-shift check is a few minutes to mark items and one more minute for comments if something’s wrong.
For cars and trucks keep the list short and repeatable:
- brakes (including parking brake) and steering
- lights and signals (headlights, indicators, brake lights, horn)
- wipers and washer, visibility, windshield condition
- tires and wheels (pressure when needed, cuts, fasteners, wear)
- under-hood (leaks, fluid levels, battery, belts)
Separately record mandatory safety and control items: fire extinguisher, first aid kit, warning triangle. If the vehicle has a tachograph and it matters for your rules, note its operability and seal condition.
For heavy equipment add items that most often cause downtime and accidents: condition of hydraulic lines and fittings, attachment mounts and play, limiters and locks, emergency stop, supports and outriggers.
Write remarks using short uniform phrases so they can be grouped and counted. Examples: "power steering leak", "front left tire - cut", "right brake light not working", "play in bucket", "low coolant level".
How to tie checks to mileage and operating hours
The most reliable rule: every pre-trip or pre-shift inspection should record the current odometer or hour-meter value. Then the entry becomes a reference point, not just a note that an inspection occurred.
Build thresholds into the electronic log so the system warns ahead of time, not on the day of expiry. Typically set a warning window: N km or N operating hours remaining until planned maintenance. Thresholds differ by vehicle and task, so store the standard in the vehicle card (for example, Maintenance-1 every 10,000 km or every 250 hours).
For idle or seasonal equipment separate calendar time and accumulated running time. If an excavator stood for a month and hours didn’t increase, a pre-shift inspection is still required when it goes back to work. In such cases use a status like "in storage" or "preserved" and a separate "return to service" mark with a mandatory check.
If you see suspicious jumps in mileage or hours, don’t adjust them for convenience. Record the fact and reason: attach a photo of the panel, a driver or mechanic comment, a mark "check sensor/speedometer/hour meter" and confirmation after verification.
After component replacement (engine, pump) track operating time separately: total for the machine and for the component from the installation date. This preserves history and lets you plan maintenance for the component based on its actual work.
How to link an inspection with repair without confusion
For the electronic log to work there must be a clear chain: a remark from an inspection becomes a repair request, then specific work, then closure with verification. That avoids situations where something was fixed verbally but not visible in the machine history.
A simple rule: each remark gets its own status and an assignee. Typical status flow: detected (defect recorded), in progress (repair assigned and started), fixed (work completed), follow-up check (awaiting verification by inspection). The final status is important: repair and verification are separate actions.
Make the follow-up inspection after repair a new entry rather than editing the old one. The old entry keeps the fact that a defect was found. The new one shows the machine was checked after work and admitted back to service. This is especially helpful when investigating incidents and disputes.
To make the vehicle history readable in a minute, the repair request should reference the specific inspection and show mileage or hours at the time of detection. Then it’s quick to see what failed most often, at what mileage, and how long the machine was out of service.
Rule for prohibiting departure
If a defect is critical (brakes, steering, fuel leak, non-working lights required for road travel) departure is prohibited until status is "fixed" and "follow-up check: passed". The rule should be the same for everyone: the mechanic records the prohibition, the dispatcher does not release, the driver does not accept the vehicle.
Minimal workflow in the system
- Remark in inspection: what is wrong, how critical, mileage or hours.
- Repair request: who will do it, deadline, status "in progress".
- Work record: what was done and which parts were used (at least briefly).
- Closure: status "fixed" and a separate follow-up inspection entry.
This turns the log from an archive of checkboxes into a clear operational history.
Photo documentation: what to photograph and how to store
Photos in the inspection log are not just for show. They help confirm equipment condition, resolve disputes about damage, and determine when a defect appeared.
What to photograph
A typical minimum set: a general view of the vehicle (showing the plate or fleet number), a photo of the odometer or hour meter, and close-ups of defects. If in doubt, add a contextual shot (the defect and the whole assembly) to show the location.
Before uploading, check that digits are legible and there are no glare spots. If the system timestamps photos automatically, that is sufficient. If not, set a rule: photos must be taken through the app so they are attached to the inspection entry.
How to store photos without drowning in files
Storage should be easy to search: equipment -> date -> inspection type (pre-trip, post-trip, periodic) -> photo set. Then the needed image is found in a minute.
Predefine access rights: view by mechanic, dispatcher and safety officers; add by driver (meter, general view) and mechanic (defects, additional nodes); delete only by an administrator and only with a reason so evidence isn’t lost.
Retention depends on internal rules, but a practical approach is keeping photos for at least 12 months and longer for high-risk equipment. Make scheduled backups and periodically test restoration.
To avoid filling device memory in the field, use compression on upload and an offline rule: if there is no connection, photos save in the app and upload when the network is available.
Roles and responsibilities: mechanic, driver, dispatcher
For the electronic log to work, each entry must have a clear author and a clear decision: admission or prohibition. This reduces disputes about who saw what and who allowed the vehicle to go out.
The mechanic is responsible for the quality of the check and the final decision for the vehicle or equipment. They configure checklists by equipment type, record results, write simple remarks and set the admission or prohibition status. If they prohibit departure, the mechanic must state the reason.
The driver is responsible for the actual condition at start and during the route. They confirm receipt of the vehicle, add readings (mileage or hours), attach photos if required, and note defects that appeared during the shift. Important: the driver must not remove a prohibition, but can add facts to the record.
The dispatcher is responsible for releasing units to the line and controlling the shift. They see prohibitions and do not release equipment until status is changed by an authorized employee. After the shift the dispatcher compiles reports: who departed, what was prohibited, how many remarks were open and closed.
Only the person who bears responsibility for the technical decision should close remarks and allow departure: mechanic (or senior mechanic). A dispatcher may change only organizational fields (shift, route), not the technical status.
To avoid gaps at night and on weekends, set substitution rules: assign an on-call mechanic with admission rights, allow the dispatcher to set status "awaiting mechanic" but not "admitted", and list defects that require immediate prohibition.
How to implement the electronic log: step-by-step
Switching to an electronic log is best started with a short pilot, not across the entire fleet. This will show which fields are actually filled, where disputes arise, and what needs simplifying.
Implementation steps
First prepare the base: an equipment directory (plate or inventory number, type, department) and 2–3 checklist templates for main groups (cars, trucks, heavy equipment). Then lock mandatory fields that prevent saving: mileage or hours, date or shift, responsible person, admission status, photos for critical remarks.
Then proceed step by step:
- run a pilot in one depot or site for 2–4 weeks
- enforce a single routine: inspection before departure, after shift, and after repairs
- agree on statuses (admitted/conditional/not admitted) and who can change them
- set up simple reports: missed inspections, overdue by mileage/hours, repeat faults
- review missed entries weekly: what wasn’t filled and why
After the pilot update checklists and field hints, train other shifts with one-page instructions and scale up. If the log is stored locally, decide in advance where photos and backups will be kept. This usually requires on-site infrastructure: a server and workstations.
Example scenario during a shift: from inspection to repair
One shift, two machines: a dump truck hauling soil and an excavator working a pit. The dump truck needs mileage and brake checks; the excavator needs hours, hydraulics and attachments checked. The electronic log must show exactly what was checked and on what data the machine was admitted.
In the morning the dump truck driver opens a pre-trip inspection entry. They record date and time, take a photo of the odometer and mark basic items: lights, brakes, tires, fluid levels. If all is OK the entry goes to the mechanic.
The mechanic reviews the notes and photos, adds items if needed (for example, visual check for leaks), and sets admission status: "approved" or "prohibited." For the excavator the operator attaches a photo of the hour meter and checks hydraulics, bucket pins and mounts.
During the excavator check a fresh hydraulic leak is found. The mechanic changes the entry to "not admitted" so the machine won’t be sent to the site. A repair request is created linked to this inspection: cause (leak), location, priority and assigned technician.
After repair the technician records the completed work and adds photos (e.g., replaced hose and a clean fitting with no leaks). The mechanic performs a follow-up inspection: records new hours, takes a control photo of the unit and changes status to "approved."
The dispatcher sees a clear readiness picture: the dump truck is admitted, the excavator was initially prohibited but after a follow-up check is now ready. Based on this the dispatcher plans releases without calling each person separately.
Common mistakes and how to avoid them
The commonest problem is entries you can’t trust. Formally everything is filled, but mileage or hours are guesswork, photos live in messengers, and whether to go or not is interpreted differently by everyone. The log becomes an archive of checkboxes.
Mistake #1 — inspections not tied to precise odometer or hour readings. If a driver writes "about 12,000" and the next shift records "12,050," you lose the basis for maintenance planning and post-failure analysis. Make the field mandatory and record the source: instrument panel, telematics, or photo.
Mistake #2 — photos are not attached to the entry and are sent to chats. After a month it’s unclear which vehicle a photo relates to or what it proves. Photos must be stored inside the inspection entry with date, author and photo type (general view, reading, defect).
Mistake #3 — no clear rules for prohibiting departure. One mechanic will pass a tire crack, another will not. You need simple criteria and clear statuses: "Admit", "Admit with remark", "Prohibit departure."
Two things that quickly kill quality: too-long checklists (people tick boxes mechanically) and varied defect wording ("leaking", "seeping", "wet"), which makes analytics impossible.
Typical fixes:
- mandatory fields: mileage/hours, admission status, signature (who made the decision)
- short daily checklist, extended checks in periodic inspections
- a defect directory with consistent names
- photos only in the inspection card
- forbidding deletion of records without control: only admin can delete with a reason and an audit trail
System readiness checks before launch
Before launch ensure the electronic log not only produces reports but actually prevents errors during shifts. The main test is simple: can equipment be released without key data, and will the dispatcher see it in time?
Run a short trial: driver creates a pre-trip entry, mechanic confirms, dispatcher opens release to the line. If rules can be bypassed anywhere, it will surface during this test.
Check the following:
- entries cannot be saved without mileage or hours, date, site and result (admit/prohibit)
- it’s possible to attach photos of the odometer/hour meter and defects when prohibiting
- after repair the follow-up check rule applies (closed repair requires a new inspection)
- a departure prohibition is visible immediately without complicated filters
- history protection: backups, retention period, audit log of edits
If any item fails, stop and fix the process. Otherwise accountability blurs: the driver says they marked it, the mechanic says they didn’t see it, the dispatcher says they released based on old data.
Next steps: devices, storage and support
For consistent daily use decide three things in advance: which devices people will use to enter records, how the system handles poor connectivity in remote sites, and where data and photos will reside.
Device choices are usually simple. A PC in the workshop is convenient for mechanics to open history, create repairs and print if needed. A tablet at the release point is handy for walking around the vehicle, attaching photos and signing. If many drivers start shifts at once, a gate kiosk (a stand with a screen and authentication) helps keep entries consistent.
For quarries, remote camps and shift sites an offline mode is essential. Entries should save locally and sync automatically when a connection appears. Decide in advance how to handle conflicts (for example, two entries for the same release) and who resolves them.
Plan data and photo storage separately. Photos consume space quickly, so you need a server with spare disk capacity and a clear backup plan. Check whether performance is sufficient for a shift, that backups run regularly and restoration is tested, who can delete files and what happens when storage fills up.
Access should be role-based with personal accounts. Drivers need access to their own inspections and admission status. Mechanics need checks, remarks and links to repairs. Dispatchers need release, shift lists, reports and overdue control. Ensure all changes remain in the action log.
If you need help with infrastructure for this process, GSE.kz (gse.kz) as a manufacturer and system integrator can select workstations for the workshop and servers for storing the log and photos, and set up support so the system doesn’t rely on a single person.
FAQ
Why switch from a paper log to an electronic one?
An electronic log ensures inspections are verifiable: you can see who and when checked the equipment, what they noted, and on what basis they allowed it to operate. This reduces “verbal inspections,” simplifies dispute resolution and helps catch small defects earlier—before they cause downtime.
What fields should each inspection record include to be trustworthy?
At minimum record: the specific unit (license plate/VIN or inventory number), date and time, the person who made the entry, mileage or operating hours, the final admission status, and a short comment if there are remarks. If there is a defect or dispute, add photos so the entry is evidence-based.
Why link checks to mileage and operating hours rather than just the date?
Tying inspections to mileage or operating hours makes each record a reference point and helps plan maintenance according to actual usage. Two inspections on the same date can reflect very different wear, so instrument readings or telematics confirmation are often more informative than the calendar.
What should be the unit of record: the whole fleet or each piece of equipment?
Start with the units that are subject to the decision “release or not”: vehicles, heavy equipment, trailers and semi-trailers. If downtime is strongly affected by attachments or interchangeable equipment, include them too—but only if you can reliably keep the entries consistent.
What types of inspections should the system distinguish?
Usually three modes are enough: before departure or shift, after the shift, and periodic calendar inspections. Separately log scheduled maintenance and unscheduled checks after complaints, overheating, accidents or evacuations so the history stays clear.
What is the minimal daily checklist for road vehicles?
Keep a short, repeatable checklist that can be done in a few minutes and leave space for comments. Focus on items affecting safety and release: brakes and steering, lights and signals, tires and wheels, wipers and visibility, leaks and fluid levels.
What else should be checked on heavy equipment besides the basics?
Add checks that commonly cause downtime and accidents: hydraulic lines and connections, attachment mounts and play, locks and limiters, emergency stop, outriggers and supports. Use consistent defect names so it’s possible to search and count repeats later.
What photos should be attached to an inspection and why?
At minimum: a general view showing the plate or fleet number, a photo of the odometer or hour meter, and close-ups of defects. Ideally photos are taken through the app and automatically linked to the inspection; otherwise, after a month it’s hard to tell what an image proves.
How to properly link an inspection remark to repair work to avoid confusion?
Do not edit the original inspection entry. Instead create a chain: a remark in the inspection, a repair request, a note of completed work, and a separate follow-up inspection. That way the fact that a defect was found remains visible, and the post-repair verification is recorded separately.
Who is responsible for what in the log: mechanic, driver, or dispatcher?
Typically: the mechanic is responsible for the technical assessment and admission status; the driver is responsible for the actual condition at start and during the shift; the dispatcher controls release to the line based on current status. Only an authorized mechanic should remove a prohibition or change the technical status.