Disaster Recovery Kit for Branch PCs: Contents
Disaster recovery kit for branch PCs: what to prepare in advance — OS image, driverpacks, instructions and tools to restore a workstation offline within 1 hour.
Goal: restore a branch workstation within an hour
An outage for a branch means an employee cannot work right now and waiting for remote help or a replacement PC isn't an option. Causes are usually simple: the OS won't boot, the disk failed, a malware lockout, or an update broke the boot process.
In a critical moment a branch often lacks what the head office relies on. Internet may be down, VPN unavailable, domain resources unreachable, and the needed distributions and drivers sitting in the cloud. Therefore the recovery kit must work fully offline and not require "one more file" to be downloaded.
The kit's objective is straightforward: return a standard workstation to working condition within 60 minutes and minimize manual steps. The on‑site engineer should follow a short, clear procedure rather than make ad hoc decisions.
Typical incidents to prepare for include: OS not booting or stuck in restore loops, a damaged or replaced disk, infection (including account lockout or ransomware), failed updates or driver conflicts, "black screen" and network issues after reinstall.
Success is more than just "Windows booted." The minimal acceptable result looks like:
- login to the OS under the required account (locally if necessary, without a domain)
- network works (at least wired), the needed segment is reachable
- printing is available to the standard printer
- critical applications for the user's role are installed
- basic security settings and policies applied (within the offline scenario)
Example: a cashier arrives and the PC won't boot. If an engineer restores the workstation to "usable and able to print" within an hour, the business impact is nearly negligible.
Kit principles: offline, simple, repeatable
The kit only works if you assume the worst: no internet, no contact with central IT, and a single rushed engineer on site. Everything necessary must be at hand and openable without guessing.
Offline by default is the main rule. OS images, drivers, utilities, instructions and emergency account procedures (sealed) should be on the media. No "download this", "log into the portal", or "pull from the cloud." If something is critical, it must be in the kit.
Simplicity starts with compatibility. Fewer model variants mean faster recovery. Practically this means standard platforms and repeatable configurations: identical network cards, storage types, BIOS/UEFI types. If branches use standardized workstation lines, maintaining one set of images and drivers is simpler and cheaper.
Repeatability is following a checklist, not "doing whatever happens." Achieve it with agreed rules: fixed folder and file names (no "final_2"), the same step order, clear media and version labels, preset settings (region, keyboard layout, agents) and a short result check (network, printing, key apps).
Security should not block recovery. Store media with a responsible person or in a safe, log issuance, protect content: access control, digital signatures for important installers, regular hash checks. This reduces the risk of tampered files or accidentally using an outdated build.
A simple test: if a new engineer can restore a workstation in an hour following a paper instruction without connecting to the network, the kit is assembled correctly.
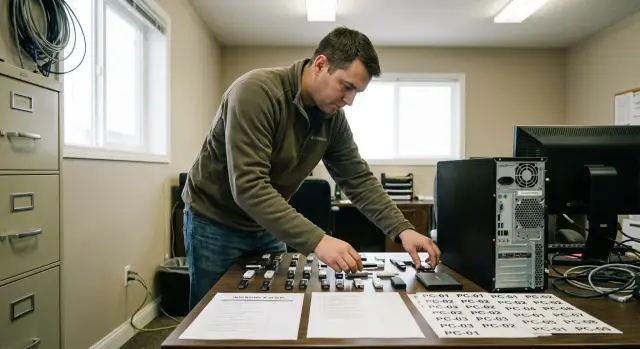
Media and structure: so you don't hunt for files under stress
When a workstation "goes down," time is spent not on installation but on finding the right file. The media must be organized so the engineer opens it and immediately knows where to go.
Don't skimp on reliability. At minimum have one fast primary media and one backup so a drive failure doesn't spoil the recovery.
- Primary: external SSD (faster image deployment, lower USB failure risk)
- Backup: quality 64–128 GB flash drive or a second SSD
- Additional: a small USB stick with only the bootloader (if the main media won't boot)
Structure matters. Use identical folders and file names on all media so the engineer doesn't have to remember "what we called the image last time."
- 01_Images
- 02_Drivers
- 03_Tools
- 04_Instructions
- 05_Logs
Labeling is more important than polish. Put a three‑line README.txt in the root: image version, build date, supported models. If the fleet is standardized, list models explicitly so the engineer immediately knows if the kit applies.
Updates should be simple and regular. Better monthly than "when remembered": one responsible person updates images and drivers by schedule, record changes in 05_Logs/CHANGELOG.txt, and run a short test on a reference PC (boot, network, login). Keep the previous build on backup media at least — don't delete it immediately.
OS image: what to prepare and how to avoid compatibility breakage
A Windows image must deploy quickly and identically each time. The main mistake is making a single "perfect" image tailored to one PC that then won't boot on different hardware.
A practical approach is one base image and, if needed, 2–3 role variants (for example, accounting, operator, engineer). Role variants differ only in apps and shortcuts; the OS base is the same. This simplifies updates and reduces driver and policy issues.
Pre‑include what usually costs time in the branch: cumulative updates, .NET and VC++ runtimes, basic fonts and language packs, power settings (so the PC doesn't sleep during installation), local policies (for example, USB autorun ban, UAC settings), standard accounts and a PC name template. If your fleet is mixed, create a "universal" image that boots reliably on various models.
Plan licensing without improvisation. Choose and test the activation scenario on a test machine:
- if the PC has an OEM license in BIOS, the Windows edition in the image must match
- if activation is via KMS, plan how the PC will reach KMS without internet (VPN or local access)
- if using MAK, keep keys and records controlled and make key entry an explicit instruction step
- allow time to check activation status after first login
Quality control depends on discipline: image version, date, changelog and mandatory test deployment after any change. It is convenient to deploy the image to a clean reference PC monthly to verify installation, login and basic apps.
Driverpacks and utilities: network and hardware must work immediately
If the network doesn't come up after OS install the engineer loses time: no domain join, no policy pulls, no access to resources. Therefore include offline drivers and a minimal set of utilities that work without internet.
Drivers: what to keep on hand
Start with categories that most often break a workstation startup. Drivers should be signed and tested on your PC models.
- chipset and power management (often affects USB and stability)
- network adapters: Ethernet and Wi‑Fi (plus Bluetooth if used)
- storage: SATA/AHCI/RAID/NVMe (so the disk is visible right away)
- video and audio (for normal user work, not only boot)
- printing and scanning (if the workstation requires it)
Store driverpacks both by PC model (a folder with the ready set) and by Hardware ID (for unexpected card revisions). Keep a file with Hardware IDs for network and storage controllers so the engineer can match the ID from Device Manager to the correct INF quickly.
Utilities: diagnose before you reinstall everything
Include offline tools to determine in 5–10 minutes whether the problem is a driver, disk or memory. Minimum: SMART viewer, quick disk test, memory check, and event/log viewers.
For network checks keep a short command cheat sheet with the tools:
ipconfig /all
ping <gateway>
nslookup <server_name>
tracert <server>
netsh interface ip show config
For example, if a replacement PC arrives and the Ethernet driver is wrong, having an offline driver by Hardware ID and quick DNS/gateway checks will get the network up in minutes and the recovery back on track.
Instructions and documents: prevent on‑site improvisation
When there's no internet and every minute counts, short clear instructions work better than "engineer experience." Documents should be unambiguous and located next to images and drivers.
One page that saves an hour
Create a one‑page instruction. Not a 20‑page manual but a step checklist with exact file and folder names. Useful format: what to do, how long it takes, and the expected result at each step.
Include a short list inside:
- where on the media the image, drivers and tools are located (folder path)
- which scenario to choose: deploy image or clean install
- what to check after first boot: network, printing, access to mail or key software
- what to do if domain account won't log in or network is missing
- how to record the outcome and hand off information to support
Templates, records and escalation
Second block — templates so you don't reconstruct details from memory. A few simple forms are enough: drive replacement act, serial number card, downtime and restoration timestamps. If the fleet is mixed, add a field "device model" to analyze recurring faults.
Prepare a short memo on accounts: which logins are allowed for initial access, what to do on lockout, and how to file an information security request for urgent access. Do not store passwords in plain text — store the access procedure and the list of responsible persons.
Add a "Who to call" card: domain, mail, accounting software, VPN, printers. In companies with standard equipment (for example, branches using identical PCs or servers from GSE.kz) this speeds escalation and reduces chaos during incidents.
Step‑by‑step recovery in 60 minutes (offline)
Main principle: don't attempt on‑the‑spot repairs if the cause isn't obvious. Either quickly confirm hardware is OK or immediately deploy the prepared image (or perform a clean install from the offline kit).
60‑minute timing
- 0–10 min: quick diagnostics. Check power, cables and keyboard. Enter BIOS/UEFI: is the disk visible, boot mode correct (UEFI/Legacy), boot order intact. If the disk is not detected or shows SMART errors, spending time on the OS is pointless.
- 10–25 min: choose a scenario. If a tested image exists for this model, deploy it. If the model is new or the image doesn't fit, run a clean install from the offline distribution.
- 25–40 min: drivers and network. Install the network driver first so the PC can access local branch resources later. Then chipset, video, audio, USB and printers. On uniform PCs (for example GSE L200 or M200) this takes minutes if the driverpack is prepared.
- 40–55 min: basic configuration. Set PC name by template, time zone, language and keyboard. Configure network (DHCP or static per rules), add needed Wi‑Fi profiles. Check access to shared folders, domain/account login and printing.
- 55–60 min: final verification and handover. Test print, launch key apps, verify user login. Do not download updates on the fly — note them for the next maintenance window.
Define in advance what "ready" means: desktop opens, network present, printing works, required programs launch.
After completion record in the visit form:
- PC serial number, model and branch
- which scenario was used (image/clean install) and its version
- diagnosed cause (based on tests)
- where logs are stored (media folder or branch share)
Quick checks and field checklist
With little time, follow one rule: remove risks first, then install the system. This short checklist helps recover a PC offline and avoids forgetting small items that later eat half an hour.
Before starting (2–3 minutes)
Check basics before formatting. If any item is "not OK", stop and document the problem.
- Have a spare SSD/disk or a clear plan for what will be reinstalled (and where to save data left on the old disk).
- Can you access BIOS/UEFI and are passwords known (BIOS, BitLocker/encryption, local admin)?
- Does the PC see the installation media and is USB boot enabled?
- Is the PC model and network controller known (important for selecting offline drivers)?
- Are credentials at hand: PC name, domain or workgroup, account for joining the domain, proxy/VPN settings (if applicable)?
After installation (checks to make sure it actually works)
These checks make the workstation truly usable, not just "Windows installed."
- Network is up: driver installed, IP acquired, DNS responds.
- PC joined the domain or configured for workgroup (verify login with the required user).
- Printer and key peripherals (scanner, MFP, reader) are connected.
- VPN works if the branch uses it, and the required client starts.
- Corporate resources needed in the first hour (file share, internal systems) are accessible.
Quickly assess hardware health: free space on system disk, SMART status, temperature. If the fleet is standard, include reference values for acceptable temperature and free space.
Run a minimal user test on site: mail and browser, open and print an office file, login to required apps, test e‑signature/token if used. This takes about 5 minutes but avoids a second visit.
Common mistakes that derail recovery
The most frequent reason for missing the time target is an image that "worked yesterday" but fails on a new hardware revision. A vendor may change the disk controller, network card or firmware and the install hits a blue screen or missing disks. A simple compatibility matrix — which models and revisions are tested with which image version and the date of the last test — prevents this. Also schedule periodic rebuilds, for example quarterly rebuilds and install tests on 2–3 reference machines.
Second mistake — missing network driver. Everything stops: no resource access, no domain join, no policy application, no software install. Mitigate by providing model‑specific drivers for your PCs and a separate "universal" set for unexpected hardware.
Another time killer is version confusion. If the media contains "Final", "Final2", "New" and instructions don't match content, the engineer wastes time guessing. Keep one active field version; archive older versions separately (preferably not on field media).
Problems can start before the visit: media not checked, dead flash drive, corrupted archive, UEFI not booting. Regular short checks are needed:
- monthly boot from media on a test PC
- verify key files (image, drivers, tools)
- ensure disk and network are visible
- log the result and date
Finally, branch specifics matter: printers, scanners, tokens, specialized plugins, client‑bank software. If overlooked, the workstation may be up but not usable. Maintain a per‑branch exceptions list: what must be installed after the base kit, versions, where offline installers are and which credentials are needed.
Example: the engineer restored the PC in 40 minutes but spent another hour on an MFP driver and an old crypto provider that wasn't documented. One file "Branch X - extra software" solves such cases better than heroic efforts.
Field example: no connectivity and one engineer on site
A small branch: 10 PCs, one shared printer and an accountant needing to complete payments. The ISP has an outage; no internet. After a night failure one key PC doesn't boot and loops in "restore." The user says, "I need to work in an hour."
The engineer arrives with an offline kit on USB and a spare SSD. Diagnostics take 5 minutes: the disk has errors and is risky to use. Only an offline scenario will work — no calls or downloads.
Field plan:
- replace the disk and confirm BIOS sees the new drive
- deploy the prepared offline Windows image (with basic policies and settings)
- install the driverpack and confirm the network driver so the PC will connect once the link returns
- connect the printer by USB or local network and install its offline driver
- open test files and print a page
Within 45–55 minutes the workstation is back. The user logs in, sees needed shortcuts and can print. With standardized models such recoveries become predictable: fewer driver and configuration surprises.
To document the result the engineer fills the visit log: PC serial number, date, reason for disk replacement, image version, applied driverpack, printer setup and what was verified (login, printing, network share access if available). These records go to IT along with the problematic disk.
After the case the kit is improved: add the second revision of the printer driver, a one‑page report template and a memo "what to check if the network doesn't come up."
Next steps: company‑level standardization and support
One successful kit can turn into chaos if each branch customizes it. After a pilot the most important task is to make the kit uniform: the same media structure, the same file names, the same decisions on images and drivers.
To scale across branches, define several standard workstation configurations (for example, "office", "cashier", "engineer"). For each configuration keep a reference offline image and a clear update schedule so on‑site engineers won't guess what is current.
Unified update rules and quality control
Updates are necessary but are the most common cause of compatibility breaks. Introduce a cycle you can follow month after month:
- update images and driverpacks in the central repository quarterly
- check monthly that the boot media and tools start on a reference PC
- after each change perform a test deployment on a clean disk
- record checkpoints (image version, date, checksum)
- keep a short rollback guide describing how to revert changes
Don't keep this knowledge in a single administrator's head. Any on‑call engineer should be able to open the document and repeat the procedure without improvisation.
When it's time to rework hardware
If you have dozens of different models, recovery time will vary because of drivers, BIOS settings and different peripherals. A practical sign it's time to standardize: engineers spend more time getting network and video working than on installation and basic setup.
Example: a branch had an old PC with a rare network adapter and domain auth couldn't work without the right driver. After switching to uniform models and a single driverpack such visits typically fit the one‑hour target.
If you need a standardized fleet and unified support across the network, this can be organized through GSE.kz: supply of standard PCs and servers, system integration and 24/7 support with a service network across Kazakhstan.
FAQ
What is the absolute minimum in a recovery kit to realistically restore a PC within an hour?
Offline Windows image, offline drivers for your models, a set of diagnostic tools, a one‑page printed instruction and a recovery report template. Also a spare SSD and a second copy of the kit so a failed flash drive won't break the visit.
How should the media be organized so the engineer doesn't waste time looking for files?
Use the same folder structure and fixed file names on every media so the engineer doesn't have to search under stress. Practical layout: `01_Images`, `02_Drivers`, `03_Tools`, `04_Instructions`, `05_Logs` plus a short README with date and version.
Is an external SSD better or is a flash drive enough for field visits?
An external SSD is usually faster and more reliable for image deployment than a standard USB flash drive, so use it as the primary media. Keep a flash drive as a backup and a small USB stick with just a bootloader in case the main media won't boot on a specific PC.
How many Windows images should be in the kit and how to keep compatibility?
Keep one base OS image and, if needed, 2–3 role variants that differ mainly by installed apps and shortcuts. Avoid making a single "perfect" image tied to one exact PC — it often fails on other hardware revisions and wastes time in the field.
What should be pre‑included in the Windows image so nothing needs to be patched in the branch?
Include what usually costs time without internet: cumulative updates current at build time, .NET and VC++ runtimes, language packs, basic policies and power settings. Set a template PC name and a clear first‑login scenario, including a local login option if domain access is unavailable.
Which drivers are most critical to keep offline and in what order should they be installed?
Install the network driver first (Ethernet or Wi‑Fi), then chipset, storage controllers, video and other drivers. Store drivers both by PC model (ready packs) and by Hardware ID so you can pick the exact INF if a different revision appears.
When is it better to reinstall immediately rather than try to fix boot issues?
Quickly confirm hardware status in BIOS/UEFI: is the disk visible, any SMART errors, boot mode correct. If the disk is not detected or shows SMART failures, don't waste time repairing Windows — replace the drive and deploy the image or perform a clean offline install.
How to avoid getting stuck on Windows activation without internet?
Predefine the activation scenario and test it: OEM requires the matching Windows edition in the image, KMS requires KMS accessibility within your network, MAK keys must be controlled. After the first login, check activation status and record it in the field report.
What should be checked after installation so the workstation is truly ready and not just "Windows started"?
Get to a practical ready state: wired network up, the required network segment visible, the printer prints a test page, key user applications launch. Leave optional updates for a scheduled maintenance window so you don't exceed the one‑hour target.
How to keep the kit current and why does standardizing the fleet speed up recovery?
Update on a schedule and apply the same rules across branches: a responsible person rebuilds images and driverpacks, logs changes and runs a short deployment test on a reference PC. With standardized models (for example, GSE.kz lines) one image and driverpack are easier to maintain and produce predictable recoveries.