Designing a Computer Lab: Network, Power, Protection
Designing a computer lab: how to plan power, network, user accounts, protection from failures and easy teacher maintenance.
Where computer lab problems begin
Complaints usually sound the same: “it’s slow,” “can’t log in,” “internet dropped,” “half the PCs can’t see the printer,” “after switching off everything broke.” This happens even with new computers because the weak points are often not the PCs themselves but everything around them: power, network, accounts and a clear recovery procedure.
The worst part is that many mistakes are baked in at the repair and layout stage. When outlets are done “however it worked” and cables were pulled without a plan, fixing it later is almost impossible without dust, noise and extra budget. The same goes for the network: a “temporary” switch on the windowsill and random patch cords quickly turn any fault into a guessing game.
Decisions that look minor from the outside affect lessons the most. For example, how long it takes a student to log in, whether a teacher can quickly grant access to needed software, and how easy it is to restore working state after a failure or bad update. If these processes aren’t thought through, the room stands idle even with decent hardware.
When designing a computer lab you should aim for a balance between budget, reliability and simplicity for the school:
- invest in the basics (power, protection, cabling), not only in the "most powerful PCs";
- create a clear diagram: what is connected where and how to service it;
- reduce manual actions (fewer passwords and "settings on each PC");
- plan recovery: what to do if one PC fails or the entire network goes down;
- leave room for growth: 2–3 extra seats, new software, additional equipment.
If you start with these things, it’s easier to choose hardware and support. If you buy PCs first and then “connect them somehow,” problems will appear in the first week.
Step‑by‑step plan: from tasks to equipment list
Start not with brands and prices but with what people will do in the room every day. Scenarios immediately set requirements for performance, network and maintenance. For the same number of seats a programming lab and a 3D graphics lab will look different.
Formulate 3–4 main scenarios: office tasks and online lessons, programming (IDEs, virtual machines), graphics and multimedia, testing and exams. For each scenario list the software and special needs: microphones, webcams, a second monitor, fast file access, printing.
Next count the workstations: student seats, a teacher seat and at least one spare so a lesson won’t be disrupted by a failure. If inclusive seats or pair work are expected, plan for that in advance.
When scenarios and seat count are clear, move to an equipment list. Besides PCs and monitors, people often forget what actually affects lessons: headsets with microphones, the right cables and extension leads, mounts, keyboards with the required layout, a projector or panel.
To avoid placement mistakes, draw a simple room plan: desk layout, aisle widths, teacher position, cabinet/rack location, where outlets and network points will be. At this stage decide what should be "quickly replaceable" (for example, spare mice and power supplies in a cupboard).
Also set support requirements: who is responsible for the room (school/university or contractor), how fast repairs are handled, where spares are stored, who can access settings. If same‑day repairs are required, identical models and clear replacement procedures help. Unified equipment lines and local service—GSE.kz with a countrywide service network, for example—are useful here.
Power: outlets, circuits, UPS and surge protection
Power is a common cause of failures in teaching rooms. When PCs, monitors, chargers, a projector and a printer are switched on at the same time, a weak supply or an overloaded line causes voltage drops, trips breakers and gradually damages power supplies.
Start with a simple calculation: how many devices will run simultaneously and their total power. When designing, include spare capacity: new devices almost always appear over time (webcams, extra monitors, charging stations, 3D printers).
Good practice is to split power into groups. Don’t put the whole room on one circuit: use separate lines for a row of desks or a zone (for example, 10–12 workstations), a separate line for the teacher and a separate one for the network cabinet. That way a fault knocks out only part of the room, not everything.
With an electrician check basics: is the supply and cable gauge sufficient with margin, are there separate groups for PCs and cabinet equipment, are breakers and RCDs correctly selected, are there enough outlets where needed, and is there no overload risk on a single group.
Extension cords are not a power plan. If unavoidable, use models with protection and proper current rating, never link them in a chain and don’t hide them under carpets or near heaters.
Put UPSs where uninterrupted operation and orderly shutdown matter: the teacher’s PC and presentation equipment, the network cabinet (switch, router, APs), a server or mini‑server, storage and controllers if used.
Agree grounding and surge protection in advance: a functional grounding circuit, correct PE scheme, surge protection in the distribution board. A simple sign of a problem: if turning on the projector makes some monitors flicker, lines are likely poorly distributed or voltage drops exist. Fix this before accepting the room.
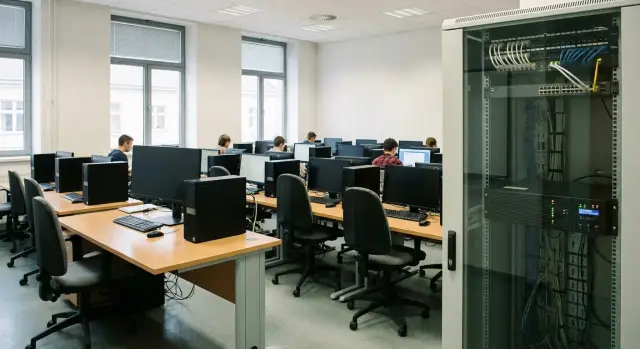
Network: wired, Wi‑Fi and connection scheme
Most classroom problems start with "temporary" network solutions: one cable for two people, a domestic router on the windowsill and a chain of switches under desks. For design adopt one simple rule: each workstation gets its own cable to the cabinet switch (star topology). It’s easier to find faults and to service.
Plan cables with furniture and outlets. For fixed PCs use twisted pair not lower than Cat 6, route cables in clear paths (ducts, trays) and label both ends. Leave spare length and a few free lines for the future, for example for a printer, interactive panel or an extra row.
Choose a switch with spare ports. If there are 25 places a 48‑port model is often more practical than barely fitting into 24+8. A managed switch is useful even in a school: you can limit unnecessary traffic, quickly disable a problematic port and segment the network by purpose.
A simple separation usually suffices: student PCs and teacher devices in one network; administrative systems separate; guest access (if needed) separate; devices like cameras and APs separate; network equipment management, if possible, on its own segment.
Wi‑Fi in a computer lab is usually for tablets, phones and occasional laptops. Keep workstations wired: more stable speed, fewer interferences and easier troubleshooting. If Wi‑Fi is needed, mount APs on the ceiling and size them by concurrent users, not “one per floor.” When a single contractor supplies and configures networking (for example, a systems integrator like GSE.kz), it’s easier to agree on the scheme, labeling and spare ports so the classroom won’t become a set of quick fixes after a year.
Workstations and hardware: what is truly convenient for lessons
Comfort in a lesson is made of small things: how fast equipment boots, where to plug a flash drive, where to keep headsets, and how the teacher sees the class. In lab design this often matters more than the “most powerful” specs.
Choose PCs or all‑in‑ones based on serviceability. All‑in‑ones look tidier and take less space, with fewer cables and easier cleaning. But if the screen fails the whole station goes to repair. Traditional PCs are easier to repair part by part and simpler to upgrade, but plan tower placement, protection and neat cabling.
Make the teacher’s station “senior” for convenience rather than raw power. The teacher needs a good screen, several accessible ports for flash drives and cables, reliable keyboard and mouse, and a clear connection scheme to the projector or panel. A missing adapter “somewhere in the cupboard” is a typical time sink.
Avoid a peripheral zoo by standardizing items: one type of headset with 10–15% spare, one webcam model (if needed), one printer per class or floor with simple cartridge replacement, identical power and video cables without rare adapters.
Labelling saves hours. A sticker with a number on the monitor, tower and desk plus an inventory number makes it obvious that “PC‑12” belongs at seat 12.
Physical protection is part of convenience: mounts for monitors and towers, a lockable cupboard for spare mice, keyboards and a couple of power supplies. If equipment is supplied locally, for example by GSE.kz (PCs L200, all‑in‑ones M200), it’s easier to keep uniform configurations and have spare parts ready for quick swaps.
User management and access without needless complexity
The simpler student login is, the less time a lesson loses. Simplicity mustn’t mean “one shared password for everyone” without control. Define clear rules: who logs in, where to save work and what can’t be changed.
For regular students personal accounts are better: files and results won’t mix and access can be granted by groups. A shared account suits occasional use but requires automatic clearing of data on logout.
To prevent lost work agree on a single storage location: network drive, server folder or an organization‑approved cloud. Desktop storage on each PC is only convenient short‑term; it disappears with a reinstall or image restore.
A useful minimum of restrictions: students can’t install programs or change system settings; critical parameters are locked; USB drives allowed only when required by the lesson; a separate guest login for inspectors or substitute teachers whose data is deleted automatically.
Password rules: they should be memorable but not identical. For example, a common template per group plus a personal element, and password changes each semester or when compromise is suspected. This avoids dangerous compromises and keeps lessons from turning into access recovery sessions.
Fault protection and fast recovery
A failure in a computer lab almost always hits the lesson: time is lost, stress rises and equipment begins to behave unpredictably. Plan both protection and a fast return to working state within minutes.
Basic level — discipline: regular OS and software updates, centralized antivirus, and clear rules about installations. Application control works well: allow a set of approved educational software and block the rest. This reduces conflicts, adware and random browser toolbars.
The most practical recovery tool is a reference image (a golden configuration) for all PCs. If a student or update breaks a system you don’t fix each machine manually; you restore the device to the baseline. Define the standard in advance: installed programs, settings, shortcuts.
Don’t overdo backups. Usually it makes no sense to back up entire disks of every PC. Save what matters: teacher materials, shared templates, student results (by groups), key lists and educational software settings.
A separate topic is network outage. The comms cabinet (switch, router, Wi‑Fi controller) should have UPS power. Then a short power blip won’t become a long reboot and a “find the internet” interruption during class.
Also prepare a short failure plan so any responsible person acts the same:
- within 1 minute — determine the scope (1 PC, a row, whole room);
- within 3 minutes — switch to a backup lesson scenario (offline task, pair work);
- within 5 minutes — restore a PC from the image or swap in a spare;
- within 10 minutes — if it’s the network, reboot cabinet equipment by instruction;
- after class — log the incident and fix the root cause (update, cable, access).
This helps the room recover quickly and makes maintenance predictable.
FAQ
Where is the right place to start when designing a computer lab?
Start with scenarios: what is done in lessons (office tasks, programming, 3D, tests) and which programs are required. Then count seats: students + teacher + at least 1 spare. After that, list **everything** that affects the lesson: PCs/monitors, headsets, camera/microphone, printer, projector/panel, cables, mounts, network cabinet and UPS. This way you won’t buy hardware that can’t be properly connected or serviced.
What problems most often "break" lessons even in a new lab?
Typical minimum: - not enough outlets and an overloaded single circuit (extension cords under each desk); - a “temporary” network: switches under desks, one cable for two seats, unlabeled cables; - one password for everyone or students with administrator rights; - no recovery plan (what to do if 1 PC fails or the network “goes down”). Fix these at the start and most “slow/doesn’t work” complaints disappear.
How to organize power in the classroom so breakers don’t trip?
Group power by zones, not one line for the whole room. A practical option is separate groups for rows/zones (for example, 10–12 seats each), a separate group for the teacher and a separate one for the network cabinet. Before installation check with an electrician: spare capacity, correct breakers and RCDs, grounding, surge protection. Extension cords are an exception only—no chains and use ones rated for the load.
Where to put a UPS and what autonomy is needed?
Place UPSs where continuity and orderly shutdown matter: - network cabinet (switch, router, controller/access points); - teacher’s PC and presentation equipment; - server/storage if present. Autonomy time usually only needs to cover short outages and allow safe shutdown (a few minutes). The key is to verify the UPS handles your actual load and to schedule battery replacements per the maintenance plan.
Which network topology is best for a computer lab?
Basic rule: **each workstation — its own cable to the switch in the cabinet** (star topology). It costs more initially but makes troubleshooting and expansion far easier. Practical measures that save time: - use at least Cat 6 twisted pair for fixed PCs; - route cables in trays/ducts; - label both ends of every cable; - pick a switch with spare ports and leave 2–3 free lines for the future.
Is Wi‑Fi needed in a computer lab if there is wired networking?
If PCs are fixed, keep them wired: more stable speed, fewer interferences and simpler fault finding. Wi‑Fi is usually needed for tablets, phones and occasional laptops. In that case: - mount access points on the ceiling; - size them for the number of simultaneous users; - separate guest access from the educational network. One domestic access point for an entire floor almost always leads to complaints.
Which is better for schools: PCs or all‑in‑ones?
Choose equipment by maintainability, not by trend. - **All‑in‑ones**: neater desks, fewer cables, easier cleaning. Downside — if the screen fails the whole station is out for repair. - **Classic desktops**: easier to repair and upgrade by parts, and easy to swap components. Downside — more cables and need to plan location of the tower. Often the winning approach is one product line and identical configurations: easier swaps and faster repairs. If buying locally (for example from GSE.kz with L200 and M200 lines and local service), maintaining a uniform park is simpler.
How to manage student accounts and access without extra hassle?
The simpler login for students, the less time lost. Simplicity mustn’t mean “one shared password for all” without control. Set clear rules from the start: who logs in, where to save work and what can’t be changed. For regular classes, personal accounts are more convenient: files and results don’t get mixed and access can be given by groups. A shared account suits one‑off lessons, but then data must be automatically cleared after logout. Agree on a single storage location: network drive, server folder or an organization‑approved cloud. Desktop storage on each PC is only convenient short‑term; it’s lost if the PC is reimaged. A practical minimum of restrictions: students can’t install software or change system settings; critical parameters are locked; USB devices allowed only when needed; a separate “guest” login for inspectors or substitute teachers whose data is auto‑deleted. Passwords should be memorable but not identical. For example, a group template plus a personal element, and change passwords each semester or when compromise is suspected.
How to protect against failures and recover quickly?
Failures always hurt the lesson: time lost, stress, equipment behaving unpredictably. Plan not only protection but a fast return to working state within minutes. Basic level — discipline: regular OS and software updates, centralized antivirus, clear installation rules. Application control helps: allow a list of educational apps and block the rest. The most practical recovery tool is a master image (a “golden” configuration) for all PCs. If an update or student action breaks the system, you restore the device to the known state instead of repairing each PC by hand. Document the standard: apps, settings, shortcuts. Backups should be pragmatic. Usually it’s unnecessary to back up every PC disk entirely. Save what’s needed: teacher materials, templates, student results by group, key lists and settings. Network outage specifics: the comms cabinet (switch, router, Wi‑Fi controller) should have its own UPS so a short power dip doesn’t turn into a long reboot and a “no internet” search during class. Have a short incident plan so anyone responsible acts the same: - within 1 minute — assess the scope (1 PC, a row, whole room); - within 3 minutes — switch to a backup lesson scenario (offline task, pair work); - within 5 minutes — restore a PC from image or swap in a spare; - within 10 minutes — if it’s a network issue, reboot cabinet equipment per instructions; - after class — log the incident and fix the root cause (update, cable, access). This way the room recovers quickly and maintenance becomes predictable.
What makes the classroom convenient for the teacher during lessons?
If managing is awkward, the room becomes a group of unmanaged PCs. Provide simple classroom management tools so time is spent on teaching, not troubleshooting. Basic daily helpers: view student screens, show teacher screen on selected PCs, quickly lock keyboard and mouse during explanations, send short messages and offer remote assistance. These cover common cases: a student lost the app window, opened the wrong thing or fell behind. Agree on file rules once: avoid flash drives and messengers. A common pattern works: a read‑only “Materials” folder and per‑student “Submit” folders where each student can write only to their own. To avoid repeating steps every lesson, enforce naming rules and a folder structure. For example: “10A_CS_Practice03_IvanovI” and folders “01‑Materials”, “02‑Tasks”, “03‑Submissions”. Place short reminders near the entrance and at the printer: how to log in, where to save, how to print, what to do if a PC freezes and who to contact. Keep them 3–5 points, concise. Before class the teacher should do minimal actions: power teacher PC and projector, do one quick network check, launch required software and open materials, enable screen sharing if needed.
What are the frequent design mistakes for computer labs?
The most expensive problems aren’t weak PCs but small things missed at the start. These later show up as random shutdowns, lost internet and wasted lesson time. Common mistakes: - skimping on electricity: too few outlets and rescuing with extension cords under desks → overheating, tripped breakers, loose plugs and higher risk to equipment. Better to plan separate lines, proper outlets and surge protection. - a network with no spare ports: any expansion becomes a reconstruction. Even if there are 25 PCs today, tomorrow may add a printer, Wi‑Fi AP, teacher laptop or interactive panel. - convenience decisions like one password for all or students with admin rights: someone installs unwanted software, changes settings, brings a virus and the whole class suffers. - no order for maintenance: unlabeled cables/outlets, no connection diagrams or equipment lists, no supplies (mice, keyboards, UPS batteries), no maintenance schedule. Good habits: assign a responsible person, keep a short incident log and stock common consumables. Then the class runs smoothly and the teacher won’t become the “on‑call engineer.”
Example: what are the base conditions for a 25‑seat class?
Conditions: Room 55–70 m², 24 student seats and one teacher seat. Lessons include regular classes, occasional tests and work with large files (presentations, graphics, databases). The teacher must start quickly and restore order fast. Furniture: plan space for a small wall cabinet 9–12U on a solid wall near power and network input. Cables won’t cross aisles and servicing is easier.
What does the final scheme look like for a 25‑seat class?
Final layout: Power: 3–4 independent outlet groups around the room (usually one per row or wall) so a fault affects only part of the room. UPS for the network cabinet and teacher station to keep the switch, Wi‑Fi AP (if any) and teacher PC running through short outages and protect against spikes. Network: a 48‑port switch in the cabinet with spare ports for printer, projector, second AP and spare. Each desk has a separate cable laid in ducts. More expensive than daisy‑chaining, but you won’t spend time hunting for breaks and moving furniture. Accounts: each student has a personal account with work saved to their folder; the teacher has a separate role to distribute files and control screens; guest access is off unless scheduled. To avoid endless repairs prepare a master system image (drivers and needed apps), a program and license list, a secure location for service accounts and a maintenance plan (monthly updates, disk checks, cleaning, incident log). If local procurement is important, consider Kazakhstan‑made PCs and all‑in‑ones (GSE lines L200 or M200). Plan a server or storage separately if needed for projects.
What checks to run before acceptance so there are no surprises in week one?
Before acceptance run a full test: power all workstations, launch typical lesson software and run a 10‑minute simulated lesson. This reveals issues faster than checking rooms separately, and is especially useful when the room was built by estimate rather than by scenarios. Record results (login time, copy speed, network and power response) and check: - Power: nothing overheats, no burning smells, breakers don’t trip, UPS holds load with margin. - Network: all PCs are visible, copying a 1–2 GB file is stable, printers and shared resources work, Wi‑Fi doesn’t collapse under load. - Login and profiles: a student logs in in 30–60 seconds, desktop and shortcuts are present, files save per rules. - Recovery: a “broken” PC is restored by instruction without long manual tweaks. - Teacher: can start the lesson without admin help (distribute materials, collect work, help student login). A final good test is a “25‑seat lesson”: one teacher, 25 sequential logins, issue the task and collect results. If this runs smoothly the room will stay predictable.
What are the next steps: implementation, regulations and support?
Once the classroom layout is clear, turn it into a predictable launch. The goal: installers, IT staff and the teacher understand where everything is, how it’s labeled and how to quickly restore the room after a failure. Assemble documentation: equipment list, layout plan, port and power diagram. That saves days when you need to find “that cable” or replace a PC without stopping the room. Agree on staged acceptance: electrical (lines, groups, loads, grounding), network (cabinet, patch panels, labeling, test each line), workstations (mounting, cable management, standard hookups), software (master image, apps, updates), acceptance (load test, login, printer and folder access, network speed, UPS behavior). A system image and user rules solve half the problems. In university rooms separate roles: student — limited account, teacher — demonstration control, admin — servicing. Add a rule “no installations” and route requests through one channel. To keep the room working after 2–3 months, have a short regimen: who is responsible for hardware, network and software; a maintenance schedule (dusting, disk checks, updates, UPS tests); and a quick recovery procedure (image restore or swap with spare PC). If you need a turnkey option in Kazakhstan, GSE.kz offers domestic PCs, all‑in‑ones and servers plus system integration services and 24/7 technical support with a countrywide service network.
What quick checklist to run before launch and acceptance?
Run all seats at once, logins, task distribution and collection, printing and screen sharing. Mini‑check: - power: no trips on simultaneous start, UPS holds up; - network: all PCs visible, large file copy stable; - login: student logs in within 30–60 seconds, profiles and shortcuts are OK; - recovery: broken PC restored from instructions without long tweaks; - teacher: can start the lesson without admin help. If this test passes, the class will function predictably both in regular days and during exams.