Deploying Workstations in Secure Buildings
How to plan workstation deployment in secure buildings: equipment lists, routes, storage, escorting and handover.
What makes work in secure buildings difficult
Deploying workstations in secure buildings usually fails not because of connectivity, but because of the facility’s restrictions. Turnstiles, security checks at checkpoints, bans on bringing certain items, restricted zones and narrow time windows turn even a simple installation into a mini-operation.
The problem is that any small issue without coordination becomes downtime. If a crew member wasn’t added to the list, the team waits at the gate. If a serial number in the paperwork doesn’t match, the box is turned back. If the route across floors wasn’t planned, you’ll lose time waiting for an escort or looking for an available lift.
Common risks that arise:
- downtime at checkpoints due to queues, inspections and data verification
- returns because of discrepancies in personnel or equipment lists
- loss of small components (cables, adapters, keys, SSDs) while moving between zones
- missed work windows if access is allowed only in the morning or after shifts finish
- lack of access to required rooms (locked, no responsible person, no keys)
Pre-agreed lists of people and equipment matter more than they seem. In practice, they often determine whether the deployment will happen on the planned day.
Before the first site visit, record at minimum: the crew composition and data for passes (as required by the site), contacts of responsible persons on both sides, a list of equipment and peripherals with quantities and serial numbers if needed. Also define who meets and escorts, which zones are accessible and at what times, where unloading and temporary storage will be, and what counts as work completion (connection, test, signed act, photo evidence).
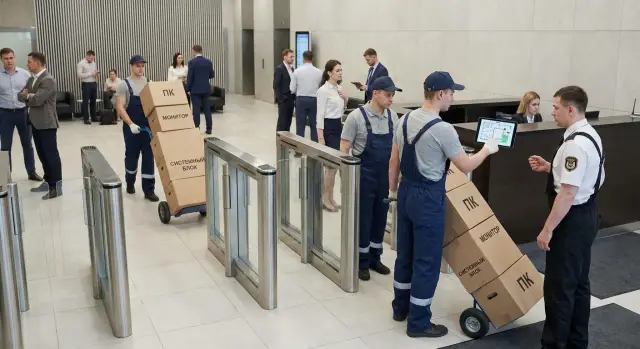
A real example: 20 PCs and 20 monitors were delivered to a site, but the checkpoint paperwork listed only “PCs.” The monitors weren’t allowed in, and half the workstations had to be moved to another day. Such mistakes are fixed only by detailing and checking documents before departure. If you work with an integrator like GSE.kz, ask in advance for the required format of lists and labeling so they match the security requirements.
Roles, approvals and the work window
In a secure facility, deployment success often depends less on installation speed and more on who agreed what beforehand. Appoint responsible persons on both sides and record the rules in writing so there’s no arguing at the turnstile on the day.
Who is responsible for what
Divide responsibilities in advance so decisions can be made quickly. The client confirms the number of workstations, allocates rooms, and is responsible for power and furniture. The IT team specifies network, domain and OS image requirements, inventory and acceptance. Security issues passes, defines routes and rules (photos, transfers, escorting). The contractor or integrator brings the equipment, performs installation, labeling, initial checks and handover with acts. Site duty staff open rooms and resolve on-site disputes.
Collect duty contacts for the workday (phone, backup number, who covers) and agree on escalation: what can be resolved on site and what only via the client’s responsible person.
Work window and access rules
Agree the exact window: night, weekend or short intervals between shifts. Consider noise restrictions (drilling, trolleys, packing) as well as time for inspections and waiting for escorts.
Also discuss room access: where keys are needed, where escorting is mandatory, which zones are closed, and whether photos or personal phones are prohibited.
Gather documents in a single packet: pass requests (people list and equipment list), powers of attorney for receiving and moving equipment, forms of acts (acceptance, movement, commissioning). This saves hours on the first day.
Passes and documents: what to prepare in advance
In secure buildings, deployments are often delayed by paperwork rather than hardware. If the checkpoint lacks the right list or numbers don’t match, the crew and equipment can get stuck at the entrance.
Start with the personnel list. It usually needs full names, national ID numbers, ID document numbers, role during the works (installation, setup, logistics), contact phone and transport details. If you travel in several vehicles, split by crews and include plate numbers so security can check quickly.
Prepare an equipment list separately. For each item include model, quantity and serial numbers (especially for PCs, monitors, printers, switches). If you bring desktop PCs or all-in-ones (including lines like L200 or M200), it’s better to record serial numbers in a single file beforehand rather than copying them at the checkpoint from boxes.
To move equipment inside the building without issues, label boxes by floor and room in advance. A simple sticker like “Floor 3, room 312, workstation 5” saves time and reduces confusion during inspection and distribution.
A typical document set (check site requirements):
- written request for crew admission and import of property
- named list of staff and backups for replacements
- equipment list with serial numbers and accessories (cables, PSUs, fasteners)
- list of tools being brought in and taken out
- contact persons from the client and security (who confirms admission)
Have a “backup” package: 1–2 reserve people and several spare pieces of equipment (for example, a spare monitor or keyboard) with pre-registered data. This helps if someone gets sick or a device needs urgent replacement without new approvals.
Equipment lists and completeness
In secure buildings, completeness errors cost more: if one cable or fastener is missing, quickly going back to fetch it is often impossible. Instead of a general list, prepare a worksheet per workstation or room tied to inventory numbers.
A good list groups by types and delivery batches. Separate lines for PCs, monitors, touch all-in-ones, dock stations, UPS units and printers. If some equipment is already on site, mark it clearly so the crew doesn’t waste time searching or re-delivering.
Keep five blocks in the worksheet: main devices (model, serial number, purpose, room), peripherals (keyboard, mouse, webcam, headset, printer), cables and small parts (power, HDMI/DP, patch cords, adapters, fasteners), tools and consumables (ties, markers, seals, anti-static bags), and control marks (received, stored, installed, checked).
Also verify network points and power for each workstation: is there a free port, is the patch cord long enough, where is the nearest outlet, is a UPS needed, and does furniture block port access. A common small detail that breaks the schedule: there is a socket but it’s occupied, or the power cable doesn’t reach the UPS.
Plan spares: 3–5% for cables and small parts and 1–2 spare devices per batch (for example, one monitor and one PC). In practice: for 40 seats they take 2–3 extra HDMI/DP cables, two patch cords of different lengths and one spare UPS.
If an integrator supplies the equipment (for example, GSE.kz), ask in advance for a packing list with serial numbers and reconcile it with your worksheet so there are no discrepancies at the checkpoint and during acceptance.
Movement routes inside the facility
In secure buildings the slowdown is often caused by movement, not installation. If the route isn’t described in advance, the crew loses hours waiting at doors, searching for responsible persons and making extra trips through checkpoints.
Record the route in one document: which checkpoint to enter through, where the unloading zone is, which entrance is allowed for trolleys, which corridors and doors are secure, who opens them and when. Indicate the lift (freight or passenger), stairwell number and an on-floor assembly point where boxes are temporarily stored before distribution.
Before departure check dimensions and limits. Problems often come from simple things: the trolley doesn’t fit through the turnstile, the box won’t fit in the lift, or the lift has a weight limit.
Quick route check
- widths of openings at the checkpoint, turnstiles and secure doors (will the trolley and box pass?)
- lift dimensions and load capacity, and its access schedule
- where pallets or boxes can be temporarily placed without blocking passages
- how many boxes can realistically be moved in one trip considering inspections
- who escorts movements between zones and how quickly they can be summoned
Then create a batch plan: for example, batch 1 — system units and monitors to the floor, batch 2 — peripherals and cables. This makes it easier to track completeness and reduces the chance that some boxes remain in another zone.
Choose floor movement order by situation. Often it’s better to start with the far rooms and move toward the closer ones: fewer repeated corridor runs and easier pack-up at the end. If there are secure rooms with limited access windows, do them first.
Plan B if access is closed
If the lift is unavailable or a door is suddenly closed, agree backup options: an alternate lift or stairs, another corridor, moving work to neighboring rooms, and an intermediate waiting point where equipment can be safely left under escort control.
On-site storage and inventory
Temporary storage often solves half the problems on secure sites. If boxes are left anywhere, you lose time finding them later and security and liability risks increase.
Agree on one specific storage area and access rules. Ideally it’s a lockable room near the lift or main route but not in passages. Appoint two responsible people: one from the client (for access and security) and one from the contractor (for safekeeping and inventory).
Ensure conditions at the site are suitable (dry, dust-free, away from leak risks, not near radiators or windows), safety rules (nothing in corridors, stairwells, evacuation routes or near fire cabinets), access control (visitor log, keys held by appointed people, sealing if possible) and loss prevention (seals on boxes, photo evidence of pallets or racks at acceptance).
Track inventory by devices instead of by boxes. On acceptance check quantities and serial numbers (PCs, monitors, UPS, printers), reconcile with the delivery note and immediately mark kits (power cable, DisplayPort/HDMI, keyboard, mouse). Then record issuance by room: who received it, date, room number, signatures.
A practical workflow for inventory:
- acceptance in the storage area with serial number marking
- labeling kits by room (sticker with room number)
- issuance only through a single responsible person, no “self-removal”
- daily reconciliation of remaining items before leaving
Keep returns and defects separate: allocate a shelf or corner, mark it clearly “quarantine,” describe the problem and record who found it. Removal of defects or excess equipment should follow an agreed procedure with an act and the same access rules as delivery.
Crew escorting and safety requirements
In secure buildings safety matters more than speed. Even with a good installation plan for PCs and peripherals, a lack of clear escorting procedures will cause the crew to lose time at every checkpoint and door.
Two escorting formats are common. One escort for the whole crew: convenient when work points are close and movements are few. Zone-based escorting (for example, one escort per floor or wing) is faster on large sites but requires pre-agreement on handovers and timing.
Before starting, clarify security rules. Bans often apply to personal phones, photos, Wi‑Fi, USB drives and even personal tools with cameras or Bluetooth. If building connectivity is poor, agree on simple contact points (security post, server room, IT room) and times for short calls or meetups.
Inside secure zones move only along agreed routes and record room visits. Practices differ: in some places you sign in at the entrance to a room, in others you sign at the floor duty. Find out who logs passage and who opens locked rooms.
Quick notes about badges and passes:
- where they are issued and where to return them at shift end
- whether passes can be handed between people (often not allowed)
- who holds reserve guest passes
- what to do if a pass is lost (report immediately to security and the site lead, stop movements until an incident act is issued)
Example: a crew installs 20 workstations in a government building. If there’s only one escort and rooms are on two floors, each trip to get access to a locked wing adds 10–15 minutes. It’s simpler to assign an escort per floor and pre-agree on the visit log and contact points.
Step-by-step plan for a deployment day
Run the workday in a short, repeatable scenario: one person responsible for documents and checkpoint, one for internal logistics, and one or two pairs of installers. This reduces stops and the chance that important steps get scattered among people.
First, get on site and distribute everything correctly:
- at the checkpoint accept the delivery using the pre-agreed lists: number of workstations, models, kits (PC, monitor, cables, peripherals). Record any discrepancies immediately before the cargo moves inside
- move equipment to the agreed temporary storage point and take it up by the planned route; if lifts require passes, allow time for waiting
- before installation distribute kits by workstation (or by room) so installers don’t run off for cables during setup
Next, install, test and leave clear records:
- install and connect: power, network, monitor, keyboard and mouse. Perform basic checks (power on, network, audio if needed) and ensure the workstation is safe (no cable tension, PSUs not blocking walkways)
- label the workstation and record serial numbers on paper or in a spreadsheet tied to room and desk. This saves hours for later requests
- hand over the result to the user or IT: quick acceptance, signatures on acts, and marks on lists
At the end of the shift collect and remove packaging and waste, clean up traces (cut cable ties, trims), ensure nothing is left in corridors and storage, return passes, close accesses per procedure and confirm completion with the client’s responsible person.
Common mistakes and how to avoid them
The worst delays in secure buildings happen not from complex equipment but organizational details. They’re easy to miss in preparation but become downtime at checkpoints and in corridors.
One frequent mistake is lists without serial numbers. If the inventory just says “PC - 20 pcs,” the checkpoint may stop the load, ask for clarifications or turn it away. The simple fix: prepare a per-workstation list with serial numbers, counts, types and the person responsible for the cargo.
Another error is a single route for everyone: one group with trolleys, one lift, one corridor. This creates a queue at the lift, people obstruct each other and security asks to clear the passage. Better to split the crew into 2–3 flows with different routes and clear unloading points on floors.
Mixed packing in boxes is a typical issue. When monitors, PSUs, cables and mice are mixed, losses are almost guaranteed. The rule helps: one box = one workstation or one equipment type, plus a sticker with the room number.
A separate risk is no agreed storage area. Boxes in passages raise security concerns and can stop work. Agree the storage place in advance, appoint a responsible person and keep issuance records.
Two mistakes that cost the most time:
- ignoring work windows: agree on access to rooms and noisy work times, otherwise some rooms will remain unfinished
- no reserve: keep 1–2 spare PCs/monitors and spare cable kits so deadlines aren’t missed due to one faulty item
Quick checklist before departure
Spend 15 minutes checking before heading to a secure building—this saves half a day at the checkpoint and in corridors. Usually it’s not the installation that fails but organizational details: wrong serial in the list, no agreed storage area, no place to leave boxes safely.
Have the crew lead keep a single sheet with these checks:
- checkpoint: confirmed lists of people and equipment (full names, document numbers, models and serial numbers, quantities). Clarified rules about tools, flash drives and photo-taking
- escorting: assigned responsible persons from the client and your team, agreed secure zones and passage order (lift, stairs, specific entrances)
- movement and storage: clear route by floors and rooms, a temporary storage point and who can access it
- labeling and documents: stickers for system units/monitors/printers, inventory sheets, acceptance acts, and defect replacement forms. A folder with printed copies kept separate from the laptop
- engineering readiness: verified power and network points by room (how many outlets, where the patch panel/switch is, whether free ports exist). Agreed plan for removing packaging, defects and returns, including where empty boxes are stored and when they will be carried out
If you install PCs and servers from a local manufacturer (for example, GSE.kz), reconcile the kit against the specification in advance: cables, fasteners, peripherals and spare units. This small step often saves the shift when access is time-limited.
Example plan for a small site
Scenario: deploy 40 workstations in an administrative building with a checkpoint. Two floors (2nd and 3rd), 20 seats each. Work window: 09:00–18:00. To avoid queues at the checkpoint and overloading the lift, delivery is split into two runs and work is done in waves.
First run (morning) — equipment for the 2nd floor; second run (after lunch) — for the 3rd floor. At the checkpoint provide the list of items (PCs, monitors, docks, printers, cables) and the crew list in advance. Inside the site assign one escort who leads along the agreed route and opens required areas.
A simple day plan:
- 09:00–10:00: checkpoint passage, acceptance of the first run, labeling boxes by room (e.g., “2nd floor, room 214, seat 3”)
- 10:00–13:00: move along route “checkpoint – lift – temporary storage – rooms”, assemble and connect 20 seats on the 2nd floor
- 13:00–14:00: check shortages, prepare request for missing small parts (patch cords, mice, adapters)
- 14:00–17:00: second run, deploy 20 seats on the 3rd floor following the same route
- 17:00–18:00: remove packaging, final check, handover by room
Temporary storage is best arranged in a single room near the lift (or a designated corner of an assembly hall), locked and accessible only to the responsible person. Keep inventory by rooms: who received what kits and serial numbers. This is especially useful if some devices must be replaced the next day.
Handover is done with two documents: a serial number list (PCs, monitors, printers) and a room readiness sheet, where “ready” is marked after network check, test print and login to an account.
The next day usually covers follow-ups: rare software installs, defect replacements, relocations at user requests and collecting feedback (what hinders work, what’s missing, where outlets are inconvenient). Allow 2–3 hours for tails and bring 1–2 spare kits and consumables.
Next steps: how to prepare with minimal downtime
To avoid stops at the gate and extra floor trips, start with a short collection of initial data. You need not only the address and room list, but also site rules: where unloading is allowed, which areas are secure, which devices are prohibited and what hours work is permitted.
Then make a simple logistics draft for the site: where to temporarily keep boxes, which corridors and lifts to use, and in what order to close rooms. This draft must be agreed with security and the client’s responsible person, because “as usual” rarely works in secure buildings.
Before delivery prepare the documents that most often delay the process. It’s better when they are templates and printouts rather than improvised at the turnstile:
- serial number list (PCs, monitors, printers, UPS)
- list of tools and consumables being brought in
- installation and handover act templates
- crew list with pass data
- contacts of escorts and floor responsibles
Build in reserves: time (checkpoint queues, waiting for escorts, room handover delays) and equipment (extra cables, mouse, PSU, spare monitor). For secure zones it’s especially important to have a plan B: what to do if access to some rooms shifts by several hours.
Practical example: for 30 rooms over three floors it’s often better to first deliver and place complete kits (PC + peripherals + cables) by zone, then go floor by floor and close out acts on the spot.
If you need a single contractor, it can be easier to combine supply and deployment: for example, deliver GSE L200 PCs, M200 all-in-ones and S200 servers and pre-arrange escorting, inventory and support. This reduces the risk that equipment arrives but passes, acts and completeness aren’t ready.
FAQ
Why does deployment in secure buildings usually get stuck at the entrance rather than during installation?
The main risk is downtime due to mismatches in access lists and inventories. First agree on named lists of the crew and a full inventory of equipment, then plan installation and the room-by-room schedule.
What employee data is needed for passes to avoid waiting at the checkpoint?
Minimum: full name and identity document data as required by the facility, role during the works, contact phone and transport details. It’s useful to include 1–2 backup people in case someone can’t attend on the day.
What must be in the equipment list for bringing items in?
Include model, quantity and—if the facility requires—serial numbers for each item, including monitors, UPS units, printers and network gear. Also list small items like cables, adapters and fasteners since these may be inspected as well.
How should boxes and kits be labeled so nothing gets lost?
Label by floor, room and workstation number so a box can be taken straight to its destination. This speeds up inspections, reduces confusion during distribution and makes it quick to verify what was installed in each room.
How to plan movement inside the building to avoid losing hours waiting?
Describe the route from the checkpoint to temporary storage and then by floor, including the lift, doors and secure transitions. Confirm who opens locked areas and how to call an escort quickly, otherwise time will be lost at every door.
Where is it best to organize temporary storage on site and how to control it?
Agree on one specific place where boxes can be legally and safely stored, preferably a lockable room near the route. Appoint responsible persons on both sides and track items by device and serial number rather than by boxes to avoid disputes at handover.
How to choose a work window so you finish without losing access to rooms?
Set the exact access window and add time for checkpoint procedures, inspections and escorting along the route. If noise or scheduled room access are limited, prioritize those rooms first—otherwise some work will have to be moved to another day.
What security restrictions most often hinder work and how to prepare for them?
Find out in advance about bans on phones, photos, Wi‑Fi, USB drives and tools with wireless components. If something is necessary for the job, get written approval before departure, otherwise the item or tool may be denied entry.
Is reserve equipment needed and in what quantity is it usually planned?
Keep spare cables and small parts and 1–2 spare devices per batch to avoid stopping the installation line because of a single fault. Also list the reserve in the paperwork in advance so replacements don’t require new approvals on site.
How to reduce the risk of document mismatches when equipment is delivered by an integrator?
Request the packing list and serial number list from the supplier and reconcile it with your inventory before departure. If you work with an integrator like GSE.kz, agree on a single format for inventories and labels so documents, boxes and security requirements match on delivery day.