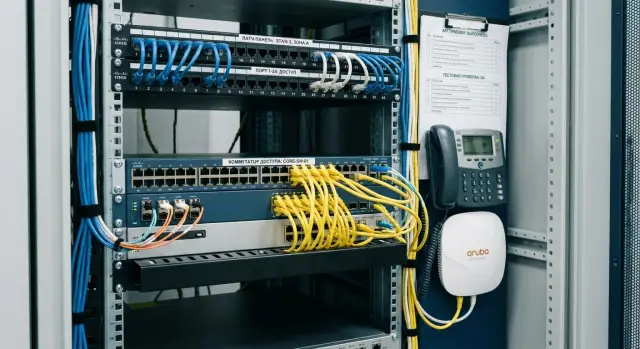
Aruba CX 6300 for the access layer: PoE, uplinks and acceptance testing
Aruba CX 6300 at the access layer: how to choose PoE budget and uplink ports, and which acceptance tests to run for reliable telephony and Wi‑Fi.
Goal: stable phones and Wi‑Fi on an access switch
When an Aruba CX 6300 is deployed at the access layer, the objective is usually simple: IP phones and Wi‑Fi access points must work reliably. Yet the access layer is where intermittent problems most often surface: a phone reboots, an AP goes offline, voice becomes "robotic", Wi‑Fi reports low speeds.
Typical symptoms of wrong PoE or uplink choices include periodic device restarts (especially at load peaks), specific SSIDs dropping, echoes and call drops, jittery voice latency, and Wi‑Fi speed drops during busy hours. Often everything seems fine until a second radio is enabled, an AP firmware update runs, or a couple of cameras are added.
Telephony and Wi‑Fi are particularly sensitive to three things:
- Power. If the PoE budget is tight, the switch will start limiting power, devices enter low‑power modes or reboot.
- Delay and loss. Voice needs stable milliseconds, not average «it’s mostly okay» numbers.
- Uplink bottlenecks. Even with free access ports, aggregated traffic from APs and phones can hit the uplink, especially when redundancy or aggregation is in play.
The access layer is the switch where endpoints connect: IP phones, APs, PCs, printers, terminals. In an office it’s the floor racks, in a school it’s the wing or floor switches, in a hospital it’s segments for wards, posts and medical devices. Here predictability and ease of maintenance matter more than peak paper speeds.
Before procurement it’s better to decide a few things so the network won’t need rework later: how many PoE ports are actually required, what PoE‑budget margin to plan for growth, what uplink speed and redundancy are needed, which VLANs and priorities will be used for voice and Wi‑Fi, and which acceptance tests will catch problems on day one.
What to collect from requirements before choosing an Aruba CX 6300
Before selecting an Aruba CX 6300 for access, collect requirements not by "port count" but by what will actually hang on the switch and the load that creates.
Start with an inventory of devices in each rack. Access switches typically host IP phones, Wi‑Fi APs, PCs and thin clients, printers, cameras, and access control. Each group has its own "cost" in PoE and its own stability requirements. A phone usually consumes little power but reacts badly to loss and delay. An AP can consume much more, especially with Wi‑Fi 6/6E and extra features enabled.
It’s important to distinguish port count from real load. Forty‑eight ports doesn’t mean "48 active and equally loaded". Some ports may be spare or for guest desks, while a few APs and the uplink often create the peak.
Plan a 1–2 year margin in two dimensions: ports (new workstations, cameras, extra APs) and power (moving to hungrier APs, adding modules to phones). Without margin you’ll often hit the PoE budget before running out of ports.
A handy mini‑questionnaire for requirements:
- how many devices of each type are in the rack now and will appear in a year;
- which require PoE and which power class is expected;
- how many APs will be on the switch and which models are planned;
- are separate VLANs needed for telephony, Wi‑Fi and cameras;
- what downtime is acceptable: can the network be down during updates or maintenance.
Using identical models across racks is often justified when sites have similar seat density. It simplifies spares, configs and acceptance. If one rack has mostly phones and PCs while another has many APs and cameras, it’s better to have 2–3 typical configurations than to buy the largest model everywhere.
Example: a floor has 6 APs and 20 phones. Almost any model will have enough ports, but PoE and uplink requirements differ. Fix those before choosing the specific SKU.
How to choose PoE: classes, budget and real‑world calculation
If Aruba CX 6300 is considered as an access switch for telephony and Wi‑Fi, start with a simple question: which devices will draw power from the switch and how many?
For phones and Wi‑Fi you usually need PoE ports for IP phones and APs; regular ports remain for PCs, printers and devices with external supplies.
PoE classes: what actually changes
PoE (802.3af) is usually enough for IP phones. PoE+ (802.3at) is needed by many modern APs. Higher classes (for example 802.3bt) are less common on access switches but may be required for APs with extra radios, USB devices or higher power needs.
Keep typical numbers in mind (check device datasheets for exact values): an IP phone is often around 4–8 W (models with screens/backlight use more), an AP commonly 15–25 W and can demand more at peak, cameras and terminals vary and frequently approach PoE+.
Switch budget vs real need
A switch has a total PoE budget—how many watts it can supply across all ports. A common mistake is counting only the number of PoE ports and ignoring the budget. The result: everything appears connected, but under simultaneous load some APs throttle or reboot.
A practical calculation:
- count devices by type;
- multiply by expected consumption (use the higher end);
- sum and compare to the switch’s PoE budget;
- add a 20–30% margin.
Margin is justified: APs draw more under heavy load, when extra features are enabled, or during firmware updates. Phones also have peaks—for example when a call is active with backlight and handset power.
Small example: 24 phones at 7 W (168 W) and 12 APs at 22 W (264 W) total 432 W. With a 25% margin that’s about 540 W. This quickly shows whether the PoE budget is sufficient or you must redistribute PoE devices, pick a different model, or use injectors where acceptable.
Uplink ports: speed and connection scheme
For an access switch the uplink matters less as a raw number and more as a combination of throughput, uplink count and a clear redundancy plan. If the uplink is narrow or overly complicated, calls and Wi‑Fi suffer first: latency grows, voice stutters, APs start refusing clients.
1G, 10G or 25G: match to load
Estimate peak traffic from Wi‑Fi and wired users and add growth margin.
- 1G uplink suits only small zones: a couple of APs and few users without heavy loads.
- 10G uplink is the baseline for most floors and office blocks with multiple APs and normal activity.
- 25G uplink makes sense when you have many APs, high client density, video surveillance or rapid traffic growth plans.
Example: a floor with 24 office ports and 8 APs—average load may be small, but during peaks (updates, cloud sync, video calls) 1G quickly becomes a bottleneck. 10G provides comfortable headroom; 25G is for larger scale.
SFP+/SFP28 and copper: common mistakes
Aruba CX 6300 access variants often come with SFP+/SFP28 uplinks, and issues mostly arise from surrounding details:
- confusing port types and transceivers (SFP+ vs SFP28) can cause link instability or reduced speed;
- using "any compatible" optics may lead to errors or reconnects under load;
- forgetting multimode vs single‑mode optics or the real distances;
- planning 10G over copper where cabling or route quality is insufficient.
LACP and redundancy: when to use it
If simplicity is the priority, one fast uplink is often more reliable than two "just in case". LACP (link aggregation) is useful when you truly need combined bandwidth and redundancy and the aggregation side is configured to match.
Plan uplink margin in advance. Wi‑Fi generation changes and client growth usually happen faster than expected, and upgrading uplinks after deployment is harder and costlier.
Connection architecture: keep schemes simple to ease maintenance
Predictability is paramount at the access layer. A switch should be installed so that a small fault (port, power, optics, a loop) is quickly localized and doesn’t take down phones and APs across the board.
Uplink redundancy: one or two
If possible, provide two uplinks. The best option is to terminate them to two different top‑of‑rack or aggregation devices so a failure of one device or its PSU doesn’t darken the entire floor. If there’s a single upper device, a second uplink still protects against a broken line or a faulty port, though not against the aggregator failing.
A practical minimum: two uplinks into aggregation (if aggregation runs as a pair), consistent optics and cabling types across the area, clear port and cable labeling, and a predefined mode (one active link or aggregation).
Optics, cable lengths and surprises during installation
Check the environment and distances before buying: copper, multimode, single‑mode. A frequent mistake is ordering modules for speed only to discover the link length exceeds the chosen optic’s tolerance or patch panels use a different connector type.
A separate uplink for telephony and Wi‑Fi can make sense when responsibilities differ (for example telephony goes to a separate network while Wi‑Fi uses a controller or separate security segment). If both services converge at the distribution level, it’s simpler to carry both through the same uplinks and separate them by VLAN.
Decide in advance where VLANs, DHCP and routing live. Typically VLAN gateways and DHCP sit higher in the stack while access switches simply place VLANs on ports—this reduces dependence on a particular switch.
Different Aruba CX 6300 SKUs may vary in uplink count and speed (SFP+ or SFP28). Before ordering, verify the exact model’s spec and the list of supported modules to avoid running into a shortage of ports or unsupported optics.
Step‑by‑step algorithm to choose the right configuration for your site
Access issues are most often caused by PoE and uplink bottlenecks. So start with the numbers, not the model name.
1) Count endpoints and their real PoE draw
List IP phones (with handsets and modules), APs (Wi‑Fi 6/6E), cameras, terminals. Note PoE class and expected power for each.
Count for the worst day: APs in peak transmit, phones with backlight and extra modules. If some devices require PoE+ or higher, capture that up front to avoid "it connected but is unstable" scenarios.
2) Determine uplink speed and redundancy
Aggregate traffic from Wi‑Fi and telephony to the core: how many APs and what real load do they carry? Choose uplinks so they don’t fill up during growth, updates and backups.
For many AP‑heavy deployments 10G becomes the baseline. Provide redundancy as a second uplink or via aggregation if that matches your network practice.
3) Choose port density and PoE budget with margin
Add port margin for expansion and ad hoc devices (5–15% often suffices). For PoE, margin matters more: total power limits don’t show themselves immediately—first phones or APs will restart or parts of the network will power down under peak.
4) Align VLAN and QoS with telephony and Wi‑Fi teams
Clarify voice/data VLANs, DSCP/CoS markings and required port and uplink priorities. A simple mismatch (phones mark voice one way while the Wi‑Fi controller expects another) will cause quality issues even when everything appears configured.
5) Prepare an acceptance plan with pass/fail criteria
Define tests to run at install: PoE under load (no reboots), uplink (speed, errors, redundancy), VLAN (phone and PC behavior, SSID, management), QoS (voice priority under background load), monitoring (what to watch when voice complaints arrive).
When criteria are clear, select the configuration to satisfy checks rather than guessing.
Acceptance: what to verify immediately after installation
Acceptance isn’t a checkbox—it’s how to catch problems while the site is still under warranty.
First verify inventory and labeling. Common surprises include wrong PSUs, a different model revision, or unexpected port configuration (for example fewer uplinks). Also confirm fans are present and there is no transit damage.
Record versions and base settings before load tests: ArubaOS‑CX version, serial number, system time, VLAN/trunk/access settings, LLDP, PoE and QoS settings. This helps when complaints appear later and you need a before/after comparison.
Quick acceptance sequence:
- Confirm model, copper port count and uplink type, power supplies and fans.
- Record OS version and save the initial config (even if temporary).
- Check rack temperature and ventilation: intake, grilles, mounting density.
- Test PoE under load: connect real consumers and ensure power doesn’t sag when everything boots simultaneously.
- Capture port error counters and logs at the start and end of acceptance.
Temperature and noise aren’t trivial. A switch in a tight cabinet near a UPS and cable bundles may overheat after an hour when PoE and traffic are present.
For PoE verify stability, not just that power exists. Example: a school powers on 20 IP phones after overnight shutdown. If the PoE budget is marginal, some handsets will reboot and APs will drop to low power.
In logs and counters look for line issues: rising CRCs, drops, flapping, autonegotiation errors. Capture metrics immediately after installation and again after a couple of hours under load. This makes it easier to prove a cable or patch panel issue instead of blaming telephony or Wi‑Fi.
Telephony tests: power, VLAN, QoS and resilience
For telephony you need predictable behavior: how power is applied to a port, how the phone gets its voice VLAN, and what happens to a call during a short uplink failure.
Power and phone behavior on PoE
Connect 2–3 phone models (preferably the actual models used) to different ports and record: boot time, registration to the PBX, audio presence. Then test power stability.
Acceptance checks to run:
- toggle PoE on/off on a port: the phone should reboot and re‑register cleanly;
- full cold start after a power outage: all phones should come up without stuck ports;
- hold a call for 3–5 minutes and resume: calls shouldn’t drop due to power sag.
If LLDP and port profiles are used, check the phone receives parameters automatically (voice VLAN, priority, any port limits). Manual exceptions in configs usually become long‑term incident sources.
VLAN, QoS and uplink failure
Verify voice/data separation works in practice. A common scenario: a phone with a PC passthrough—phone should be in the voice VLAN, PC in the user VLAN, with no leakage. Often mistakes lead to a PC getting an IP from the voice network or vice versa.
For QoS you don’t need deep theory at acceptance. It’s enough to prove two facts: voice is marked and actually receives priority.
Generate background load (file copy from the PC behind a phone) while making a call and observe packet loss, voice artifacts, latency and jitter during peaks.
Test uplink failure: pull the main uplink or shut the port and observe the call. Ideally the call continues or is interrupted briefly and then recovers. If calls always drop, likely causes are a loop, wrong aggregation or voice traffic not mapped to the right queues.
Wi‑Fi tests: PoE, traffic, roaming and common issues
Even when the switch appears healthy, Wi‑Fi often fails on small issues: brief PoE dips, excessive broadcast, wrong DHCP or an overloaded uplink. Add some concise checks for the wireless side to acceptance.
1) PoE at simultaneous AP boot
Restart all APs in the zone at once (or cycle PoE) and observe. APs should come up without reboot loops and without some ports losing power. Problems usually show in the first 3–10 minutes when APs hit peak consumption.
2) Basic Wi‑Fi service checks
Connect a test laptop and phone to the SSID and verify:
- DHCP IP acquisition (repeat 10–20 reconnects);
- DNS resolution (test multiple names);
- access to Wi‑Fi services (controller, RADIUS/AAA, guest portal—whatever is used);
- consistent behavior between "corporate" and "guest" VLANs;
- recovery after a short uplink outage (pull the patch cord for 10 seconds and plug back).
3) Roaming in the office zone
Walk through 2–3 neighboring APs with a phone or laptop while running a continuous ping to the gateway and a voice/video call in parallel. A normal result is no noticeable pause and no DHCP renews. If it freezes, common causes are wrong VLANs on AP ports, extra filtering or an overloaded uplink.
4) Multicast, broadcast and loops
Watch broadcast/multicast counters and port errors. A sudden spike after connecting a single AP or patch cord often indicates a loop or incorrect STP settings. Catch this before go‑live or the entire Wi‑Fi segment may collapse.
5) Uplink under load
Simulate client traffic (parallel downloads from multiple Wi‑Fi clients) and measure throughput, latency and loss. If loss grows with load, first check whether the uplink is saturated, that the SFP+/SFP28 link came up at the expected speed, and whether there are CRC or other errors on optics or patch cords.
Common mistakes in selection and acceptance and how to avoid them
Wi‑Fi and telephony problems rarely stem from "bad hardware"—they come from small decisions during selection and acceptance.
-
PoE exists but is insufficient. On paper the budget looks enough, but devices draw more at peak (warm‑up, Wi‑Fi 6/6E transmit power, USB on phones). If you only checked that power is present you won’t see sag.
-
1G uplink where 10G is needed. Typical sign: many APs, active file work, video calls plus telephony. During peak you’ll see queues, jitter and losses and voice will degrade.
-
No reserve for uplink and power. Any maintenance becomes an outage: pull one uplink or PSU and half the floor is cut off.
-
QoS configured only on paper. Something was enabled but nobody verified that voice actually lands in the right queue or that markings aren’t overwritten along the path.
-
Phones and PCs put on the same port profile without clear rules. Result: unclear voice/data separation, confusing DSCP trust and random PCs affecting calls.
Practical remedies: plan PoE margins by budget and ports, choose uplinks based on Wi‑Fi peak traffic (not the average), provide at least uplink redundancy, define failure scenarios in advance, capture QoS trust boundaries and validate them with real calls under load, and clearly separate phone port roles when using passthrough.
Example: a 48‑port switch with 20 APs and 30 phones. It all connects, but after occupancy APs start rebooting and calls get noise. The cause is often a combination: marginal PoE, 1G uplink to the core and default QoS. If these points were load‑tested during acceptance, the issue would be caught pre‑launch.
Short checklist and next steps before commissioning
Quick checklist before turning users loose
Before enabling users, run a short check across the most common failure causes:
- PoE: is the budget sufficient under real consumption, any ports in power‑deny?
- Uplink: correct speed and optic type, no CRCs or flaps?
- Redundancy: does failover or aggregation behave as intended?
- VLAN & QoS: phones and APs in correct VLANs, markings and priorities behave predictably?
- Port logs: are there auth/port‑security events, autoneg or duplex errors?
If any item is doubtful, stop and resolve before a mass‑user rollout.
What to record and how to proceed
At minimum save: the final configuration, firmware versions, a port‑to‑device wiring map and the acceptance test results with dates.
Before full rollout run a pilot on one rack: 1–2 switches, a few phones and 2–3 APs for 2–3 days. In that time you’ll see if PoE is enough, whether overheating or flaps appear, issues with VLAN/QoS, and behavior when an uplink is disconnected.
If you need precise PoE calculations for particular phone and AP models, assistance choosing uplink and redundancy schemes, or help formalizing acceptance protocols, it’s often faster to engage an integrator. GSE.kz (gse.kz) provides system integration and can help with design, supply and acceptance testing for telephony and Wi‑Fi networks, and with post‑launch support.
FAQ
Where should I start when choosing an Aruba CX 6300 for access layer telephony and Wi‑Fi?
Start with an inventory: how many IP phones, Wi‑Fi APs, cameras and other PoE devices will be in each rack now and in a year. Then check not only the number of PoE ports but the total PoE budget of the chosen model, since the budget is more often the cause of instability.
How do I know if PoE is enough or I need PoE+ (or higher)?
PoE (802.3af) usually covers most IP phones, while PoE+ (802.3at) is commonly required for modern APs. If an AP uses extra radio modules or features, it may need a higher class (802.3bt); otherwise it can fall into a limited mode or reboot.
How to quickly calculate a PoE budget to avoid device reboots?
Take the expected consumption of each device type close to the upper bound from the datasheet, multiply by quantity, sum and compare to the switch’s total PoE budget. Then add a 20–30% margin to handle peaks and future, more power‑hungry replacements.
What symptoms indicate PoE budget is insufficient?
Typical signs: APs reboot cyclically, some AP features are disabled, phones unexpectedly reboot during high activity or after bulk power‑on. If everything “works” but fails during peak hours or after updates, that’s also a common sign of insufficient PoE budget.
How to choose uplink speed: 1G, 10G or 25G?
For most floors and office blocks 10G uplink is the safest baseline: Wi‑Fi and cloud services generate bursts easily. 1G fits only small zones with a few APs and light load; 25G makes sense when you have very high density, many APs, video surveillance or plans to scale traffic quickly.
Do I need two uplinks and should I use LACP at the access layer?
Two uplinks are useful if the network must survive a line failure, especially when they go to two different aggregation devices. Enable LACP when you truly need combined bandwidth and are sure the aggregation side is configured the same way; otherwise one fast uplink or two separate links (without aggregation) can be simpler and more reliable.
How to check VLAN and QoS for telephony during acceptance without a lab?
First ensure the phone obtains the voice VLAN automatically (for example via LLDP) and that the PC behind the phone stays in the user VLAN. Then generate background traffic from the PC (a file copy or download) and make a call at the same time: voice should remain clear without robotic artifacts, drops or noticeable latency increase.
What minimal Wi‑Fi tests are required during acceptance of an access switch?
Test simultaneous boot: reboot all APs in the area or briefly cycle PoE on the ports, then watch them for 5–10 minutes. Also run repeated SSID reconnects to verify DHCP assignment, and confirm clients recover correctly after a short uplink interruption.
What to check if voice is ‘raspy’ or Wi‑Fi slows down though the link is up?
Start with the physical link: check CRC errors, flapping (frequent up/down), autonegotiation speed/duplex, and any optics or transceiver errors. If errors rise under load, the culprit is often cabling, patch cords, incompatible modules or wrong transmission medium—not the phones or APs themselves.
What must be recorded after installation to simplify later troubleshooting?
Save ArubaOS‑CX version, the initial and final configuration, port error counters before and after load tests, and PoE/uplink event logs. When complaints appear later, these records help quickly determine what changed and where the problem started.