Address storage for up to 3,000 SKUs without a WMS: marking
Address storage for a warehouse with up to 3,000 SKUs: how to mark zones, racks and bins, run inventory without an expensive WMS, and what to automate first.
Why you need address storage at ~3,000 SKUs
When a warehouse reaches about 3,000 SKUs, small problems start quietly consuming time. A storekeeper may keep some locations in their head, but vacation, shift change or a new employee turn searches into a scavenger hunt. Shipping delays grow, mispicks appear, and receiving puts goods “where there was space” — then they’re hard to find.
Address storage solves this with a simple rule: each SKU has a clear address, and each storage spot has a clear label. Then finding something becomes not “where is it” but “which bin in the document”. Errors show up immediately: if bin A-02-03 contains the wrong item, you catch it during picking, not at inventory time.
At this scale you can often start without an expensive WMS: the main problem is usually discipline, layout and unified records, not complex algorithms. A basic spreadsheet and clear rules are enough: how addresses are assigned, who and when can change them, and what to do when a location overflows.
Two habits change. Receiving assigns an address (or checks for a free bin) before goods go to the rack. During picking the storekeeper follows a route from the pick list and confirms they took the item from the correct bin rather than working from memory.
Typically within 2–4 weeks you get:
- faster item location because the address is known in advance;
- fewer mispicks because each bin has a clear “owner”;
- easier onboarding: the warehouse is explained by a map, not by anecdotes.
In a parts warehouse (fasteners, cables, components) even simple addressing reduces “lost items” after the first receiving cycle and one control check of fast-moving SKUs.
Basic terms and rules you must agree on first
For addressing to work without a WMS, start by agreeing on terminology. If people have different meanings for “bin” or call the same SKU three different things, layout quickly becomes chaos.
What counts as an address
An address is a chain from general to specific: zone (area of the warehouse) -> row (aisle) -> rack -> level (shelf) -> bin (exact spot). It’s important that the address is always read the same way and is unique. Then a worker sees the code and knows where to put or pick an item even if they’re in that area for the first time.
Decide separately what you mean by “bin”: one shelf compartment, one pallet position or, for example, one carton in a flow rack. The key is not to mix different location types under one rule.
Rules to fix in advance
There are product groups you should separate upfront, otherwise they’ll constantly break the general rules: oversized/bulky and heavy items, quarantine and returned goods, items with expiry or serial tracking, and products requiring special storage.
Also check constraints: allowed weight per shelf, comfortable access (frequently picked items should be nearer and lower), storage conditions, expiry rules and picking principle (FIFO/FEFO). Even without automation these rules save time and reduce mistakes.
One more basic step — unified item names and units. Agree how you write items (brand, model, size) and in what units you track them (pcs, pack, m, kg). Simple test: one person records an SKU, another must find it without follow-up questions.
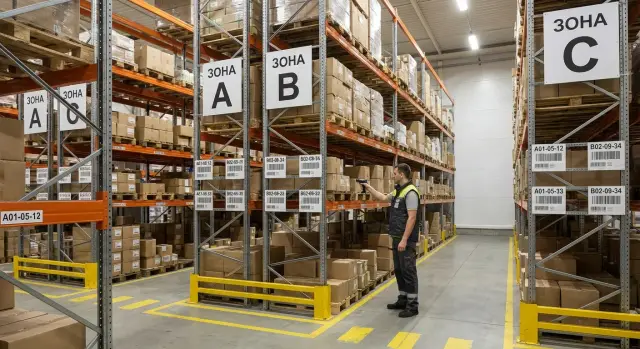
How to mark warehouse zones simply
Zone marking only works if it’s instantly understandable. Start with a single-sheet warehouse map rather than jumping to signs. Take a plan (or sketch one) and mark docks and doors, columns, heaters, fire cupboards and places where pallets can’t go. Then draw main aisles and traffic directions.
On the map highlight 4–5 zones — usually enough for a warehouse up to 3,000 SKUs: receiving, storage, picking, packing and shipping. The route should be logical: goods enter through receiving, go to storage, then to picking, then packing and shipping. If picking and packing are far from shipping you create extra handling and more opportunities for mistakes.
Fast vs slow-moving items: when to separate
Create a fast-moving zone when a small share of SKUs generates most movements. Keep these SKUs closer to picking and at hand level. Slow movers can be positioned further away and higher.
A simple rule: if an SKU is picked many times per day — it belongs in the fast-pick zone. If it’s picked weekly or less often — put it in the slow zone.
Aisles, turning areas and safety
Don’t place racks flush with each other. Leave clear aisles and turning space for carts, otherwise people will start “cutting corners” and breaking the logic of addresses. Mark main aisles (they must be kept clear), evacuation routes and a spot for empty containers on the map.
Test convenience before fixing signs: walk the route “receiving -> storage -> picking -> packing -> shipping” with an empty cart. If you have to squeeze, turn in tight spots or cross opposing traffic, adjust the layout now.
Numbering logic: rows, racks, shelves, bins
Numbering must be boring and predictable. A practical rule for warehouses up to 3,000 SKUs: go left-to-right and from the entrance to distant rows. Then the address immediately indicates where to go.
Choose one code format and stick to it. A simple template: Z-03-02-05, where Z is zone, 03 is row, 02 is rack, 05 is shelf or bin (as agreed). Make parts fixed length (leading zeros) so tables don’t get messy: “2” shouldn’t end up after “10”.
Basic settings that usually prevent chaos:
- movement follows the warehouse map: from entry to distant rows, within a row left-to-right;
- single separator: hyphens only, no spaces or dots;
- one meaning per code block: if
05means shelf, it always means shelf; - uniqueness: one address = one physical storage spot.
To avoid similar-character errors, forbid confusing symbols. For example, don’t use O and I (they’re mistaken for 0 and 1), or ambiguous pairs like S/5, Z/2, B/8. It’s often simpler to limit letters or use digits for zones.
Plan for growth: reserve ranges. For example, rows 01–20 current, 21–29 expansion, 30–39 seasonal. Empty numbers let you add locations without renaming the whole warehouse or reprinting labels.
Signs and labels: cheap and clear options
Labels must be consistent and readable everywhere. A single digit mistake or a similar sticker quickly turns searching into a lottery.
Label places, not items. Minimum visible info: zone, row, rack, level and bin.
Size matters more than aesthetics. If a sign must be readable from 2–3 meters, use large characters and high contrast (black on white). Rows and racks usually use A5/A4; bin labels work well at about 70x30 mm or 100x50 mm. Make the location code larger than any auxiliary information.
Barcode or QR? Initially a linear barcode (e.g., Code 128) is simpler: it scans faster, is easier to print and survives dirt better. QR is useful only if you need to store more data; most warehouses only need one line: “ZONE-ROW-RACK-LEVEL-BIN”.
For materials you don’t need “forever” solutions immediately. Paper in plastic holders for signs and laminated stickers for bins are often enough. If there’s heavy dust, temperature swings or regular wet cleaning, choose thermal labels and a thermal printer.
Organize printing like a small production: one template, one font, one code logic. Before sticking labels check:
- readability at distance;
- scan stability (including at an angle);
- how labels stick on difficult surfaces (corners, edges);
- who replaces damaged labels.
Example: zone “HR” has a sign “HR-02”, the rack shows “HR-02-05”, and the bin shows “HR-02-05-03-04” plus a barcode. The code is easy to read and the scanner confirms without questions.
Inventory without WMS: Excel, Google Sheets or a simple database
You can run the system without a WMS if you record every stock movement. For a start, Excel or Google Sheets is often enough. The tool matters less than discipline: one version of the file, clear statuses and clear responsibility for entries.
Practical minimum — three entities: product directory, address directory and movement log. In the product card keep only fields you actually fill:
- SKU (code) and name;
- current storage address;
- quantity on hand;
- batch/serial (if relevant);
- status (normal, quarantine, defective, written off).
Record movements in a separate log and calculate balances with formulas or a pivot table. For each operation record type (receipt, transfer, pick, return), date and time, quantity, from-address and to-address, and who made the entry. If goods are “in transit”, use a status such as “awaiting placement” so they don’t disappear between receiving and the shelf.
Agree reasons for adjustments in advance. Don’t write only “corrected”. A short list (count, mispick, defect, write-off, return) helps you find root causes faster.
Reports that pay off in the first month: balances by address, SKUs below minimum, slow movers and discrepancies (item without address or address without item).
Avoid complicated access: assign roles. For example: pickers enter movements, shift leader approves adjustments, accounting views reports. In Google Sheets protect sheets and allow editing only to the movement log; in Excel keep the file on one workstation and hand it over by shift.
Step-by-step rollout: pilot, rollout, rule enforcement
Roll out by pilot, not all-at-once. This shows you where logic breaks and lets you fix issues while mistakes are cheap.
Start with one clear zone of fast but non-critical SKUs. 200–400 SKUs usually give you a realistic picture.
Pilot in 1–2 weeks
A working order without WMS looks like:
- choose the pilot zone and SKU list;
- create addresses using the chosen numbering and apply labels (rows, racks, levels, bins);
- place stock by address and immediately reconcile (what, where, how many);
- run receiving and picking by addresses only — no “put where convenient”;
- after 3–5 shifts expand coverage.
To keep the pilot stable, fix a few strict rules: receiving must end with address assignment, mispicks are not hidden, every transfer is recorded (at least in the spreadsheet).
Rolling out and locking rules
When the pilot is stable, roll out other areas in waves: zone by zone, repeating the same steps. Put procedures on one page: how to create addresses, who prints labels, how to record transfers and what counts as an error.
Typical example: an operator sees 12 discrepancy lines in the evening. Investigation shows most come from a “temporary shelf” without an address. You introduce the rule “temporary address mandatory”, add a separate tag — and discrepancies drop sharply.
What to automate first for impact
The fastest wins aren’t complex programs but control of two things: where something was put and where it was taken from. Automate operations that most often cause time-loss.
First priorities:
- scan address and SKU at receiving and picking (record the “SKU–address” link);
- print labels on site so you can reissue them in a minute;
- simple forms for transfers and counts so “A to B” isn’t handled by word of mouth;
- separate addresses and statuses for defects and returns so they don’t mix with good stock.
If you already have an inventory system, do minimal integration and don’t try to connect everything at once. It’s enough to sync the SKU directory (code, name, unit), balances and receiving/shipping documents.
Usually a simple workstation suffices: a PC or all-in-one, a scanner and a label printer. Key requirement — reliability and quick service, especially for shift work.
Example scenario: a parts warehouse with 3,000 SKUs
An auto-parts warehouse: about 3,000 SKUs, 6 racked aisles, 2 storekeepers, daily shipments. Before changes finding a SKU took minutes and stock counts became a weekend project. Goal: implement address storage without expensive WMS and see results within a week.
They zoned by movement. Receiving was at the dock with a nearby inspection/labeling spot. Fast items moved closer to shipping to cut walking. Bulky and slow items moved further back; aisles remained straight and safe.
Address format chosen short: Row-Rack-Shelf-Bin (for example, R3-S02-P2-B05). They completed marking in 2 days because they covered the basics: zones, row and rack numbering, end-of-aisle signs, bin labels and the rule “no goods without an address”.
Pick routes were linear: the storekeeper moves through rows in order with no zigzags. Errors are caught by two checks: SKU vs bin label and a mark on the pick list (paper or spreadsheet). If an SKU isn’t found within 30–60 seconds follow an escalation: check adjacent bins, then the returns area, then call a teammate.
They tracked three metrics: search time, shipping errors (returns, missing items) and count speed (bins per hour). Within days search time fell dramatically and counts became a routine task rather than a weekend project.
Common mistakes and how to avoid them
A common situation: labels exist but the system doesn’t become a habit. People revert to “memory” and order collapses. These failures crop up most often.
Mistake 1: address code too complex
If the address looks like a 12-character cipher, people won’t read it and will dictate it with errors. Keep the code simple: zone, row, rack, level, bin.
Mistake 2: labels exist but no return rules
Labels don’t help without a rule: “if you took it, return it to the same address and record it.” If a temporary spot is needed, provide a separate “Quarantine/Sorting” zone with its own addresses.
Mistake 3: mixing batches, sizes and similar SKUs
Trying to “save bins” quickly causes mispicks. A working rule: one bin — one SKU. If that’s impossible, at least use clear internal separators and prominent internal labels (batch/size).
Mistake 4: addresses changed without recording
Moved a box “for a minute” and didn’t record — then balance disappears. Allow address changes only via a simple scenario: record the transfer immediately, clear the old address and confirm the new one.
Mistake 5: inventory only once a year
If counts happen only annually, errors become normal. Better to run short regular checks: one row today, another tomorrow. This rhythm finds systemic issues faster (faded labels, floating addresses, ownerless zones) and doesn’t halt operations.
Quick checklist and next steps
When the system works it feels like order: any worker finds items fast and errors are rare and visible.
Quick self-check:
- every SKU has a primary address; temporary locations are used by rule and for limited time;
- labeling is readable from the aisle: large characters, consistent format, signs not blocked or peeling;
- receiving and picking are recorded the same way: one document, same fields, same confirmation logic;
- a simple transfer and counting procedure exists: who moves items, how they mark it and how often checks happen.
Practical test: if someone moved a box “for a minute” and didn’t mark it, can you confidently say where it is tonight? If not, transfer rules are weaker than your layout.
Next steps that help: appoint one owner of the addressing system, lock a minimal set of data in the records (SKU, name, primary address, balance, date of last count) and prepare basic equipment for receiving and picking areas.
If you need reliable PCs, all-in-ones, a server for a shared database or IT help for rollout, this is often covered by GSE.kz (gse.kz) — a Kazakhstan-based PC maker and systems integrator.
FAQ
How do I know that at 3,000 SKUs it's time to implement address storage?
Usually you notice it by search times and errors: items are found “from memory”, newcomers can’t quickly locate SKUs, mispicks increase and items get “lost” after receiving. If these problems repeat daily, addressing brings quick benefit even without a WMS.
What exactly counts as an “address” in the warehouse?
An address is a clear chain from general to specific so the location is unique and read the same by everyone. Most often it’s zone, row, rack, level and bin recorded in a single format.
Which address format is best to avoid confusion?
Pick one simple template and don’t change it later. It helps if the code reads left-to-right following the warehouse flow and parts of the code have fixed length so table sorting doesn’t get messed up.
Where should I start marking zones if there were none before?
Start with a single-sheet warehouse map: entrances, docks, aisles, constraints and flow directions. Then allocate basic zones like receiving, storage, picking, packing and shipping so routes don’t force unnecessary transfers.
When should a separate fast-moving zone be created?
Separate a fast-moving zone when a small share of SKUs generates most movements and people run across the warehouse for them. Keep fast items closer to picking and at a comfortable height; slow-moving items can be placed further and higher while keeping clear aisles.
What is the minimum labeling needed for the system to work?
Minimum — signs on rows and racks and separate labels on bins so the code is readable from the aisle. Mark places, not items, and make sure labels aren’t blocked by boxes or peeling off.
Which is better for addresses: barcode or QR?
At start, a linear barcode is usually more convenient: it scans faster, is easier to print and tolerates dirt better. QR codes make sense when you really need more data, but for an address one line is normally enough.
Is it realistic to run address storage without a WMS and without messy records?
Yes — you can start with Excel or Google Sheets if you record every movement and keep one source of truth. Keep three simple parts: a product directory, an address directory and a movement log, otherwise discrepancies will accumulate unnoticed.
How to launch addressing in 1–2 weeks without stopping the warehouse?
Run a pilot in one zone with 200–400 SKUs: mark locations, place stock by addresses and immediately verify “what, where, how many”. Then enforce receiving and picking by address only and expand in waves, keeping rules stable.
Which mistakes most often break address storage and how to avoid them?
Common failures are overly complex codes, unrecorded temporary moves, mixing different SKUs in one bin, and no clear quarantine/returns area. Fix these with simple rules: one address — one physical place, every move recorded immediately, and temporary locations with their own addresses and time limits.